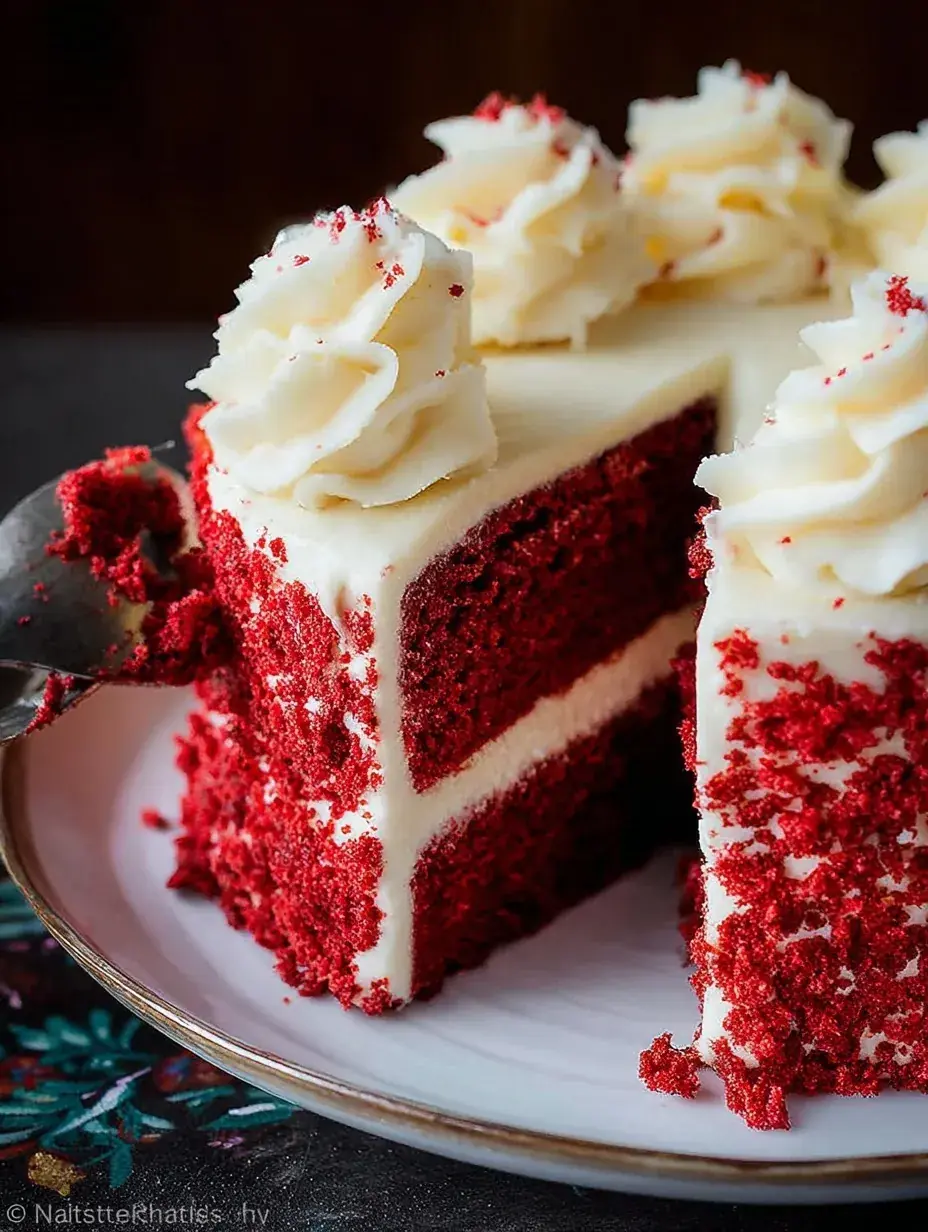
The radio was on softly in the background, and my daughter already had a small smudge of cocoa on her nose while she helped me sift the flour. There is something about the deep red color of a Red Velvet Cake that makes the whole kitchen feel festive and warm. I usually save this one for those quiet Sunday afternoons when we have nowhere to be but home together.
Why You Will Love This Red Velvet Cake
I used to struggle with cakes that looked beautiful but tasted like nothing more than dry bread with a bit of food coloring. This recipe solves that frustration by using buttermilk and vinegar to create a crumb that stays incredibly moist for days. You do not have to choose between a striking appearance and a dessert that actually melts in your mouth.
After trying four different versions, I realized that the secret is the balance of the tangy cream cheese against that tiny hint of cocoa. My family always reaches for seconds when I make it this way because it is not overly sugary. It is a reliable classic that makes any occasion feel a little more special without the stress of a professional kitchen.
What Makes This Red Velvet Cake Special
- The Tangy Crumb: The combination of buttermilk and vinegar creates a unique, tender texture that you just do not get with standard vanilla cakes.
- Subtle Cocoa Depth: It is not quite a chocolate cake, but that one teaspoon of cocoa adds a hidden richness that rounds out the sweetness.
- Velvety Smooth Frosting: Using high-quality butter and cream cheese ensures the topping is sturdy enough to hold its shape but soft enough to spread like a dream.
- Striking Crimson Color: This cake is the ultimate showstopper for any dessert table because that deep red hue always catches everyone’s eye.
- Perfect for Little Hands: My daughter loves helping with the frosting, and because it is a sturdy layer cake, it is very forgiving for beginner decorators.
The Best Red Velvet Cake Recipe
This is the one recipe I pull out whenever we have a birthday or a holiday gathering coming up. It feels like a celebration in every slice, and honestly, the smell of it baking is better than any candle you could buy.
Ingredient Notes
- Buttermilk: This is the magic ingredient for moisture and that signature tang; if you do not have it, you can make a quick version with milk and lemon juice.
- Red Food Coloring: Use a good quality liquid to get that vibrant shade without having to use the whole bottle.
- Vinegar: It sounds strange in a cake, but it reacts with the baking soda to help the layers rise and stay light.
- Cream Cheese: Make sure this is completely softened at room temperature so you do not end up with lumps in your frosting.
- Unsweetened Cocoa Powder: Just a small amount is needed to give the cake its classic flavor profile without turning it brown.
Instructions
- Prep and Preheat. Get your oven to 350 degrees and make sure your pans are well-greased so the layers pop right out. I like to use a little flour on the pans too just to be safe.
- Sift the Dry Mix. Sift the flour, sugar, baking soda, salt, and cocoa into a large bowl to remove any lumps. This ensures your cake has that perfectly smooth, velvety texture.
- Whisk the Wet Ingredients. In a separate bowl, mix the oil, buttermilk, eggs, food coloring, vinegar, and vanilla until the color is deep and even. It will look very bright, but it mellows slightly as it bakes.
- Combine the Batter. Gradually add the wet mixture into the dry ingredients while mixing on medium speed. Stop as soon as it looks smooth to avoid overworking the flour.
- Bake the Layers. Divide the batter between your two pans and bake for about 30 to 35 minutes. You will know they are done when a toothpick comes out clean from the center.
- Cool and Frost. Let the cakes cool completely on a wire rack before you even think about the frosting. Once they are cold, whip up your cream cheese and butter until fluffy, then layer them up.
Billy’s Tips and Mistakes to Avoid
- Room temperature ingredients are a must for this recipe, especially the eggs and buttermilk, to keep the batter from curdling.
- Do not overmix the batter once you add the flour or the cake will be tough instead of soft and fluffy.
- If your cake layers have a dome on top, use a serrated knife to gently level them off so they stack perfectly.
- You can make the cake layers a day ahead of time, wrap them in plastic, and frost them the next morning to save time.
- Let your daughter help pipe little stars on top with any leftover frosting; it makes the cake look so professional and sweet.
Storage Tips
This cake needs to live in the fridge because of the cream cheese frosting. It will stay fresh and delicious in an airtight container for up to 4 days. If you want to serve it to guests, take it out about 20 minutes before eating so the frosting softens slightly for the best texture.
Variations and Swaps
- Try adding a handful of mini chocolate chips to the batter for a little extra texture and a double chocolate hit.
- For a slightly lighter version, you can use a Greek yogurt substitute for half of the oil, though it will change the crumb slightly.
- Top the cake with fresh raspberries or a dusting of cake crumbs from the leveled tops for a beautiful, rustic look.
Why This Recipe Works Every Time
The science behind the buttermilk and vinegar reaction is what gives this cake its famous lift and tender bite. It is a reliable recipe because the oil keeps it moist even if you accidentally leave it in the oven for an extra minute or two.
I learned the hard way that using cold cream cheese results in a lumpy mess, so now I always set mine out on the counter the night before. This small step makes the assembly part so much more relaxing and successful every single time I bake it.
Ingredients
- 2.5 cups all -purpose flour
- 1.5 cups granulated sugar
- 1 teaspoon baking soda
- 1 teaspoon fine salt
- 1 teaspoon unsweetened cocoa powder
- 1.5 cups vegetable oil
- 1 cup buttermilk , room temperature
- 2 large eggs , room temperature
- 2 tablespoons red food coloring
- 1 teaspoon distilled white vinegar
- 1 teaspoon vanilla extract
- 16 ounces cream cheese, softened
- 1 cup unsalted butter, softened
- 4 cups powdered sugar
- 1 teaspoon vanilla extract
Instructions
- Preheat oven to 350°F (175°C) and grease two 9-inch round cake pans with butter and flour.
- In a large bowl, sift together the flour, sugar, baking soda, salt, and cocoa powder.
- In a separate medium bowl, whisk together the vegetable oil, buttermilk, eggs, red food coloring, vinegar, and vanilla extract.
- Using a stand mixer or hand mixer, gradually add the wet ingredients to the dry ingredients and mix on medium speed until smooth and well combined.
- Divide the batter evenly between the two prepared cake pans.
- Bake for 30 to 35 minutes, or until a toothpick inserted into the center of the cakes comes out clean.
- Cool the cakes in their pans for 10 minutes, then invert onto a wire rack to cool completely before frosting.
- Prepare the frosting by beating the softened cream cheese and butter together until smooth. Gradually add powdered sugar and 1 teaspoon of vanilla extract, beating until light and fluffy.
- Assemble the cake by frosting the top of one layer, placing the second layer on top, and frosting the top and sides of the entire cake.
Frequently Asked Questions
Can I make this Red Velvet Cake as cupcakes instead?
Yes, you certainly can, and they are just as delicious for parties. Just reduce the baking time to about 18 to 22 minutes and keep an eye on them so they do not overbake.
Why is my red velvet cake brown instead of red?
This usually happens if you use too much cocoa powder or not enough food coloring. Stick to the one teaspoon of cocoa to keep that bright crimson look that makes the cake famous.
Do I have to use distilled white vinegar?
It is the best choice for the chemical reaction with the baking soda, but apple cider vinegar works in a pinch if that is all you have in the pantry. The taste will not be affected.
The Bottom Line
This Red Velvet Cake is more than just a dessert; it is a way to make any ordinary day feel like a special occasion. I hope your family enjoys every moist, tangy bite as much as mine does during our holiday celebrations. Sweet moments do not have to be complicated. Let’s make something wonderful together.
I love seeing the look on my daughter’s face when we cut the first slice and see that bright red color. It is pure holiday magic in our house. Billy
Billy