Every December, as the first snowflakes start to swirl outside my kitchen window, I find myself reaching for the peanut butter jar. There is something so festive about the smell of chocolate and nutty sweetness filling the house while the Christmas lights twinkle. It is the official start of our holiday treat-making marathon.
Why You Will Love This Buckeye Fudge
I remember the first time my daughter and I tried making these together on a very messy Saturday afternoon. We were supposed to make traditional buckeye balls, but I was running late for a school event and simply did not have the patience for all that rolling and dipping. I decided to press the mixture into a pan instead, and honestly, we liked this version even better because every single bite has the perfect ratio of chocolate to peanut butter.
On my second batch, I discovered that sifting the sugar made the base so much more velvety, which solved the grainy texture I had the first time. It is such a relief to have a dessert that looks this beautiful without having to spend hours at the counter. We make this every year now because it is just so reliable and comforting.
What Makes This Buckeye Fudge Special
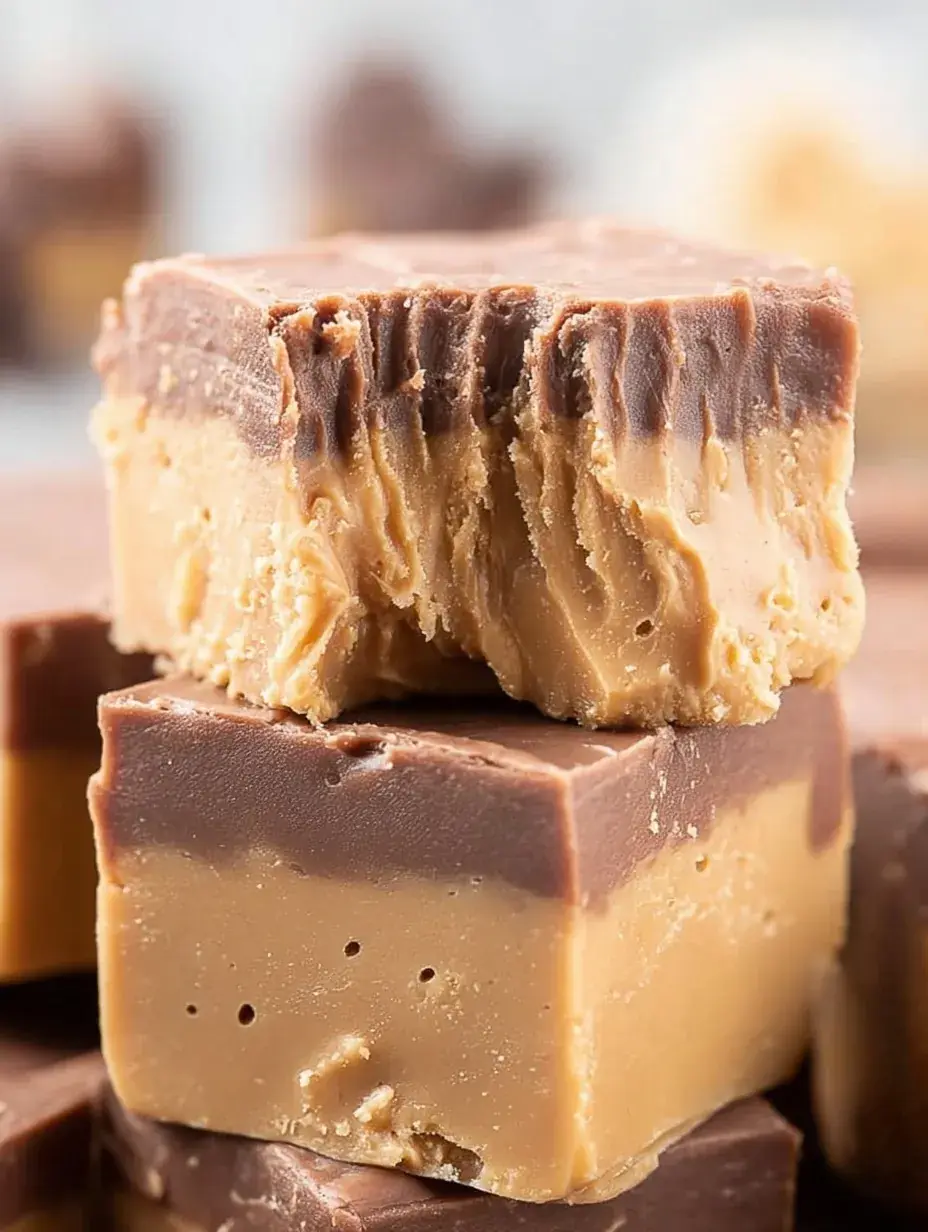
What really sets this apart from other treats is that incredibly dense, melt-in-your-mouth base that feels like a hug for your taste buds. It is not grainy like some fudge can be because we melt the peanut butter and butter together until they are completely homogenous before adding the sugar. The top layer is a smooth chocolate ganache that adds a silky finish that looks professional but takes almost no effort at all.
Personally, I have found that using semi-sweet chips provides just enough contrast so the dessert is not too sugary. It is a simple two-layer process that looks much more impressive on a holiday platter than the time it actually takes to assemble. My daughter loves helping me spread the chocolate, and it has become one of our favorite low-stress kitchen traditions.
The Best Buckeye Fudge Recipe
I have made this so many times that I can almost do it with my eyes closed, which is lucky because my kitchen is usually a chaotic mess of wrapping paper during the holidays. This version is thick, rich, and stays perfectly set even when sitting out on a dessert table.
Ingredient Notes
- Creamy Peanut Butter: This provides the classic flavor and structure; I recommend using a standard brand rather than natural varieties for the best set.
- Unsalted Butter: Using unsalted allows you to control the saltiness of the base while providing that buttery richness.
- Powdered Sugar: Sifting this is essential to ensure your fudge is smooth and free of any tiny white lumps.
- Semi-Sweet Chocolate Chips: These melt down beautifully into a glossy layer that cuts easily without cracking.
- Sweetened Condensed Milk: This is my secret for a ganache that stays soft and fudgy rather than turning into a hard chocolate shell.
Instructions
- Prepare Pan. Line an 8×8 inch square baking pan with parchment paper, making sure some hangs over the sides. This ensures you can lift the whole block out easily once it is firm.
- Melt Base. Combine the butter and peanut butter in a microwave-safe bowl and heat in 30-second bursts. Stir until it is completely smooth and looks like a golden liquid.
- Flavor and Sweeten. Stir in the vanilla extract, then gradually mix in the sifted powdered sugar. The mixture will become very thick and look like a uniform dough.
- Press Layer. Transfer the peanut butter dough to your pan and press it down firmly. I like to use the bottom of a flat measuring cup to get a perfectly even surface.
- Make Ganache. Melt the chocolate chips and condensed milk together in short intervals, stirring frequently. Stop as soon as it looks glossy and completely melted.
- Spread and Chill. Pour the chocolate over the peanut butter and spread it to the corners with a spatula. Refrigerate for at least 2 hours until the layers feel firm to the touch.
Billy’s Tips and Mistakes to Avoid
- Always sift your powdered sugar even if it looks fine in the bag; I learned the hard way that lumps are impossible to stir out later.
- Use an offset spatula to spread the chocolate layer for that perfectly flat, professional look.
- Do not overheat the chocolate as it can seize and become grainy; slow and steady is best in the microwave.
- Let the fudge sit at room temperature for about 10 minutes before slicing to prevent the chocolate from snapping.
- If you want extra clean squares, wipe your knife with a warm damp cloth between every single cut.
Storage Tips
You should keep this fudge in an airtight container in the refrigerator for up to 2 weeks. It can sit out at room temperature for about 2 hours during a party, but it stays best when kept cool. If you want to plan ahead, you can freeze the sliced squares for up to 2 months; just thaw them in the fridge overnight before serving.
Variations and Swaps
- Try using dark chocolate chips if you prefer a less sweet topping that feels a bit more grown-up.
- Add a pinch of sea salt on top of the wet chocolate layer for a lovely salty-sweet finish.
- Let the kids add festive sprinkles to the top before the chocolate sets to match whatever holiday you are celebrating.
Why This Recipe Works Every Time
The reason this Buckeye Fudge works so well is the addition of sweetened condensed milk to the chocolate layer. Most recipes just use melted chips, which can become brittle, but this method ensures the top stays as soft as the base. It creates a seamless bite that does not fall apart when you pick it up.
I made the mistake of using a natural peanut butter once and the oil separation was a disaster, so I always recommend the standard creamy kind now. It makes the texture much more reliable for a smooth finish that sets up perfectly in the fridge every single time. It is a foolproof way to get those classic flavors without the fuss of rolling individual balls.

Ingredients
- 1/2 cup unsalted butter, softened
- 1 cup creamy peanut butter
- 1 teaspoon vanilla extract
- 3 cups powdered sugar, sifted
- 2 cups semi -sweet chocolate chips
- 1/2 cup sweetened condensed milk
Instructions
- Line an 8x8 inch square baking pan with parchment paper, ensuring excess paper hangs over the edges for easy removal.
- In a large microwave-safe bowl, combine the butter and creamy peanut butter. Heat in 30-second increments, stirring between each, until completely melted and homogenous.
- Stir the vanilla extract into the peanut butter mixture.
- Gradually incorporate the powdered sugar into the peanut butter mixture, stirring until a thick, uniform dough forms.
- Press the peanut butter mixture firmly and evenly into the bottom of the prepared baking pan using a spatula or the bottom of a measuring cup.
- In a separate microwave-safe bowl, combine the semi-sweet chocolate chips and the sweetened condensed milk.
- Heat the chocolate mixture in 30-second intervals, stirring thoroughly after each interval, until the chocolate is fully melted and the texture is glossy.
- Pour the chocolate ganache over the peanut butter layer, spreading it to the edges with an offset spatula to create an even surface.
- Refrigerate the fudge for at least 2 hours, or until the layers are completely set and firm to the touch.
- Grasp the parchment paper overhang to lift the fudge from the pan and slice into 1-inch squares using a sharp knife.
Frequently Asked Questions
Does Buckeye Fudge need to be refrigerated?
Yes, I highly recommend keeping it in the fridge because the butter and peanut butter base will soften if left out too long. It keeps the layers distinct and prevents the fudge from becoming too messy to handle.
Can I use natural peanut butter for this fudge?
I have found that natural peanut butter is often too oily and does not allow the fudge to set properly. For the best results and a smooth texture, stick with a standard creamy commercial brand.
How do I get clean slices when cutting the fudge?
The secret is using a sharp knife and dipping it in hot water, then drying it off before each slice. This melts the chocolate slightly as you cut, giving you those perfectly sharp, clean edges every time.
The Bottom Line
This is the ultimate treat for anyone who loves the combination of peanut butter and chocolate but wants something simple to pull together. It has become a staple in my kitchen because it is so easy to share with neighbors and friends. Sweet moments don’t have to be complicated. Let’s make something wonderful together.
I hope this fudge brings a little extra sweetness to your holiday table this year. Watching my daughter sneak a piece from the fridge is one of my favorite winter memories. Billy
Billy