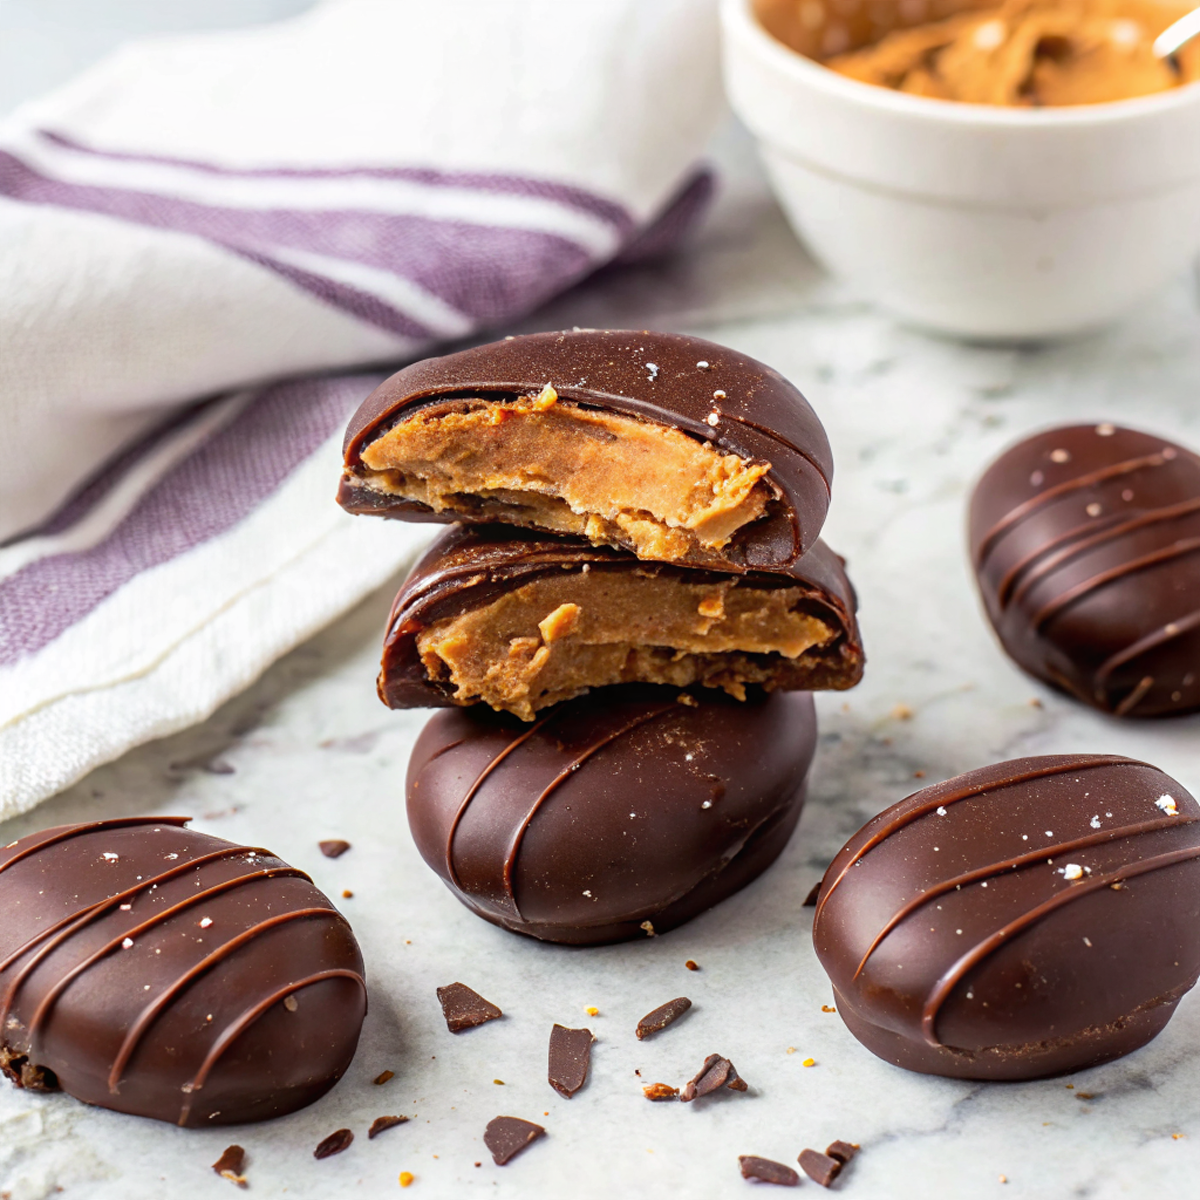
Peanut butter is my reliable shortcut when a weeknight dinner needs a fast sweet ending. I stirred the jar, tossed a few simple pantry things together, and my daughter and I had a tray of creamy, chocolate-coated peanut butter eggs chilling before her bedtime. These are the kind of kitchen moments that feel cozy without requiring an hour of fuss.
Why You’ll Love This Healthy Homemade Reese Eggs Recipe
Some nights I like to make treats ahead so dessert is ready when plates are cleared; these keep that promise perfectly. I often shape a batch while dinner finishes and pull them out later for a fuss-free finish that still feels special.
This recipe encourages a small make-ahead habit: make a tray, freeze or chill, and you have a ready stash for lunchbox treats, family dessert night, or a last-minute guest. My daughter loves helping with the dunking, which turns cleanup into a sweet memory.
What Makes this Recipe Unique
– Affordability: Uses pantry staples so you can make a batch without a big grocery run.
– Key ingredient: Natural peanut butter gives creaminess and holds the centers together with no extra binders.
– Simple method: A short chill and a quick dip in melted chocolate create an impressive finish without fancy tools.
– Texture payoff: The contrast between a cool, slightly tacky center and a crisp chocolate shell is wonderfully satisfying.
– Family friendly: Kid-approved steps let little helpers take part in safe, fun tasks like rolling and tapping off excess chocolate.
Estimated Macros & Calories
A practical estimate to help you plan your weeknight treats.
(estimated per serving, without optional ingredients)
- Calories: 220 kcal
- Protein: 11 g
- Carbohydrates: 10 g
- Fat: 17 g
- Fiber: 3 g
The Most Authentic Healthy Homemade Reese Eggs Recipe Recipe
This is a warm, family-friendly way to make chocolate-covered peanut butter eggs with just a few grocery-store ingredients and no special equipment. I like how easy it is to get the centers to the right texture for dipping, and my daughter insists on sprinkling the tops “her way.”
Ingredient Notes
– Natural peanut butter: Gives the filling its creamy body and peanut flavor; stir it smooth before using so the texture is consistent.
– Pure maple syrup: Sweetens and helps the filling bind; it also keeps the centers slightly tacky so they hold their shape.
– Vanilla protein powder: Adds structure and a mild vanilla note; if your powder is very fine or very coarse, fold gently until cohesive.
– Pure vanilla extract: Brightens the filling; a little goes a long way, so don’t skip it.
– Dark chocolate: Melts into a sturdy shell; choose a bar you like eating plain, and keep it warm but not scorch-hot when coating.
– Flaky sea salt (optional): A tiny pinch on wet chocolate brings out the chocolate and peanut butter flavors—totally optional but delightful.
Instructions
Step 1: Prepare your work surface
Line a small baking sheet with parchment or a silicone mat and set it aside so everything’s ready when the filling is shaped. Keep your counter clean and dry so the chocolate sets smoothly.
Step 2: Make the filling
Stir the peanut butter briefly to smooth it, then combine it with maple syrup, vanilla extract, and the vanilla protein powder in a bowl. Fold with a spatula until the mixture is evenly blended and feels cohesive but a bit tacky.
Step 3: Chill the filling
Cover the bowl and chill the filling until it firms up slightly; this makes shaping much easier. A quick chill also helps the chocolate set faster later, which I appreciate on busy nights.
Step 4: Shape the eggs
Portion the chilled mixture with a small cookie scoop or a heaping spoon and roll each portion between your palms into an egg shape. Place the shaped eggs on the prepared sheet with a little space between them, and if the filling softens, return the tray to chill again.
Step 5: Firm the centers
Move the tray to the freezer so the shaped eggs get cold and slightly hard to the touch before coating. Cold centers make for a cleaner dip and crisp shell when the chocolate sets.
Step 6: Melt the chocolate
Melt the dark chocolate gently in a double boiler over low simmering water, stirring until smooth, or heat in short bursts in the microwave, stirring between each. Keep the chocolate warm but not too hot so it stays glossy and easy to work with.
Step 7: Dip the eggs
Remove the eggs from the freezer and dunk each into the melted chocolate using two forks or a dipping tool, lifting and tapping off excess chocolate on the rim. Return the coated eggs to the lined tray and work briskly so the centers remain cold.
Step 8: Finish with extra chocolate and salt
If you like, spoon a bit of extra melted chocolate over the tops for a smoother finish, then add a tiny pinch of flaky sea salt while the chocolate is still wet. My daughter loves doing this bit because it feels fancy and takes two seconds.
Step 9: Set and store
Place the tray back in the freezer until the chocolate is fully set, then transfer the eggs to an airtight container for storage in the refrigerator or freezer. I keep a stash on hand and pull a couple for dessert after dinner.
Tips and Mistakes to Avoid
– Chill the filling until it’s firm enough to shape; soft centers will be hard to coat cleanly.
– Keep the chocolate warm but not scorching; overheated chocolate can seize and look dull.
– Work quickly during dipping so the centers stay cold and you get a crisp shell.
– Tap excess chocolate off the fork gently rather than shaking—it gives a neater finish.
– If the filling becomes too sticky while shaping, a short chill on the tray will rescue it.
Storage Tips
Store the set eggs in an airtight container in the refrigerator for up to two weeks for easy grab-and-go desserts. For longer keeping, freeze the eggs and thaw a few in the fridge before serving. Making a batch ahead is a lovely habit; I make one on a quiet afternoon and have dessert ready for a whole week of weeknight dinners.
Variations and Substitutions
– Keep it simple by omitting the protein powder for a purer peanut butter center; the rest of the method stays the same.
– Choose a plant-based or dairy-free protein powder and check that your dark chocolate is labeled dairy-free if you need a dairy-free option.
– Skip the flaky sea salt or use it sparingly on half the batch so picky eaters have a milder option.
Why This Recipe Is The Real Deal
The key technique here is the chill-and-freeze routine: firm centers mean a tidy dip and a satisfying contrast between creamy filling and crisp chocolate. I always freeze the shaped eggs before coating, and that one step makes the whole process feel much less fussy.
The other win is using good natural peanut butter; it carries the flavor and texture so you don’t need extra ingredients. My daughter can help with most steps, which keeps this very much a family recipe in practice, not just in spirit.
The Bottom Line
These peanut butter eggs are an affordable, make-ahead way to end a weeknight dinner on a joyful note—easy enough for kitchen helpers and convincing enough for guests. Try a batch, tell me how it went, and leave a comment about your favorite dipping technique.
Billy Mackenzie
Founder of MerryDessert.com
Simple, joyful homemade desserts — sweet moments, made with love.
Healthy Homemade Reese Eggs Recipe
Ingredients
Peanut Butter Filling
- 1 cup natural peanut butter (stirred)
- 1 Tbsp pure maple syrup
- 2 scoops vanilla protein powder (about 24 g per scoop)
- 1/4 tsp pure vanilla extract
Chocolate Coating
- 3 oz dark chocolate, chopped (70% cacao recommended)
- to taste flaky sea salt (optional)
Instructions
Preparation Steps
- Line a small baking sheet with parchment paper or a silicone mat and set aside. Make sure your work surface is clean and dry.
- Stir the peanut butter briefly to make it smooth. In a mixing bowl, combine the peanut butter, maple syrup, vanilla extract, and vanilla protein powder. Fold the mixture together with a spatula until evenly blended; the mixture should be cohesive but slightly tacky.
- Cover the bowl and chill the filling in the refrigerator for 20–30 minutes to firm it slightly. Chilling makes shaping easier and helps the coating set faster later.
- Using a small cookie scoop or a heaping tablespoon, portion the chilled mixture and roll each portion between your palms into an egg shape. Place the shaped eggs on the prepared sheet about 1/2 inch apart. If the filling becomes too soft, return the tray to the fridge for 10 minutes before continuing.
- Transfer the tray to the freezer and let the shaped eggs firm up for 20 minutes — they should be cold and slightly hard to the touch before coating.
- While the centers chill, melt the chocolate in a double boiler over low simmering water, stirring until smooth. Alternatively, microwave the chopped chocolate in 20-second bursts, stirring between each until fully melted. Keep the chocolate warm but not too hot.
- Remove the eggs from the freezer. Using two forks or a dipping tool, dunk each egg into the melted chocolate and use one fork to lift it out, tapping the fork on the edge of the bowl to let excess chocolate drip off. Return coated eggs to the parchment-lined tray. Work quickly so centers stay cold.
- If you like, spoon a little extra melted chocolate over the tops for a smoother finish and sprinkle a tiny pinch of flaky sea salt on each egg while the chocolate is still wet.
- Place the tray back in the freezer for 10–15 minutes to fully set the chocolate. Once set, store the eggs in an airtight container in the refrigerator for up to 2 weeks or in the freezer for longer storage.