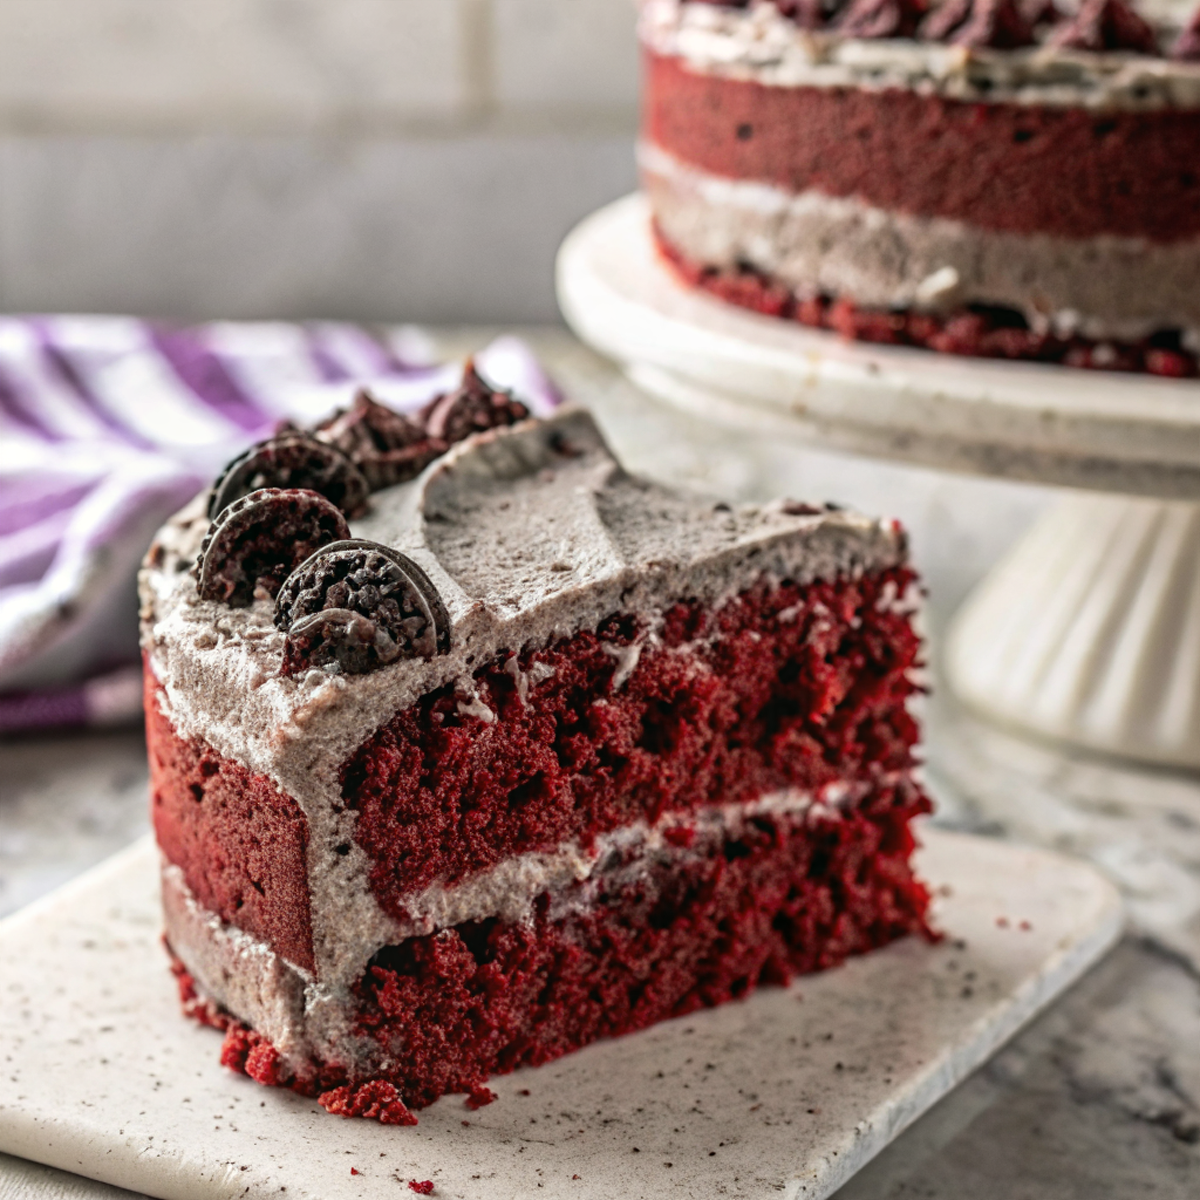
I pulled this together at the end of a very long recipe testing day, when all I wanted was something familiar and a little silly to cheer up the kitchen. My daughter helped me sift powdered sugar while I stirred batter, and before I knew it we had a goofy, chocolatey red velvet cake studded with Oreo pieces. It felt like the kind of last-minute dessert that somehow becomes the memory of the evening.
Why You’ll Love This Easy Red Velvet Oreo Cake
When you need a last-minute dessert after a long day, this is the kind of cake that shows up and says everything will be fine. It uses pantry staples and a handful of Oreos to turn a classic red velvet into something playful and family-ready.
I find it especially handy when testing other recipes all day and wanting to end on something that’s comforting without being fussy. My daughter asks to decorate “her way” and that always makes it better.
What Makes this Recipe Unique
– Key ingredient: Oreo cookies folded into both batter and frosting add crunch and cookie flavor throughout, not just on top.
– One-bowl wet mix: The buttermilk, sour cream, oil, eggs, vinegar, vanilla, and red gel coloring get whisked together for an easy wet base.
– Speedy shortcuts: Using coarsely chopped Oreos in the batter and finely crushed ones in the frosting gives big impact with simple steps.
– Texture contrast: Creamy, slightly speckled cream cheese frosting meets chunky cookie bits for a soft cake with a little crisp bite.
Estimated Macros & Calories
A rough nutrient snapshot to help plan around a generous slice. (estimated per serving, without optional ingredients)
- Calories: 1050 kcal
- Protein: 10 g
- Carbohydrates: 120 g
- Fat: 58 g
- Fiber: 3 g
The Most Authentic Easy Red Velvet Oreo Cake Recipe
This is warm and personal, not precious — the kind of cake I make when I want something that feels special but won’t take over the whole afternoon.
Ingredient Notes
– All-purpose flour: Gives structure to the cake; don’t skip sifting if you want a light crumb.
– Unsweetened cocoa powder: Adds the faint chocolate backbone that plays nicely with the red gel coloring.
– Buttermilk and sour cream: Make the crumb tender and slightly tangy; room temperature helps the batter come together smoothly.
– Neutral vegetable oil: Keeps the cake moist in a way butter sometimes won’t; it’s the reason slices stay soft the next day.
– Eggs: Bring lift and help the batter set properly; use room-temperature eggs for even mixing.
– Red gel food coloring: Gives the cake its classic color; gel is more vivid so you use less.
– Oreo cookies (coarsely chopped): Folded into the batter so you get chunky bits of cookie in every forkful.
– Cream cheese and butter: The frosting base; beat until very smooth so your frosting spreads without tearing the cake.
– Powdered sugar: Sift before adding to the frosting to avoid lumps and to keep things silky.
Instructions
Step 1: Preheat and Prep Pans
Preheat the oven and prepare two round cake pans with parchment, greasing them first and dusting with flour or cocoa. Tap out the excess dust so the cakes release cleanly after baking.
Step 2: Combine Dry Ingredients
Sift the flour, cocoa powder, baking powder, baking soda, salt, and instant espresso powder into a large bowl and whisk briefly to blend. This keeps the cocoa and leaveners evenly distributed.
Step 3: Mix the Wet Ingredients
Whisk together the buttermilk, sour cream, vegetable oil, eggs, white vinegar, vanilla extract, and red gel coloring until the mixture is smooth and evenly colored. A consistent wet mix helps the batter come together quickly when combined with the dry ingredients.
Step 4: Make the Batter
Create a well in the dry ingredients and pour in the wet mixture, then fold gently with a rubber spatula until just combined. Stop when the batter is thick and slightly glossy to avoid overmixing.
Step 5: Fold in Chopped Oreos
Fold the coarsely chopped Oreo pieces into the batter by hand so they stay chunky and distributed; set aside a few pieces for decorating. Divide the batter evenly between the prepared pans so the layers bake up the same height.
Step 6: Bake Until Set
Bake the pans on the center rack until a toothpick comes out with just a few moist crumbs, rotating halfway through for even browning. The tops should be springy and beginning to pull away from the pan when ready.
Step 7: Cool the Layers
Let the cakes cool in their pans briefly, then run a knife around the edges and invert onto a wire rack to remove the parchment. Allow the layers to cool completely before frosting so the frosting holds its shape.
Step 8: Make the Frosting
Beat the softened cream cheese and butter together on medium speed until very smooth and slightly aerated. This creates a light base for the powdered sugar.
Step 9: Add Powdered Sugar
With the mixer on low, add the sifted powdered sugar one cup at a time, then increase the speed briefly to reach a spreadable consistency. Taste and adjust sweetness if needed.
Step 10: Fold in Finely Crushed Oreos
Fold the finely crushed Oreos with a spatula so the frosting keeps a slightly speckled texture. If the frosting seems too soft to spread, chill it briefly to firm up.
Step 11: Assemble the Cake
Place one cake layer flat side up on a cake plate and spread about a third of the frosting evenly over the top. Stack the second layer and press gently to level before frosting the outside.
Step 12: Crumb Coat and Chill
Apply a thin crumb coat all over the cake to seal in crumbs, then refrigerate the cake until the crumb coat firms. This makes the final frosting smoother and cleaner.
Step 13: Finish and Decorate
Apply a generous second layer of frosting, smooth it with an offset spatula, and decorate with the reserved Oreo pieces or halved cookies. Chill briefly before slicing to get clean slices.
Tips and Mistakes to Avoid
– Let your eggs, buttermilk, and sour cream reach room temperature so the batter mixes evenly and the cake rises consistently.
– Don’t overmix after combining wet and dry ingredients; a few streaks of flour are better than a dense cake.
– Fold Oreos by hand into the batter to keep pockets of cookie instead of grinding them into crumbs.
– If your frosting is runny, a short chill helps it firm without adding more powdered sugar.
– Use sifted powdered sugar to keep the frosting silky and lump-free.
Storage Tips
Store the finished cake in the refrigerator in an airtight cake carrier for a few days so the frosting stays firm. You can freeze individual slices wrapped tightly for longer storage and thaw in the fridge before serving. Leftover slices are nice chilled or brought to room temperature briefly before serving.
Variations and Substitutions
– For a different mix-in, skip the coarsely chopped Oreos in the batter and stir more finely crushed Oreos into the frosting for a uniform speckled look.
– You can omit the instant espresso powder if you prefer a purer chocolate note; it’s listed as optional and only enhances the cocoa.
– This recipe contains wheat and dairy, so it’s not set up as a gluten-free or dairy-free cake without significant ingredient swaps.
Why This Recipe Is The Real Deal
Simplicity wins here: straightforward wet and dry mixes, a hands-off bake, and a frosting that comes together in one bowl. I love that it feels a little fancy because of the red color and the Oreos, but it doesn’t demand special ingredients or tools.
One of my favorite moments is letting my daughter scatter the reserved Oreo pieces on top; it makes the cake feel like ours. That kind of low-effort joy is exactly why I keep this recipe handy.
The Bottom Line
If you need a last-minute dessert that still feels celebratory, this red velvet cake with Oreos is a cheerful pick. Give it a try and tell me how your kitchen helper decorated it.
Billy Mackenzie
Founder of MerryDessert.com
Simple, joyful homemade desserts — sweet moments, made with love.
Easy Red Velvet Oreo Cake
Ingredients
Cake Batter
- 2 1/4 cups all-purpose flour
- 1 1/3 cups granulated sugar
- 1/2 cup unsweetened cocoa powder
- 3/4 tsp baking powder
- 3/4 tsp baking soda
- 1 tsp salt
- 1/2 tsp instant espresso powder (optional; enhances chocolate flavor)
- 1 cup buttermilk, room temperature
- 3/4 cup sour cream, room temperature
- 3/4 cup neutral vegetable oil
- 3 large eggs, room temperature
- 1 tsp white vinegar
- 2 tsp vanilla extract
- 1 tsp red gel food coloring
- 14 cookies Oreo cookies, cores removed and coarsely chopped
Oreo Cream Cheese Frosting
- 16 oz full-fat cream cheese, softened
- 8 oz salted butter, softened (or unsalted + a pinch of salt)
- 7 cups powdered sugar, sifted
- 12 cookies Oreo cookies, finely crushed (reserve a few for garnish)
To Finish
- 6 cookies extra Oreo cookies, halved or whole for decoration (optional)
Instructions
Preparation Steps
- Preheat the oven to 350°F. Grease and line two 8-inch round cake pans with parchment; lightly dust with flour or cocoa and tap out the excess.
- In a large bowl, sift together the flour, cocoa powder, baking powder, baking soda, salt, and instant espresso powder. Whisk briefly to blend and set aside.
- In a separate bowl, whisk the buttermilk, sour cream, oil, eggs, vinegar, vanilla, and red gel coloring until smooth and evenly colored.
- Make a well in the dry ingredients and pour in the wet mixture. Using a rubber spatula, fold the batter gently until just combined — avoid overmixing. The batter will be thick and slightly glossy.
- Fold in the coarsely chopped Oreos by hand so they stay chunky and distributed; reserve a few pieces for decorating. Divide the batter evenly between the prepared pans (use a kitchen scale or scoop for even layers).
- Bake on the center rack for 30–35 minutes, or until a toothpick comes out with just a few moist crumbs. Rotate the pans halfway through baking for even browning.
- Let the cakes cool in the pans for 15 minutes, then run a knife around the edges, invert onto a wire rack, peel off parchment, and cool completely before frosting (cooling fully helps the frosting hold).
- While the layers cool, make the frosting: beat the softened cream cheese and butter together on medium speed until very smooth and slightly aerated (about 2–3 minutes).
- With the mixer on low, add the powdered sugar one cup at a time until incorporated, then increase speed briefly to reach a spreadable consistency. Taste and adjust sweetness if needed.
- Fold in the finely crushed Oreos with a spatula so the frosting keeps a slightly speckled texture. Chill the frosting in the refrigerator for 20–30 minutes if it seems too soft to spread.
- Place one cake layer (flat side up) on a cake plate. Spread about a third of the frosting evenly over the top. Stack the second layer and press gently to level.
- Apply a thin crumb coat of frosting all over the cake to seal in crumbs. Refrigerate the cake for 30 minutes to firm the crumb coat.
- Finish with a generous second layer of frosting, smooth with an offset spatula, and decorate with reserved Oreo pieces or halves. Chill 20–30 minutes before slicing to make clean slices.