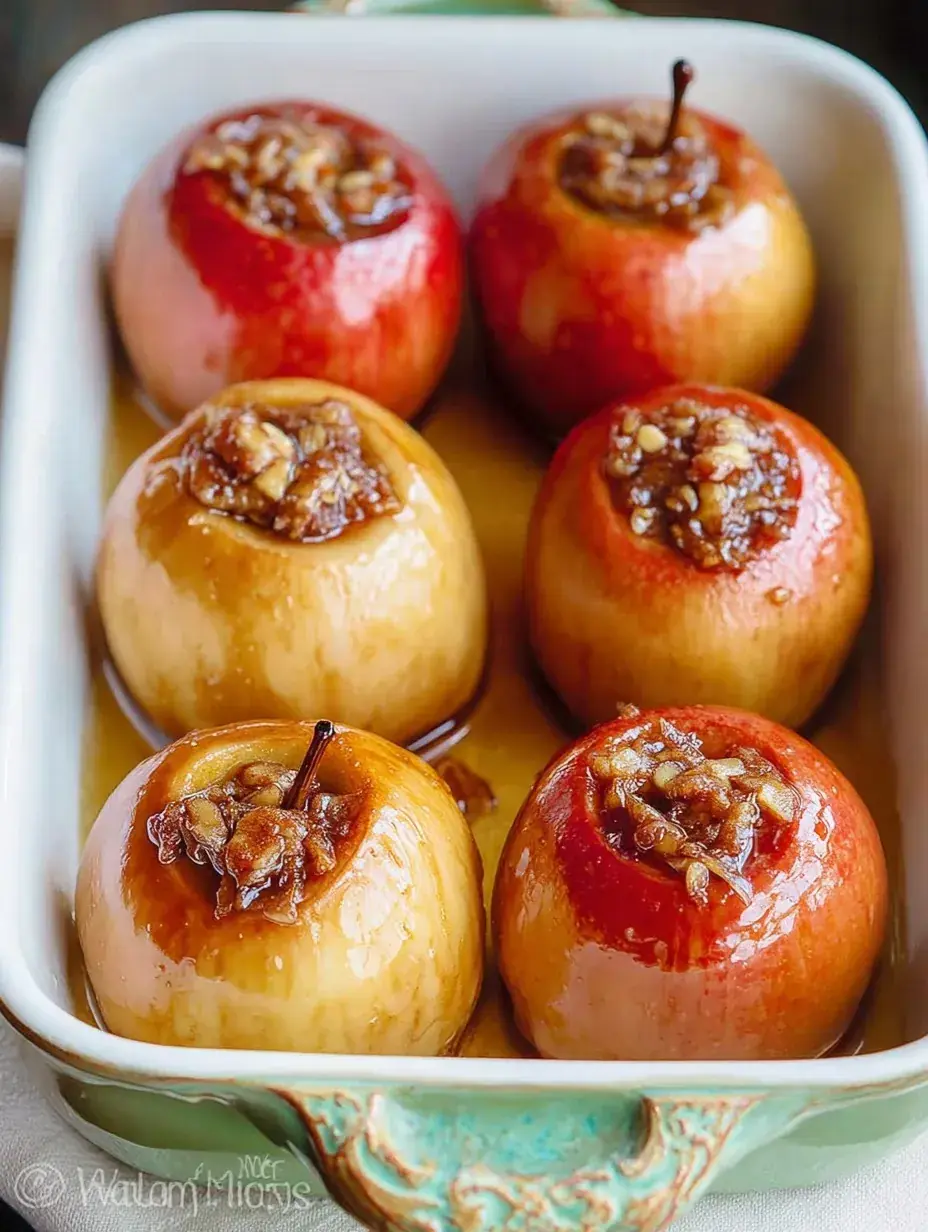
There is something about a quiet Sunday afternoon that just calls for the smell of cinnamon drifting through the house. I was looking at a bowl of apples on my counter today and remembered how much my daughter loves it when we turn them into a warm treat. It is the kind of simple kitchen session that makes the whole weekend feel more special.
Why You Will Love This Classic Baked Apples
These apples remind me so much of the treats my grandmother used to make when the air started getting crisp outside. She never liked complicated recipes, and honestly, I have found that the most basic desserts often bring the most comfort to my family. We usually eat these while they are still steaming hot with a little splash of cold cream on top.
I remember the first time I made these on my own and I accidentally cored the apple all the way through to the bottom. All the sugar leaked out into the pan, which taught me very quickly to leave a little floor in each apple to hold that delicious filling. It is a mistake you only make once before you learn the trick.
What Makes This Classic Baked Apples Special
- Key feature: The contrast between the soft, tender apple flesh and the slightly crunchy, buttery oat center is what makes this so satisfying.
- Key ingredient: Real butter is essential here because it melts down into the oats and sugar to create a rich sauce inside the fruit.
- Ease factor: This is a wonderful entry-level bake because you do not need a mixer or any fancy equipment to get a great result.
- Seasonal fit: I make these most often during the late autumn months, but they are just as lovely as a lighter alternative to heavy holiday pies.
- Kid-friendly note: My daughter loves being the official stuffing person, pressing the oat mixture into the apples with her small spoons.
The Best Classic Baked Apples Recipe
I made a batch of these just last night when we had a sudden craving for something sweet but did not want to spend hours in the kitchen. It is such a reliable way to use up fruit while making the house smell absolutely wonderful.
Ingredient Notes
- Honeycrisp or Granny Smith Apples: You need an apple that holds its shape under heat so it does not turn into applesauce in the oven.
- Old-Fashioned Rolled Oats: These provide a much better texture and chew than quick oats, which can get a bit mushy.
- Walnuts: I love the earthy crunch they add, but you can easily swap them for pecans or leave them out if you have a nut allergy.
- Cinnamon: This is the heart of the flavor, and I usually find that a fresh jar makes a big difference in how fragrant the apples become.
- Boiling Water: Adding this to the pan creates steam, which helps the apples cook through evenly without drying out the skin.
Instructions
- Prepare the oven. Set your oven to 375°F (190°C) so it is nice and hot when the apples are ready to go in.
- Core the apples. Use a paring knife or a melon baller to scoop out the seeds and core, making sure you stop about half an inch from the bottom. You want a deep well that looks like a little cup.
- Mix the filling. Stir the brown sugar, oats, cinnamon, and walnuts together in a small bowl until they are well combined.
- Add the butter. Work the softened butter into the dry ingredients using a fork or your fingers until the mixture looks like wet sand.
- Stuff the fruit. Press the oat mixture firmly into the center of each apple, piling it up slightly at the top if you have extra.
- Bake with water. Place the apples in a baking dish, pour boiling water into the bottom, and bake for about 45 minutes until the fruit is soft when poked with a knife.
Billy’s Tips and Mistakes to Avoid
- Do not cut all the way through the bottom of the apple or your filling will escape into the pan water.
- If the tops start to brown too quickly before the apple is soft, you can loosely tent a piece of foil over the dish.
- I learned that using boiling water rather than cold water starts the steaming process immediately, which leads to a better texture.
- Always baste the apples with the pan juices right when they come out of the oven to give them a beautiful golden shine.
- Let the kids help with the crumbling part, as it is a great way for them to feel involved in the baking process.
Storage Tips
You can keep any leftover apples in a sealed container in the fridge for up to 4 days. They actually reheat quite well in the microwave for about a minute, which makes them a great quick breakfast with a scoop of yogurt. Personally, I think they are best served warm, so I always give them a quick heat-up before eating.
Variations and Swaps
- Try adding a tablespoon of raisins or dried cranberries to the oat mixture for a little extra sweetness and chew.
- For a dairy-free version, you can use a solid coconut oil instead of butter, and it still tastes wonderfully rich.
- If you want to make this even more kid-friendly, add a few mini chocolate chips to the stuffing once it has cooled slightly.
Why This Recipe Works Every Time
The secret to this recipe is the balance of moisture from the steam and the richness of the butter melting into the oats. It creates a self-basting environment that keeps the apple skin from getting tough while the inside becomes buttery and soft. It is a very forgiving process that does not require the precision of a layer cake.
After making these several times, I realized that the size of the apple really dictates the bake time. I once used very large apples that took over an hour, so now I always check them with a sharp knife to make sure they are tender all the way through before I pull them out.
Ingredients
- 4 large tart apples (such as Honeycrisp or Granny Smith)
- 1/4 cup packed brown sugar
- 1/4 cup old -fashioned rolled oats
- 1 teaspoon ground cinnamon
- 1/4 cup chopped walnuts
- 2 tablespoons unsalted butter, softened
- 1/2 cup boiling water
Instructions
- Preheat oven to 375°F (190°C).
- Remove the core of each apple using a melon baller or paring knife, stopping about half an inch from the bottom to create a well.
- In a small mixing bowl, combine the brown sugar, oats, cinnamon, and walnuts.
- Mix in the softened butter until the mixture is crumbly.
- Divide the stuffing mixture evenly among the apples, pressing it firmly into the cavities.
- Place the apples upright in an 8x8 inch baking dish.
- Pour the boiling water into the bottom of the baking dish around the apples.
- Bake for 40 to 45 minutes, or until the apples are tender when pierced with a knife but still hold their shape.
- Remove from oven and baste the apples with the juices from the pan before serving.
Frequently Asked Questions
What are the best apples for baking?
I personally prefer Honeycrisp because they are sweet and sturdy, but Granny Smith is great if you like a tarter flavor. You just want to avoid soft apples like McIntosh which can fall apart completely in the oven.
Can I make these ahead of time?
You can certainly core and stuff the apples a few hours in advance and keep them in the fridge. Just wait to add the boiling water and bake them right before you want to serve them for the best texture.
Should I peel the apples before baking?
No, you should definitely leave the skin on. The skin acts like a little bowl that holds everything together while the apple softens, plus it adds a lovely color to the finished dish.
The Bottom Line
Baking doesn’t always have to involve flour and complicated steps to be satisfying. These apples are a gentle reminder that simple fruit and a few pantry staples can create a memory that lasts much longer than the dessert itself. Sweet moments don’t have to be complicated. Let’s make something wonderful together.
I hope these bring a little warmth to your kitchen this week, just like they do for mine and my daughter’s. Billy
Billy