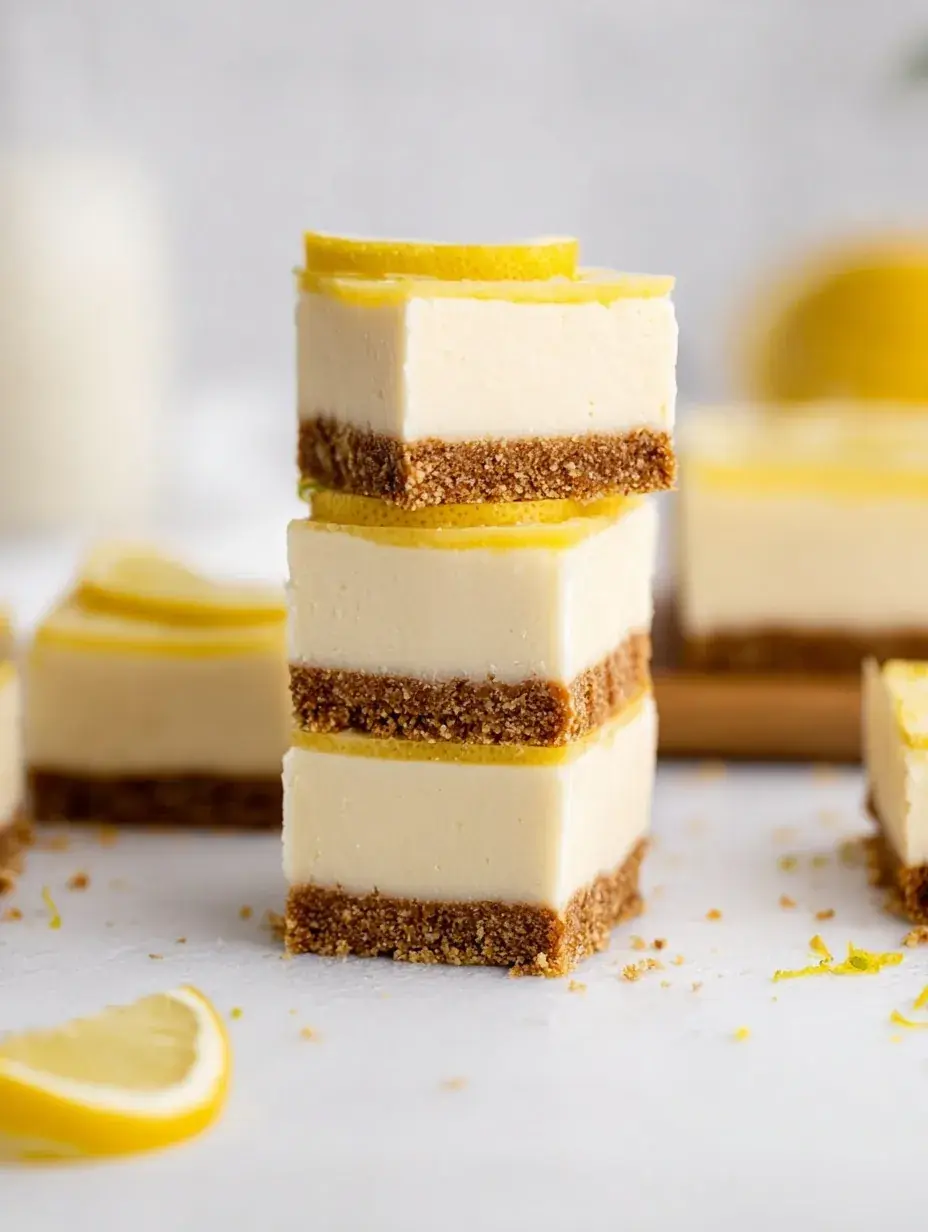
Every time the first warm breeze of spring hits my kitchen window, I find myself reaching for the lemons. It is that transitional moment where I am done with heavy winter puddings and craving something that feels like sunshine on a plate. My daughter and I usually whip these up on a Saturday morning so they are perfectly chilled by the time we want a treat after our backyard gardening.
Why You Will Love This No-Bake Lemon Cheesecake Bars
I remember the first time I made these for a family picnic a few years back when our oven decided to quit right before the guests arrived. I was so worried they would be too soft or not real enough without the baking step, but they ended up being the first thing to disappear from the table. My mother-in-law even asked for the recipe twice, which is the highest compliment I could ever receive in my kitchen.
After testing this recipe four times to get the lemon balance just right, I realized that using fresh zest is the absolute secret to that bright flavor. I once tried using bottled juice in a pinch, but honestly, it just did not have that same zing that makes these bars so special.
What Makes This No-Bake Lemon Cheesecake Bars Special
These bars are the definition of low-stress baking because they require zero oven time and very little cleanup.
- Key feature: The texture is incredibly light and mousse-like because we fold in real whipped cream instead of relying on gelatin.
- Key ingredient: Fresh lemon zest provides those tiny pops of citrus oil that wake up the rich cream cheese.
- Ease factor: Since there is no baking involved, you do not have to worry about the cheesecake cracking or overcooking.
It is the kind of dessert that looks impressive but feels like a secret shortcut.
The Best No-Bake Lemon Cheesecake Bars Recipe
I love making these because they stay fresh in the fridge for days, making them a great prep-ahead option for any weekend. The citrus smell that fills the kitchen when you grate the lemons is enough to put anyone in a good mood.
Ingredient Notes
- Graham cracker crumbs: These create that classic buttery base that holds everything together beautifully and provides a nice salty-sweet contrast.
- Cream cheese: Make sure it is truly at room temperature so you do not end up with tiny white lumps in your filling.
- Fresh lemon juice: Use real lemons here because the flavor is much cleaner and sharper than anything from a bottle.
- Heavy whipping cream: This gives the bars their height and airy texture once it is folded into the cheese mixture.
- Powdered sugar: It dissolves instantly into the cream cheese for a perfectly smooth mouthfeel without any grittiness.
Instructions
- Mix Crust. Combine the crumbs, butter, and sugar until it looks like wet, dark sand. Press it very firmly into your pan so it does not crumble when you slice the bars later.
- Beat Cheese. Use a hand mixer to whip the cream cheese and powdered sugar until the mixture is completely silky. You should not see any streaks of sugar or lumps of cheese at this stage.
- Add Citrus. Pour in your lemon juice, zest, and vanilla, then beat again until everything is combined. The mixture will smell amazing and look slightly glossy.
- Whip Cream. In a cold bowl, beat your heavy cream until it holds its shape and forms stiff peaks. You want it firm enough that it does not slide off the whisk.
- Fold Gently. Use a spatula to slowly turn the whipped cream into the lemon mixture. Do this carefully so you do not deflate all that beautiful air we just whipped in.
- Chill Well. Smooth the filling over your crust and let it sit in the fridge for at least four hours. The filling should feel set and firm to a light touch before you try to cut it.
Billy’s Tips and Mistakes to Avoid
- I learned the hard way to always line the pan with parchment paper so you can lift the whole block out easily for slicing.
- If you want a cleaner slice, run your knife under hot water and wipe it dry between every single cut.
- Skipping the room-temperature step for the cream cheese will result in a grainy texture that is hard to fix later.
- You can actually make these a full day early, as the flavor only gets better as they sit and the crust softens slightly.
- My daughter loves adding a few extra lemon slices or even a tiny mint leaf on top to make them look fancy for guests.
Storage Tips
Keep these bars in an airtight container in the fridge for up to 4 days for the best texture. If you want to save them for later, they actually freeze surprisingly well for about 30 days, just be sure to thaw them in the fridge for about an hour before serving.
Variations and Swaps
- Swap the graham crackers for crushed gingersnaps if you want a spicy, warm kick to contrast the tart lemon.
- To make these gluten-free, simply use your favorite gluten-free graham cracker substitute for the base and check your vanilla extract.
- Top each bar with a dollop of blueberry jam or fresh raspberries for a classic fruit pairing that looks beautiful on a plate.
Why This Recipe Works Every Time
The balance between the salty-sweet crust and the tart lemon filling creates a flavor profile that is not too heavy. It feels refreshing rather than indulgent, which is why I find myself making it all through the warmer months for every outdoor gathering we host.
I made the mistake of using a light cream cheese once, and it just did not set up the same way, so I always recommend the full-fat version for that perfect sliceable texture. It is a small detail, but it really makes the difference between a messy plate and a perfect bar.
Ingredients
- 1.5 cups graham cracker crumbs
- 6 tablespoons unsalted butter, melted
- 1/4 cup granulated sugar
- 16 ounces cream cheese, softened to room temperature
- 1 cup powdered sugar
- 1/4 cup fresh lemon juice
- 1 tablespoon lemon zest
- 1 teaspoon vanilla extract
- 1 cup heavy whipping cream, chilled
Instructions
- Combine graham cracker crumbs, melted butter, and granulated sugar in a bowl until the mixture resembles wet sand.
- Press the crust mixture firmly and evenly into the bottom of an 8x8 inch square pan lined with parchment paper.
- In a large bowl, beat the softened cream cheese and powdered sugar together until smooth and free of lumps.
- Add the lemon juice, lemon zest, and vanilla extract to the cream cheese mixture and beat until well incorporated.
- In a separate chilled bowl, whip the heavy cream until stiff peaks form.
- Gently fold the whipped cream into the lemon cream cheese mixture using a spatula until just combined.
- Spread the cheesecake filling evenly over the prepared graham cracker crust.
- Cover and refrigerate for at least 4 hours or overnight until the filling is firm.
- Lift the bars out using the parchment paper edges and slice into 12 rectangles using a warm knife.
Frequently Asked Questions
Can I use lime instead of lemon for this recipe?
Yes, lime works beautifully and gives it a tropical feel. You might want to add an extra tablespoon of sugar if your limes are particularly tart.
Why is my no-bake cheesecake not setting?
This usually happens if the cream cheese was too warm when mixed or if the whipped cream was not beaten to stiff peaks. Make sure to give it the full 4 hours in the fridge to firm up.
Do I have to use a springform pan for these bars?
No, an 8×8 square pan works perfectly for bars. The parchment paper handles allow you to lift the whole block out once it is chilled so you can cut it on a board.
The Bottom Line
These bars are a little slice of sunshine that I know your family will love as much as mine does. It is proof that you do not need an oven to create something truly memorable and delicious for your loved ones. Sweet moments don’t have to be complicated. Let’s make something wonderful together.
I hope these bring a little brightness to your kitchen this week and make your spring afternoons feel extra sweet. Billy
Billy