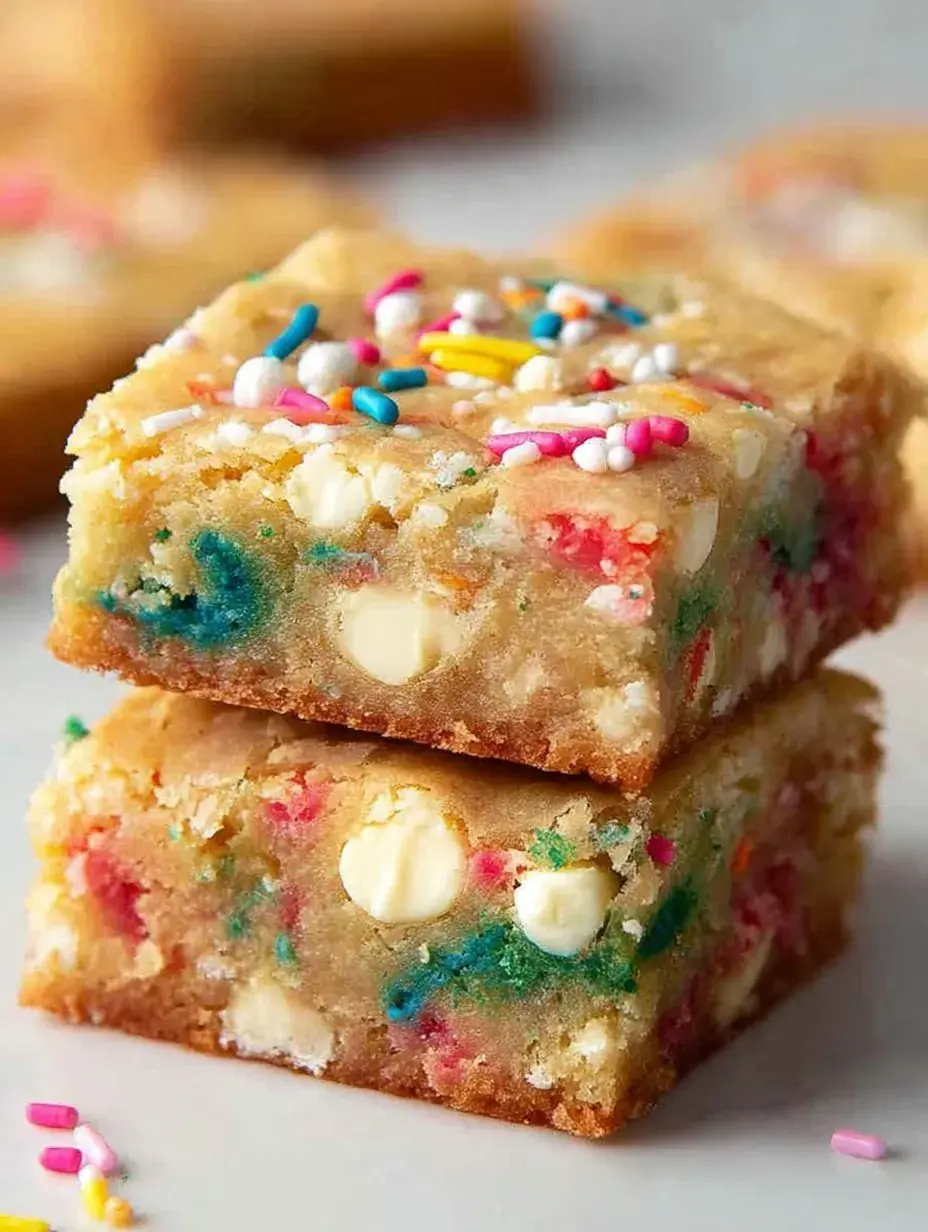
The radio was on, my daughter had flour on her nose, and somehow that made everything taste better. We were huddled in the kitchen on a quiet afternoon, surrounded by the smell of vanilla and melting butter. There is something so peaceful about watching a jar of colorful sprinkles transform a simple batter into something festive.
Why You Will Love This Thick & Chewy Funfetti Blondies
I first started making these Thick & Chewy Funfetti Blondies for my daughter’s school bake sales because they were so much sturdier than a standard cupcake. They quickly became a staple in our house, especially during the holidays when we want something bright but don’t have the energy for rolling out cookies. I remember one rainy Tuesday when we made a batch just because we needed a little bit of color on a gray day.
After testing this recipe a few times, I realized that adding a tiny bit of almond extract makes them taste exactly like a classic birthday cake. It is my little secret that makes people ask for the recipe every single time I bring a tray to a neighbor’s house. Personally, I have found that these disappear faster than almost anything else I bake.
What Makes This Thick & Chewy Funfetti Blondies Special
These bars are the ultimate comfort food because they combine the dense texture of a brownie with the sweet nostalgia of a sprinkle cake.
- Dense Texture: These are incredibly fudgy and thick, never cakey or dry like some other bar recipes.
- Key Ingredient: We use rainbow jimmies because they hold their color beautifully without bleeding into the batter during the bake.
- Ease Factor: This is a simple one-bowl recipe that is perfect for beginners or busy moms who want a quick win.
It is the kind of treat that makes any ordinary afternoon feel like a little celebration in your kitchen.
The Best Thick & Chewy Funfetti Blondies Recipe
I love how simple these are to throw together when you need a reliable dessert that everyone will enjoy. My daughter always asks to be the one in charge of the sprinkles, and I usually let her add a few extra for good measure.
Ingredient Notes
- Melted Butter: This creates that signature dense and chewy texture we all love in a good blondie.
- Almond Extract: This is the secret to that nostalgic cake batter flavor, so try not to skip it if you can.
- Rainbow Jimmies: These work better than tiny nonpareils because they do not melt away or turn the batter gray.
- Brown Sugar: It adds essential moisture and a very slight caramel note to the buttery base.
- White Chocolate Chips: These add a creamy sweetness that balances out the richness of the dough.
Instructions
- Preheat and Prep. Set your oven to 350°F and line your square pan with parchment paper. Leave a little overhang on the sides so you can easily lift the bars out later.
- Mix Fats and Sugars. Whisk the melted butter with both sugars in a large bowl until the mixture looks smooth. It should be well combined and glossy.
- Whisk in Liquids. Add the eggs and extracts, then whisk vigorously for about a full minute. You will see the batter lighten in color and become slightly fluffy.
- Fold in Dry Ingredients. Gently stir in the flour and salt using a spatula. Stop as soon as you no longer see any dry white streaks to keep the texture soft.
- Add the Fun. Fold in those colorful sprinkles and white chocolate chips until they are evenly dotted throughout. The batter will be quite thick and smells amazing.
- Bake to Perfection. Spread the batter into your pan and bake for about 25 minutes. The edges should be golden but the center should still look slightly soft.
Billy’s Tips and Mistakes to Avoid
- Do not overbake these bars or they will lose that fudgy center I worked so hard to perfect.
- I learned the hard way to wait until they are completely cool before slicing, otherwise they might crumble.
- Whisking the eggs for a full minute is the secret to getting that beautiful crackly top on your blondies.
- Use a metal baking pan if you have one for the most even heat distribution across the bottom.
- If you are baking with kids, let them do the sprinkle folding; it is the best part of the whole process.
Storage Tips
You can keep these Thick & Chewy Funfetti Blondies in an airtight container at room temperature for up to 4 days. If you want them to last longer, they actually freeze beautifully for up to 3 months when wrapped tightly in plastic wrap. I like to pull one out of the freezer and let it thaw for a quick school snack.
Variations and Swaps
- Swap the rainbow colors for red and green sprinkles to make these festive for a Christmas dessert table.
- Use dairy-free butter and chocolate chips if you need to accommodate someone with a milk allergy.
- Add a handful of crushed pretzels for a salty-sweet version that I personally find irresistible.
Why This Recipe Works Every Time
The balance of fats and sugars is what gives these bars their incredible staying power and chewy bite. I have made the mistake of using too much flour in the past, but this specific ratio ensures they stay soft for days on end.
My daughter and I have tested these with many different types of sprinkles, and the long jimmies really are the winner. It is a reliable recipe that I know will turn out right even on my busiest mornings when I am rushing to get a treat ready.
Ingredients
- 1 cup unsalted butter, melted and slightly cooled
- 1 cup granulated sugar
- 1/2 cup light brown sugar, packed
- 2 large eggs , room temperature
- 1 tablespoon vanilla extract
- 1/2 teaspoon almond extract
- 2 1/4 cups all -purpose flour
- 1/2 teaspoon sal t
- 1/2 cup rainbow jimmies (sprinkles)
- 1/2 cup white chocolate chips
Instructions
- Preheat oven to 350°F (175°C) and line an 8x8 inch square baking pan with parchment paper, leaving an overhang on two sides.
- In a large mixing bowl, combine the melted butter, granulated sugar, and light brown sugar, whisking until the mixture is smooth and combined.
- Add the eggs, vanilla extract, and almond extract; whisk vigorously for 60 seconds until the batter lightens in color.
- Gently fold in the all-purpose flour and salt using a spatula until just combined and no dry streaks remain.
- Fold in the rainbow sprinkles and white chocolate chips until evenly distributed throughout the batter.
- Spread the batter into the prepared baking pan, smoothing the top with a spatula to ensure an even thickness.
- Bake for 25 to 30 minutes, or until the edges are lightly golden and a toothpick inserted into the center comes out with a few moist crumbs.
- Remove from the oven and allow the blondies to cool completely in the pan on a wire rack before lifting out by the parchment paper and slicing into 16 squares.
Frequently Asked Questions
Can I use nonpareils instead of jimmies?
I wouldn’t recommend it because the tiny round sprinkles tend to bleed their dye into the batter. This can turn your beautiful golden blondies a strange muddy color while they bake.
How do I know when the blondies are finished baking?
Look for the edges to turn a light golden brown and start to pull away from the parchment paper. The center should be set but still have a very slight wiggle when you move the pan.
Can I make these gluten-free?
Yes, you can substitute the all-purpose flour with a high-quality 1-to-1 gluten-free baking blend. I have tried this for a friend and the texture remained surprisingly chewy and delicious.
The Bottom Line
Baking these Thick & Chewy Funfetti Blondies is a simple reminder that the best treats are often the ones that bring the most smiles. Whether it is for a birthday or just a quiet Sunday with your family, these bars are sure to be a hit. Sweet moments don’t have to be complicated. Let’s make something wonderful together.
I hope your kitchen smells as sweet as mine does today. Happy baking from my family to yours. Billy
Billy