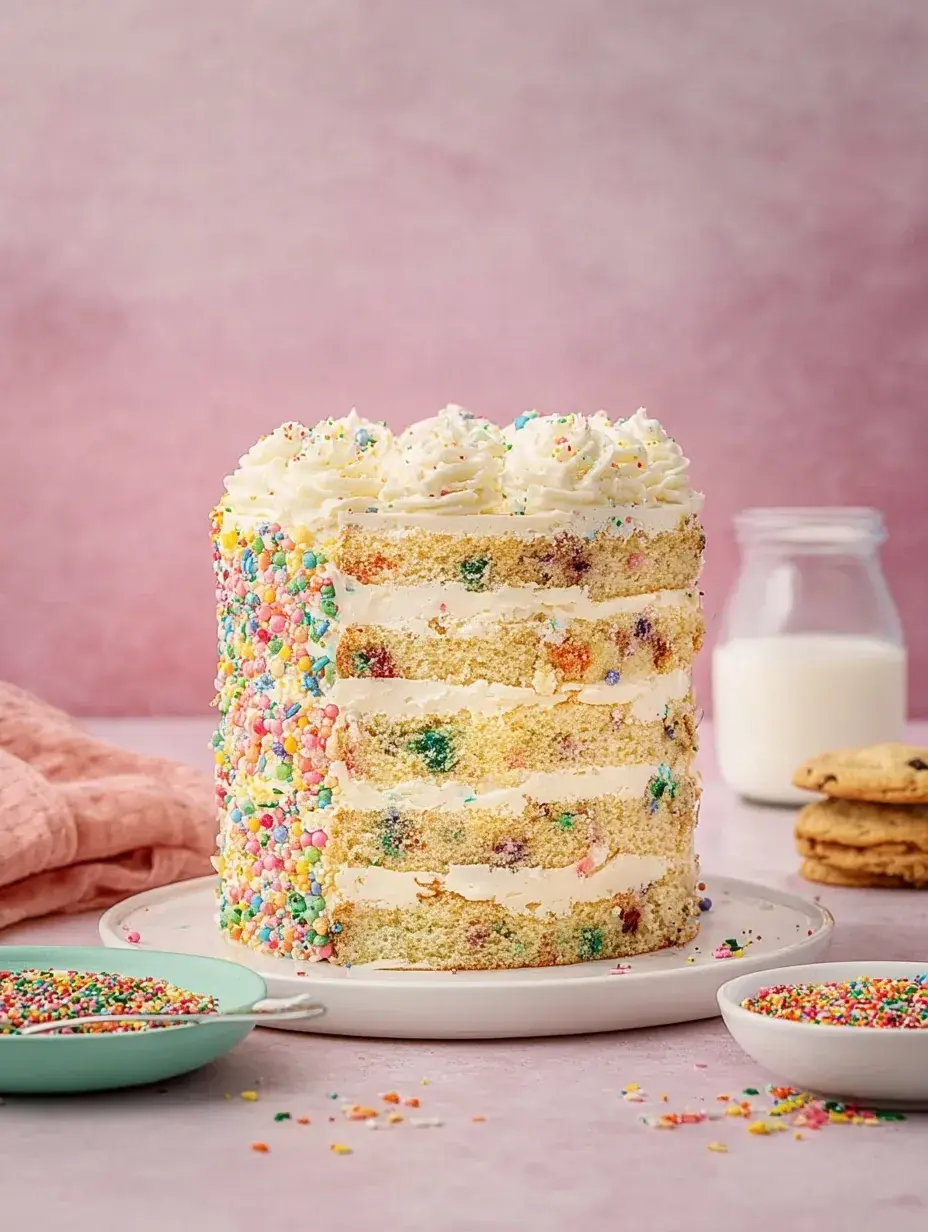
It looks like a masterpiece from a professional pastry shop that took years to master. Honestly, it is just a series of simple steps that anyone can do in a home kitchen once you have the right tools. My daughter and I spent a whole Saturday afternoon assembling this, and the look on her face when we peeled back the plastic was worth every second.
Why You Will Love This Milk Bar Birthday Cake
I first saw this cake in a bakery window years ago and thought I could never recreate those perfect, colorful layers at home. Last November, my daughter decided she wanted a real birthday cake, so I finally pulled out the cake ring and gave it a go. We had flour everywhere and rainbow sprinkles bouncing off the floor, but the process was surprisingly meditative.
After testing this recipe a few times, I realized that the magic isn’t in perfection but in the specific textures. It has that nostalgic, boxed-mix flavor we all loved as kids, but with a sophisticated saltiness and crunch that makes it feel grown-up. Personally, I have found that eating a slice feels like a celebration of every birthday you have ever had.
What Makes This Milk Bar Birthday Cake Special
- The Signature Crumbs: These little clusters of sandy, sweet goodness are baked separately and provide a crunch that most cakes are missing.
- Clear Vanilla Magic: Using clear vanilla instead of brown extract gives it that specific birthday taste that reminds me of childhood treats.
- Naked Layer Aesthetic: By using a cake ring and acetate, you get those beautiful exposed sides that show off every component without messy frosting.
- The Buttermilk Soak: Brushing the layers with a milk mixture ensures the cake stays incredibly moist even after days in the fridge.
- Cream Cheese Tang: The frosting has just enough cream cheese to cut through the sweetness, making it balanced and rich.
The Best Milk Bar Birthday Cake Recipe
This is a bit of a kitchen project, but I promise the reward is huge. When I made this last weekend, I realized it is less about skill and more about just following the steps in order.
Ingredient Notes
- Cake Flour: Essential for that soft, tender crumb; all-purpose makes it a bit too heavy and dense for this specific look.
- Clear Vanilla Extract: This is the secret to that classic funfetti flavor; don’t swap it for the dark stuff if you want that nostalgic aroma.
- Grapeseed Oil: Provides moisture without adding a heavy flavor, allowing the vanilla and butter to shine through.
- Acetate Strip: This isn’t an ingredient you eat, but you absolutely need it to get those clean, professional-looking sides during assembly.
- Rainbow Sprinkles: Use the jimmies style rather than nonpareils so they do not bleed too much color into your batter while mixing.
Instructions
- Bake Crumbs. Mix your dry ingredients with oil and vanilla until small clusters form, then bake until they are sandy and fragrant. Let them cool completely so they stay crunchy inside the cake layers.
- Mix Batter. Cream the butter and sugar for a full three minutes until it looks pale and fluffy. This step incorporates the air needed for a light Milk Bar Birthday Cake.
- Bake Sheet. Spread the batter onto a lined sheet pan and bake until the top springs back when touched. I usually check mine around 25 minutes to make sure the edges do not get too dark or crispy.
- Whip Frosting. Beat the butter, shortening, and cream cheese with the syrups until the mixture is almost white. Adding a pinch of citric acid helps brighten the flavor and cuts the richness of the sugar.
- Cut Rounds. Use your cake ring to stamp out two full circles and use the leftover scraps to form the bottom layer. It feels like a puzzle, but the frosting hides all the seams perfectly once it is assembled.
- Assemble Layers. Build your layers inside the ring with acetate, starting with cake, then soak, then frosting, and finally crumbs. Freeze the whole thing for at least six hours to set the structure before unmolding.
Billy’s Tips and Mistakes to Avoid
- Don’t skip the glucose or corn syrup in the frosting; it provides a smooth, stretchy texture that holds up beautifully between the layers.
- Make sure your butter is truly softened to room temperature, or your frosting will have tiny lumps that are hard to beat out later.
- I learned the hard way to wait for the crumbs to cool entirely before adding them to the frosting, otherwise they soften too much.
- If you do not have a cake ring, you can use the sides of a springform pan, though the height might be a little different than the original.
- Keep your acetate strips tall; it is much easier to trim them later than to try and add more height mid-assembly.
Storage Tips
You can keep this cake in the fridge for up to 5 days, and it actually tastes better on day two once the soak has settled into the sponge. For longer storage, wrap the frozen cake tightly in plastic wrap and it will stay fresh for up to 30 days. When you are ready to serve, just let it thaw in the fridge for a few hours.
Variations and Swaps
- Try swapping the rainbow sprinkles for chocolate chips or crushed freeze-dried strawberries for a completely different flavor profile.
- To make it dairy-free, I have had success using a high-quality vegan butter and plant-based cream cheese, though the texture is slightly softer.
- For a holiday version, use red and green sprinkles and add a tiny bit of peppermint extract to the milk soak.
Why This Recipe Works Every Time
This recipe relies on the contrast between the soft sponge and the salty, crunchy crumbs. It is a technical bake, but the visual cues like the springy cake top and pale white frosting help you know exactly when you have got it right. I love how the acetate strip does all the hard work for you.
The first time I made this, I rushed the freezing step and the cake slumped when I removed the ring. Now I always leave it overnight because that cold setting time is what creates those iconic, clean layers that make this dessert so famous. It is a lesson in patience that pays off with every bite.
Ingredients
- 250 g Granulated sugar
- 50 g Light brown sugar
- 285 g Cake flour
- 6 g Baking powder
- 4 g Kosher salt
- 50 g Rainbow sprinkles
- 40 g Grapeseed oil
- 12 g Clear vanilla extract
- 115 g Unsalted butter, softened
- 60 g Vegetable shortening
- 55 g Cream cheese
- 25 g Glucos e
- 18 g Light corn syrup
- 100 g Powdered sugar
- 0.5 g Citric acid
- 3 Large egg s
- 110 g Buttermil k
- 50 g Whole milk
Instructions
- Preheat oven to 350°F (175°C).
- Prepare birthday crumbs: Combine 100g sugar, 25g brown sugar, 90g cake flour, 2g baking powder, 2g salt, and 20g sprinkles. Add 40g oil and 4g clear vanilla; mix until clusters form. Bake for 15 minutes.
- Prepare cake: Cream 115g butter and 250g sugar. Add 3 eggs and beat for 3 minutes. Stream in buttermilk, 40g oil, and 8g clear vanilla. Fold in 185g cake flour, 4g baking powder, 2g salt, and 30g sprinkles. Spread on a lined quarter-sheet pan and bake for 30 minutes.
- Prepare frosting: Cream 115g butter, 60g shortening, and 55g cream cheese with glucose and corn syrup. Add powdered sugar, salt, a pinch of baking powder, and citric acid. Whip until pale white.
- Assemble: Cut two 6-inch rounds and cake scraps from the sheet. Place a 6-inch cake ring on a tray lined with acetate. Layer cake scraps at bottom, brush with milk soak (milk + vanilla), spread frosting, and top with crumbs. Repeat with cake rounds. Freeze for 6 hours before removing ring.
Frequently Asked Questions
Can I use regular vanilla extract for a Milk Bar Birthday Cake?
Yes, you can use regular vanilla, but the flavor will be more like a traditional sponge and less like the nostalgic Milk Bar Birthday Cake flavor we are aiming for. The clear vanilla gives it that specific box-mix taste.
Why do I need to freeze the cake before serving?
Freezing is what allows the frosting and soak to bond the layers together firmly. This ensures you can peel off the acetate without the cake falling apart or the layers sliding.
What if I do not have cake flour?
You can make a substitute by removing two tablespoons of all-purpose flour from one cup and replacing it with two tablespoons of cornstarch. However, real cake flour is always best for the finest texture.
The Bottom Line
Building this Milk Bar Birthday Cake is a wonderful way to spend an afternoon being creative in the kitchen. It might look intimidating, but once you break it down into layers, it is just about having fun with sprinkles and crumbs. Sweet moments don’t have to be complicated. Let’s make something wonderful together.
I hope this cake brings as much joy to your family as it did to mine during our last birthday bash. Happy baking! Billy
Billy