I used to feel so intimidated by cheesecake that I avoided making it for years. After failing a traditional baked version three times in one holiday season, I finally gave up and tried this no-bake method instead. It is much more forgiving and honestly tastes just as decadent as the fancy versions.
Why You Will Love This No-Bake Pumpkin Cheesecake Bars
Every year when the first cool breeze hits our neighborhood, my daughter asks if it is time for our favorite pumpkin bars yet. We started making these on a particularly messy rainy afternoon when we needed something sweet but did not want to wait for the oven to preheat. Personally I have found that the waiting part is the hardest, but the results are always worth the patience.
I remember the first time I made these, I didn’t let them chill long enough and we had to eat them with spoons, which was still a total hit with my family. Since then, I have learned that a few hours in the fridge makes all the difference for that perfect, clean slice. It has become a tradition to whip these up the night before our big family dinner so they are ready to go.
What Makes This No-Bake Pumpkin Cheesecake Bars Special
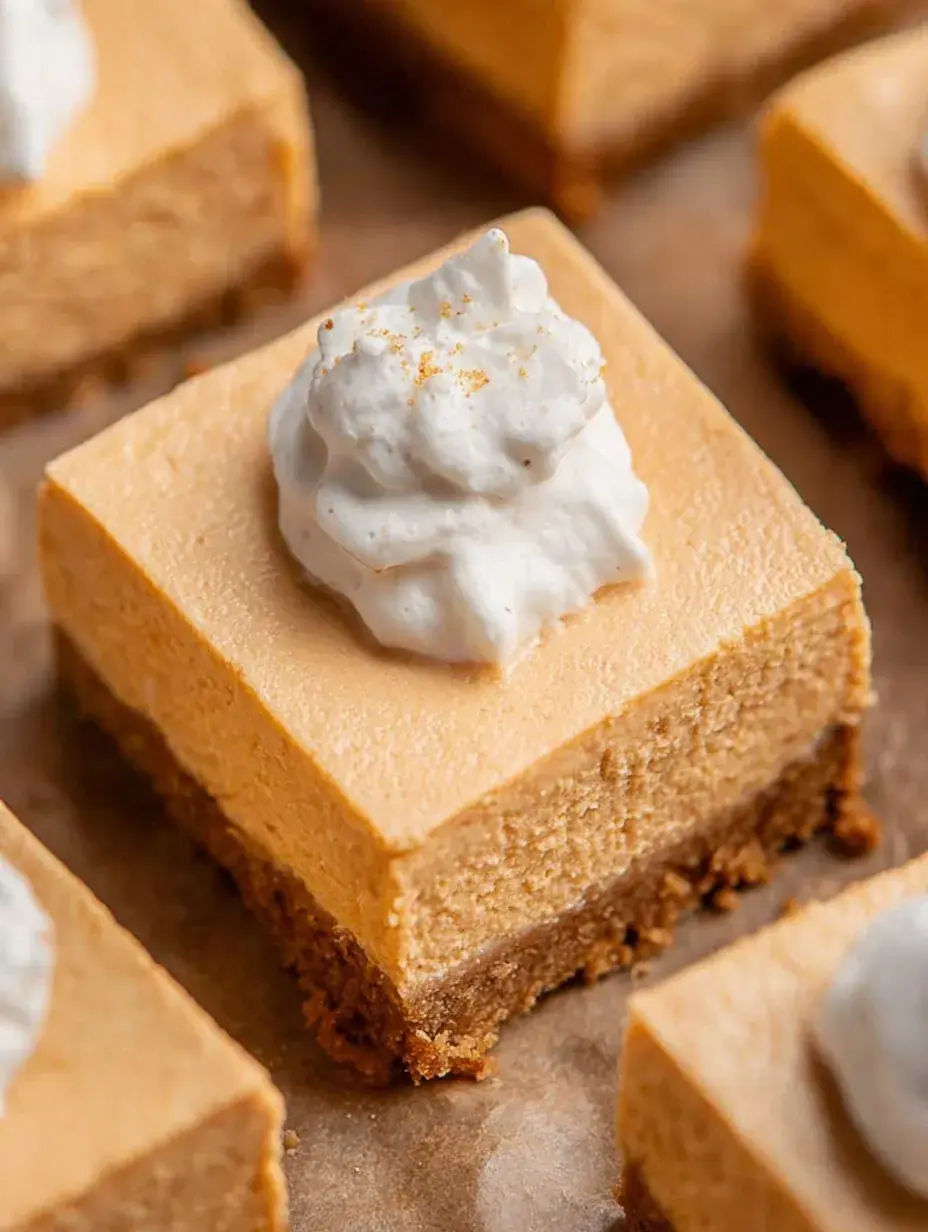
- Key feature: The texture is incredibly velvety and light, sitting somewhere between a mousse and a traditional cheesecake.
- Key ingredient: Real pumpkin puree provides that authentic autumn flavor that you just cannot get from extracts alone.
- Ease factor: This is a zero-oven recipe, making it ideal for when your stove is busy with a turkey or other holiday dishes.
- Seasonal fit: I usually make this from late September through Christmas because it captures the cozy spirit of the season so well.
- Kid-friendly note: Children love helping press the graham cracker crumbs into the pan and folding in the fluffy topping.
The Best No-Bake Pumpkin Cheesecake Bars Recipe
This is my go-to recipe when I want a dessert that looks impressive but actually takes very little active work in the kitchen. I made a batch of these last weekend for a small gathering and there wasn’t a single crumb left on the tray by the end of the night.
Ingredient Notes
- Cream Cheese: Use the full-fat blocks and ensure they are very soft to prevent any lumps in your filling.
- Pumpkin Puree: Make sure you buy plain pumpkin and not the pre-spiced pie filling for the best results.
- Graham Cracker Crumbs: These provide a sturdy, buttery base that balances the creamy topping perfectly.
- Pumpkin Pie Spice: This blend of cinnamon, ginger, and nutmeg is what gives the bars their signature cozy aroma.
- Whipped Topping: This acts as the stabilizer that keeps the bars fluffy and helps them hold their shape when sliced.
Instructions
- Line Pan. Cover an 8×8 inch baking pan with parchment paper so you can easily lift the bars out later. Make sure the paper hangs over the edges to act as handles.
- Mix Crust. Combine the crumbs, sugar, and melted butter until the mixture looks like wet sand. Press it very firmly into the bottom of the pan to create a solid, even layer.
- Beat Cheese. Use a hand mixer to whip the softened cream cheese until it is light and completely free of any lumps. This step is essential for a silky finish.
- Add Flavors. Mix in the pumpkin, powdered sugar, vanilla, and spices until the color is a uniform, beautiful orange. The filling should look thick and smell wonderful.
- Fold Topping. Use a rubber spatula to gently stir in the whipped topping until no white streaks are visible. Be careful not to stir too hard so you keep the air in the mixture.
- Chill Bars. Spread the filling over the crust and refrigerate for at least 4 hours. You will know they are ready when the center feels firm to a light touch.
Billy’s Tips and Mistakes to Avoid
- Tip 1: Do not rush the softening of the cream cheese or you will end up with tiny white dots in your orange filling. I usually leave mine out for at least two hours.
- Tip 2: Use the bottom of a flat measuring cup to press the crust down. I found that using my fingers often leads to an uneven base that falls apart.
- Tip 3: If you skip the parchment paper, the first bar will almost certainly break when you try to get it out of the pan.
- Tip 4: These bars actually taste even better on the second day after the spices have had more time to meld together.
- Tip 5: For the cleanest slices, wipe your knife with a warm, damp cloth between every single cut.
Storage Tips
Keep these bars in the refrigerator in an airtight container for up to 4 days. If you want to make them further in advance, they actually freeze quite well for up to a month. Just be sure to thaw them in the fridge for a few hours before you plan to serve them to your guests.
Variations and Swaps
- Try using gingersnap crumbs instead of graham crackers for a spicier, more intense ginger flavor in the crust.
- You can use a dairy-free cream cheese and coconut whipped cream if you need a vegan-friendly version of this treat.
- My daughter loves to sprinkle extra cinnamon or even a few mini chocolate chips on top right before serving.
Why This Recipe Works Every Time
The combination of the cold, creamy filling and the slightly salty crunch of the crust is what makes these so addictive. They aren’t as heavy as a baked cheesecake, so you don’t feel weighed down after having a square. It is a simple balance of textures that feels very sophisticated without any of the stress of traditional baking.
I adjusted the sugar levels after my husband said the first batch I ever made was a bit too sweet for his liking. By using powdered sugar instead of granulated in the filling, I found the bars have a much smoother mouthfeel. It is these little tweaks that make the recipe reliable for any family gathering.
Ingredients
- 1 1/2 cups graham cracker crumbs
- 1/4 cup granulated sugar
- 6 tablespoons unsalted butter, melted
- 16 ounces cream cheese, softened to room temperature
- 1 cup pumpkin puree (not pie filling)
- 1 cup powdered sugar
- 1 teaspoon vanilla extract
- 1 1/2 teaspoons pumpkin pie spice
- 8 ounces whipped topping, thawed
Instructions
- Line an 8x8 inch baking pan with parchment paper, leaving an overhang on the sides for easy removal.
- In a medium bowl, combine graham cracker crumbs, granulated sugar, and melted butter until the mixture resembles wet sand.
- Press the crumb mixture firmly into the bottom of the prepared pan in an even layer.
- In a large mixing bowl, beat the softened cream cheese until smooth and free of lumps.
- Add the pumpkin puree, powdered sugar, vanilla extract, and pumpkin pie spice to the cream cheese; beat until fully incorporated and smooth.
- Gently fold in the whipped topping using a rubber spatula until the mixture is uniform in color.
- Spread the pumpkin filling evenly over the crust and smooth the surface with an offset spatula.
- Refrigerate for at least 4 hours or until firm before lifting out of the pan and slicing into 12 bars.
Frequently Asked Questions
Can I use homemade pumpkin puree for these bars?
You can, but make sure you strain it well through a cheesecloth first. Homemade puree tends to be much more watery than the canned version, which could make your cheesecake bars too soft to slice.
How long do the bars need to set in the fridge?
I recommend at least 4 hours, but honestly, overnight is even better. This gives the filling time to fully stabilize and the crust time to set firmly with the butter.
Can I substitute the whipped topping for real whipped cream?
You can use homemade whipped cream, but you will need to stabilize it with a little extra powdered sugar or gelatin. Whipped topping is much sturdier and keeps the bars from wilting if they sit out on a dessert table.
The Bottom Line
There is something so special about a dessert that brings the family together without keeping me stuck in the kitchen all afternoon. Whether you are hosting a big holiday party or just want a cozy treat for a Sunday night, these bars are a perfect choice. Sweet moments don’t have to be complicated. Let’s make something wonderful together.
I hope these bars bring a little bit of autumn magic to your kitchen this week. Happy baking and stay cozy! Billy
Billy