Running out of fresh dessert ideas for lunchbox treats mid-week?
Why You’ll Love This Spooky Halloween Hand Pies
These hand pies are built for a make-ahead habit: assemble, chill briefly, and finish with a quick bake when you need them. I like making a batch on a Sunday so my daughter and I can grab one for lunches or an after-school snack during the week.
They keep their charm whether you bake them the same day or warm them later, and the assembly is simple enough that my kiddo helps press seams and add the “bandages.” Having a stored stash of these feels like a tiny kitchen victory mid-week.
What Makes this Recipe Unique
– Speed: Ready quickly because you use refrigerated pie crusts and jam, so assembly moves fast.
– Jam-forward filling: The red berry jam gives a bright, gooey center that needs no cooking beforehand.
– Simple technique: Egg wash and basic crimping create a neat seal without fancy tools.
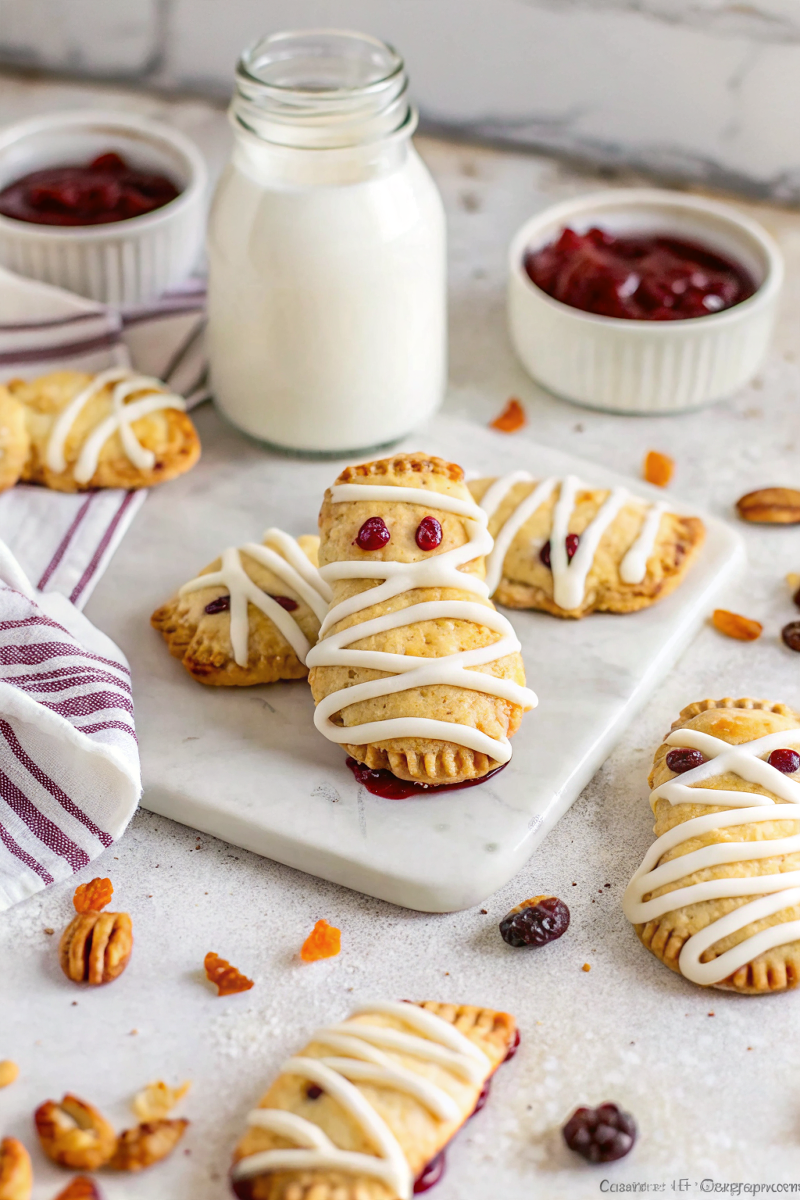
– Playful look: Thin dough strips mimic mummy bandages for a spooky, family-friendly finish.
– Make-ahead friendly: Chill before baking so shapes hold up and you can time the oven to dinner or school pickup.
Estimated Macros & Calories
A quick estimate to help plan your lunchbox treats. (estimated per serving, without optional ingredients)
- Calories: 170
- Protein: 2 g
- Carbohydrates: twenty-two g
- Fat: 9 g
- Fiber: 1 g
The Most Authentic Spooky Halloween Hand Pies Recipe
Direct and matter-of-fact: follow the steps below in order and you’ll have warm, golden hand pies with a pretty white glaze accent.
Ingredient Notes
– Refrigerated pie crusts: These give flaky, buttery layers with minimal effort; keep scraps to roll and reuse.
– Red berry jam: Provides the filling; choose raspberry, cherry, or mixed berry for that bright red color.
– Fresh lemon zest (optional): Brightens and balances the jam if you decide to stir it in.
– Egg (for egg wash): Beaten with a little water, it helps the edges stick and gives a glossy finish. Don’t skip it or the strips won’t adhere as well.
– Powdered sugar, milk, and vanilla: Make a simple white glaze that pipes easily; thin with a little milk until it flows.
– Mini chocolate chips or black gel coloring (optional): Use these to dot pupils on the eyes if you want more contrast.
Instructions
Step 1: Warm the oven and prep pans
Heat the oven to the stated temperature and line baking sheets with parchment; keep an empty sheet nearby for assembling pies. Organization at this stage saves time once the filling starts going on.
Step 2: Cut the shapes
Unroll a pie crust on a lightly floured surface and cut shapes with a small cutter or a hand-shaped template, then repeat with the rest. Save scraps to roll thinly and cut more shapes so nothing goes to waste.
Step 3: Brighten the jam
Stir the jam together with the lemon zest in a small bowl until evenly combined to lift the flavor. This step helps balance sweetness and adds a little zip.
Step 4: Fill the crusts
Place half of the cut shapes on the prepared sheet and spoon a small dollop of jam into the center of each, taking care not to overfill. Leaving the edges clear makes sealing easier.
Step 5: Seal the pies
Brush a thin ring of beaten egg around each filled shape, cover with a second shape, and press the edges together with your fingers. Use a fork or a thumb to make a decorative edge and ensure a good seal.
Step 6: Add the mummy bandages and vents
Trim excess dough and roll scraps into thin strips, then lay them across the tops diagonally to create a bandage effect and press the ends into the edges. Make two small vents by poking holes or slits so steam can escape.
Step 7: Chill before baking
Set the assembled pies on a baking sheet in the fridge to firm up; chilling helps the shapes keep their form while baking. This is the perfect moment to tidy the counter while the dough rests.
Step 8: Egg wash and bake
Brush the chilled pies with the remaining egg wash and bake in the center of the oven, rotating the pans halfway through, until the crusts are puffed and golden. Keep an eye on color and puff as your cue.
Step 9: Cool before glazing
Move the pies to a wire rack and let them cool until the jam has set enough that it won’t run when you decorate. Cooling also makes handling easier for piping.
Step 10: Make the glaze
Whisk powdered sugar with a splash of milk and the vanilla until smooth and easy to pipe; add a touch more milk only if needed. Spoon the glaze into a small piping bag or a resealable bag with a corner snipped off.
Step 11: Decorate like a mummy
Pipe thin zigzags of glaze to emphasize the bandages, then dot two small circles of glaze for eyes and add tiny pupils with a drop of black gel coloring or mini chocolate chips if you like. Let the glaze set before serving.
Tips and Mistakes to Avoid
– Chill the assembled pies briefly; skipping this makes them lose shape during baking.
– Avoid overfilling with jam or seams will leak; a small amount in the center is all you need.
– Patch or press seams firmly and use egg wash around edges so the top and bottom stick together.
– Roll scraps thinly so the bandage strips bake through without creating thick lumps.
– If a strip lifts while baking, press it down gently before glazing so it sets into place.
Storage Tips
Store cooled pies in an airtight container in the fridge if you plan to keep them for a few days, or freeze them for longer storage and bake or reheat from frozen. Warm them briefly in the oven before serving to refresh the crust, or bring frozen pies to room temperature then reheat until hot.
Variations and Substitutions
– Swap the jam for a different red berry flavor among the listed options to change the filling profile.
– Use mini chocolate chips for pupils as noted in the recipe instead of coloring.
– For a gluten-free option, choose a gluten-free refrigerated pie crust product in place of the standard pie crusts.
– For dairy-free glaze, substitute a nondairy milk in place of the milk listed when thinning the powdered sugar.
Why This Recipe Is The Real Deal
Simplicity is the point: store-bought crusts, spoonable jam, and a quick glaze mean real improvement to your week without fuss. I usually make a batch with my daughter helping the decorating, and it’s genuinely one of those recipes I return to whenever I need an easy, cheery treat.
The steps are straightforward and forgiving, so you can relax about imperfections and focus on timing your baking around school pickup or dinner. These pies let you keep a steady make-ahead habit that actually gets used.
The Bottom Line
These Spooky Halloween Hand Pies are a practical, make-ahead answer to mid-week lunchbox boredom — fun to assemble, easy to store, and pretty to decorate with kids; try them and leave a note about how your family decorated theirs.
Billy Mackenzie
Founder of MerryDessert.com
Simple, joyful homemade desserts — sweet moments, made with love.
Spooky Halloween Hand Pies
Ingredients
Pastry
- 2 boxes refrigerated pie crusts (4 crusts total)
Filling
- 1/3 cup red berry jam (raspberry, cherry, or mixed berry)
- 1 tsp fresh lemon zest optional, brightens the filling
Wash & Glaze
- 1 large egg beaten with about 1 tsp water for egg wash
- 1/3 cup powdered sugar
- 1-2 tbsp milk to thin the glaze as needed
- 1/2 tsp vanilla extract added to the glaze
Instructions
Preparation Steps
- Heat the oven to 375°F and line two baking sheets with parchment paper. Keep one sheet nearby for assembling the pies before chilling.
- Unroll one pie crust on a lightly floured surface. Using a 3-inch round or hand-shaped cookie cutter (or a small rectangular template), cut as many shapes as you can. Repeat with remaining crusts. Reserve scraps to roll once more and cut additional shapes.
- In a small bowl, stir the jam together with the lemon zest until evenly combined. This brightens the jam and helps balance sweetness.
- Place half of the cut shapes on the prepared baking sheet. Spoon about 1 teaspoon of jam into the center of each shape — avoid overfilling so seams seal well.
- Brush a thin ring of beaten egg around the edge of each filled shape. Cover each with a second cut shape and press the edges together with your fingers to seal. Use the tines of a fork or press lightly with a thumb to create a decorative edge.
- Trim any excess dough and use the scraps to roll thin 1/4-inch strips. Lay the strips across the top of each pie diagonally to create a 'bandage' or mummy effect; press the ends into the edge to secure. Make two tiny holes or small slits for vents.
- Set the assembled hand pies on a baking sheet and refrigerate them for 8–10 minutes. Chilling firms the dough so the shapes hold up better while baking.
- Brush the tops of the chilled pies with the remaining egg wash. Bake in the center of the oven for 14–16 minutes, rotating the pans halfway through, until the crusts are puffed and golden-brown.
- Transfer pies to a wire rack to cool for at least 15 minutes before glazing so the jam doesn’t run.
- Whisk together powdered sugar, 1 tablespoon milk and the vanilla extract until smooth and pipeable; add up to 1 more tablespoon milk if needed. Spoon the glaze into a small piping bag or a resealable bag with a corner snipped.
- Pipe thin zigzags of white glaze to accentuate the mummy bandages. For eyes, dot two small circles of glaze and — if desired — tint a tiny bit with a drop of black gel coloring or use mini chocolate chips for pupils. Let the glaze set about 20 minutes before serving.