Have you ever wanted to make Classic Churros at home but felt a little intimidated by the idea of frying dough? That was exactly how I felt until a quiet Sunday afternoon when my daughter begged for a special treat. We realized we already had every single ingredient in our pantry, and the results were better than any carnival snack.
Why You Will Love This Classic Churros
I first discovered how simple these were during a rainy weekend when we ran out of cookies. I always thought you needed special equipment or years of practice to get that perfect crunch, but I was so surprised by how basic the dough really is. It felt like finding a little bit of magic in my own pantry using just flour and butter.
Honestly, the first time I made them, I was worried the center would stay raw, but they came out perfectly fluffy. My daughter actually preferred my homemade Classic Churros over the ones we get at the local fair. It has become our favorite little secret for when we want a treat that feels special without the fuss.
What Makes This Classic Churros Special
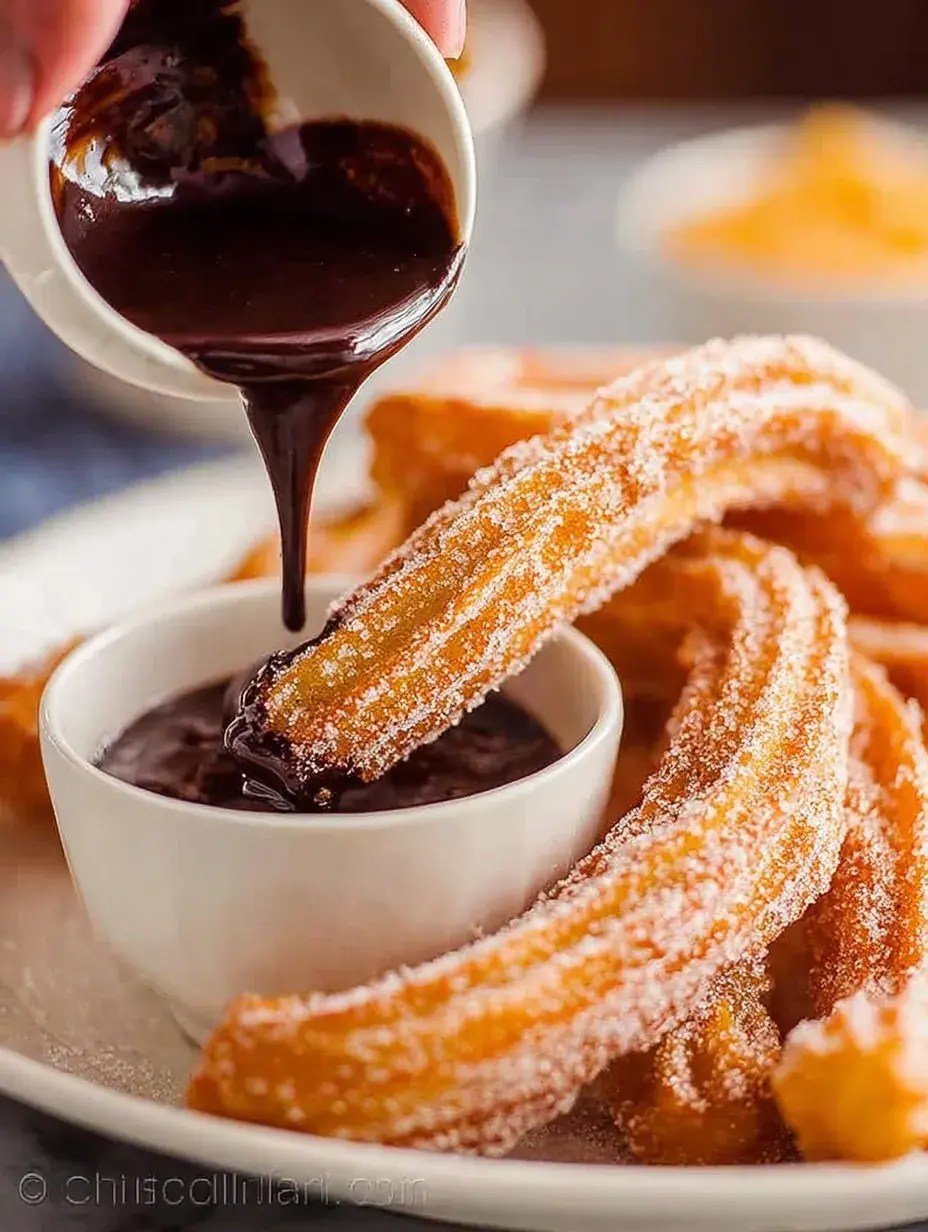
The texture is what really sets this recipe apart from others I have tried. You get that incredible golden crunch on the outside that yields to a soft, almost cloud-like center.
Using a closed-star tip creates those deep ridges that hold onto the cinnamon sugar perfectly. It ensures every single bite is covered in that sweet, spiced coating.
It is a wonderful way to get kids involved in the kitchen safely. My daughter loves whisking the sugar and cinnamon together while I handle the frying part.
The Best Classic Churros Recipe
This recipe has become a staple for us during the holiday season. It is surprisingly quick to whip up when you have friends dropping by for a warm drink and a chat.
Ingredient Notes
- Unsalted Butter: This adds a rich, creamy flavor to the dough and helps create that tender interior.
- All-Purpose Flour: I find this provides the best structure so the dough doesn’t fall apart in the oil.
- Large Egg: Beating this in gives the dough its beautiful golden color and helps it puff up while frying.
- Cinnamon and Sugar: This is the classic finishing touch that you shouldn’t skimp on for that authentic taste.
- Vegetable Oil: I prefer using a neutral oil with a high smoke point to get that perfect crispy finish without any burnt aftertaste.
Instructions
- Boil the Base. Combine the water, butter, sugar, and salt in a pan and bring it to a rolling boil. You want the butter completely melted and the mixture bubbling before you move to the next step.
- Incorporate the Flour. Remove from the heat and stir in the flour quickly until it forms a smooth, thick ball of dough. It should pull away from the sides of the pan and look slightly matte.
- Cool and Egg. Let the dough rest for five minutes so you don’t scramble the egg when you add it. Beat in the egg and vanilla until the mixture looks glossy and feels slightly tacky to the touch.
- Heat the Oil. Warm your oil in a heavy pot until it reaches the right temperature for frying. You can test it with a small scrap of dough; it should sizzle and float immediately.
- Pipe and Cut. Squeeze the dough through a pastry bag directly into the oil, using scissors to snip off the ends. Aim for about four inches long so they are easy to flip and eat.
- Fry and Coat. Cook them until they are a deep golden brown on all sides, then drain them quickly on paper. Toss them in the cinnamon sugar while they are still hot so the coating sticks well.
Billy’s Tips and Mistakes to Avoid
- Tip 1: Don’t rush adding the egg; if the dough is too hot, it will cook the egg and ruin the texture. I learned this the hard way during my first attempt.
- Tip 2: Keep your oil temperature steady because if it drops too low, the dough will soak up oil and become greasy.
- Tip 3: Use a sturdy pastry bag as the dough is quite thick and can easily burst through thinner plastic ones.
- Tip 4: You can make the dough an hour ahead of time and keep it covered at room temperature before frying.
- Tip 5: Let your kids handle the sugar coating step with a shallow bowl to keep the mess contained and fun.
Storage Tips
These are definitely best eaten fresh and warm, but you can keep leftovers in an airtight container at room temperature for up to 2 days. If they lose their crunch, just pop them in a warm oven or air fryer for 3 minutes to crisp them back up. I do not recommend freezing them after they have been fried as they tend to get quite tough.
Variations and Swaps
- Try dipping the finished treats into a warm dark chocolate ganache for a richer experience.
- I sometimes add a pinch of nutmeg to the sugar coating for a more festive, wintery flavor profile.
- For a dairy-free version, I have successfully used a plant-based butter stick instead of dairy butter.
Why This Recipe Works Every Time
The secret is the choux-style dough which creates steam inside as it fries. This is what makes the centers so light and airy while the outside turns into a crispy shell.
I spent a few afternoons testing different flour-to-water ratios to make sure the dough was thick enough to hold its shape to make these Classic Churros. I found that letting the dough cool slightly before adding the egg was the one detail that changed everything for the better.
Ingredients
- 250 ml wate r
- 50 g unsalted butter
- 2 tablespoons granulated sugar
- 1/2 teaspoon sal t
- 150 g all -purpose flour
- 1 large eg g
- 1 teaspoon vanilla extract
- 1 liter vegetable oil for deep frying
- 100 g granulated sugar for coating
- 1 tablespoon ground cinnamon
Instructions
- In a medium saucepan, combine water, butter, 2 tablespoons sugar, and salt. Bring to a boil over medium-high heat.
- Remove saucepan from heat and stir in the flour with a wooden spoon until a smooth ball of dough forms.
- Allow the dough to cool for 5 minutes, then beat in the egg and vanilla extract until the mixture is glossy and smooth.
- Heat vegetable oil in a deep heavy-bottomed pot or Dutch oven to 375°F (190°C).
- Transfer the dough to a pastry bag fitted with a large closed-star tip.
- Pipe 4-inch lengths of dough into the hot oil, cutting the ends with kitchen shears.
- Fry 3 to 4 churros at a time for 2 to 3 minutes per side until evenly golden-brown.
- Remove churros with a slotted spoon and drain briefly on paper towels.
- In a shallow bowl, whisk together the coating sugar and cinnamon.
- While still warm, toss the fried churros in the cinnamon-sugar mixture until fully coated.
Frequently Asked Questions
How do you keep churros crispy?
The best way to keep them crispy is to avoid covering them while they are still warm, as steam will make them soft. If you need to refresh them later, a quick toast in the oven usually does the trick.
What is the secret to good churros?
The real secret is maintaining a consistent oil temperature of 375 degrees. If the oil is too cold, they become oily, but if it is too hot, the middle will stay raw while the outside burns.
Can you make Classic Churros dough ahead of time?
Yes, you can prepare the dough and keep it in the piping bag at room temperature for about an hour. I have found that frying it fresh gives the best rise and texture compared to dough that has been chilled.
The Bottom Line
Making these at home is such a joyful way to spend an afternoon with the people you love. They are simple, sweet, and always bring a smile to my daughter’s face. Sweet moments don’t have to be complicated. Let’s make something wonderful together.
I hope your kitchen smells as wonderful as mine does right now with all that cinnamon in the air. Happy baking and stay cozy! Billy
Billy