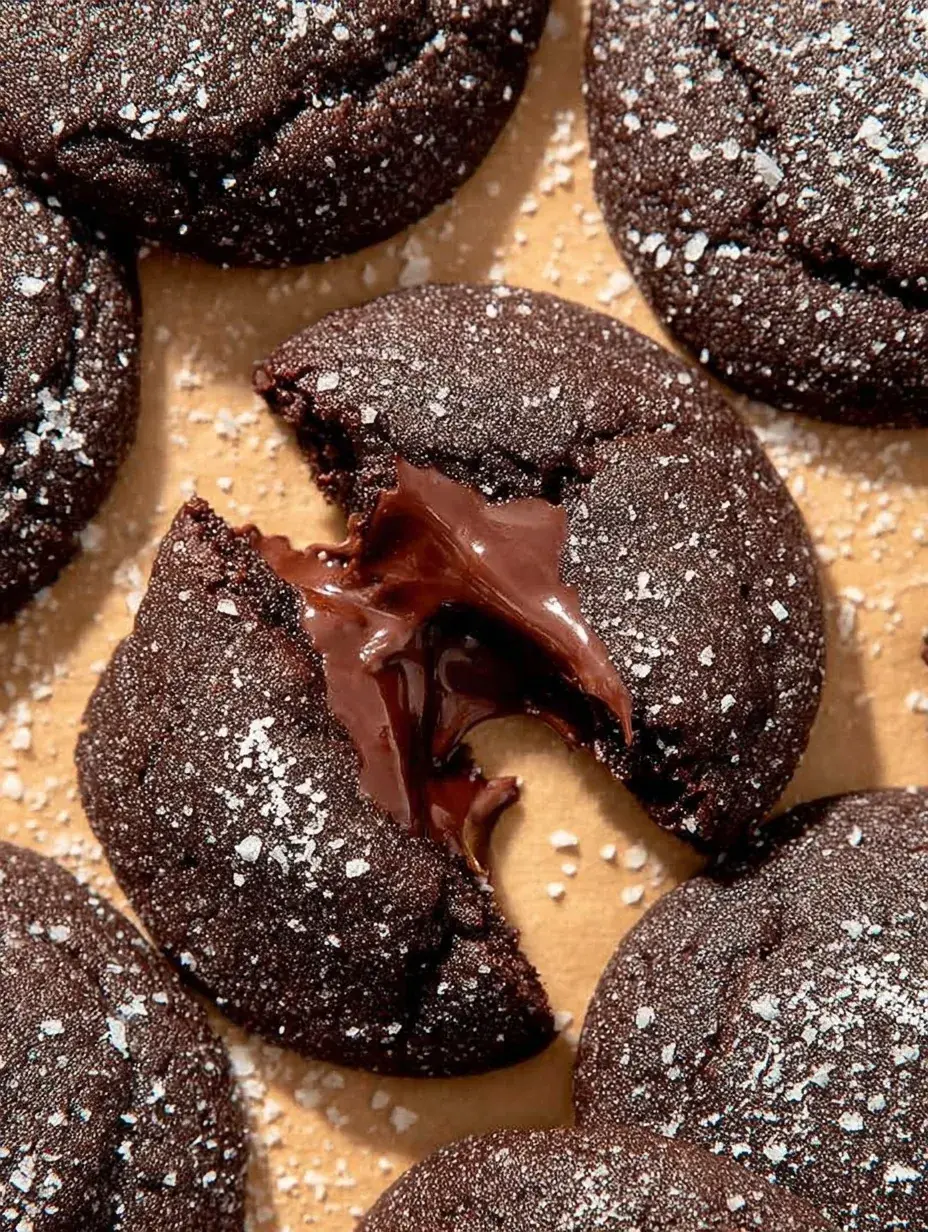
Honestly, the first time I tried making these, the chocolate center leaked out all over my baking sheet because I did not seal the dough well enough. My daughter just laughed and said they looked like little volcanoes, but once we tasted that gooey middle, I knew I had to get it right. These Chocolate Lava Cookies are now our favorite rainy afternoon treat when we want something extra special.
Why You Will Love This Chocolate Lava Cookies
I stumbled upon the idea for this dessert during a particularly cold December when I could not decide between a chocolate chip cookie and a molten lava cake. I spent a whole afternoon in the kitchen experimenting with different ways to tuck a chocolate ganache inside a dough that would not fall apart in the oven.
The surprise on my husband’s face when he took his first bite and discovered the warm chocolate center was all the proof I needed that this was a keeper. Personally, I have found that the contrast between the soft dough and the liquid center makes these feel much fancier than they actually are to bake.
What Makes This Chocolate Lava Cookies Special
- The Molten Heart: The center stays liquid and rich even after the cookie sets, giving you that restaurant-style dessert feeling right at home.
- Deep Cocoa Base: Using a high-quality unsweetened cocoa powder creates a dark, fudgy exterior that perfectly balances the sweet chocolate filling.
- Make-Ahead Magic: You can prep the ganache balls days in advance, making the final assembly feel much less rushed when guests are coming over.
- Kid-Friendly Assembly: My daughter loves being the ganache sealer, helping me pinch the dough shut to make sure no chocolate escapes.
- Perfect Texture Contrast: You get the slightly crispy edges of a classic cookie paired with the velvet-smooth texture of a truffle in every single bite.
The Best Chocolate Lava Cookies Recipe
It feels like a little bit of kitchen magic every time these come out of the oven. I usually make a batch when the house feels a bit too quiet and we need a sweet, chocolatey pick-me-up to brighten the day.
Ingredient Notes
- Unsalted Butter: Softened butter is key here for a smooth dough that wraps easily around the frozen center without cracking.
- Heavy Cream: This is what makes the ganache filling stay soft and flowy instead of turning into a hard chocolate chunk.
- Semi-Sweet Chocolate: I prefer chopping up a bar for the center because it melts much more smoothly than standard chocolate chips.
- Cocoa Powder: This provides the structural fudge factor for the outer cookie layer.
- Brown Sugar: I always pack mine tightly to ensure the cookies stay soft and chewy rather than becoming dry or crumbly.
Instructions
- Freeze the Center. Melt the heavy cream and chocolate together, then chill the mixture until it is firm enough to scoop into small balls. These need to go into the freezer until they are completely solid so they do not melt too fast while baking.
- Cream the Sugars. Beat your softened butter with both sugars until the mixture looks pale and fluffy. This step creates the base that holds everything together and ensures a soft crumb.
- Mix the Wet. Add your egg and vanilla, beating until everything is well combined and smooth. I usually stop to scrape the sides of the bowl to make sure no butter is left behind.
- Whisk the Dry. In a separate bowl, combine your flour, cocoa, baking soda, and salt to ensure even distribution. Slowly stir this into your butter mixture until a thick, dark dough forms.
- Stuff the Cookies. Flatten a scoop of dough and place a frozen chocolate ball in the middle. Carefully pinch the dough around it, rolling it into a smooth ball so the lava is fully trapped inside.
- Bake and Rest. Place them on your prepared sheet and bake until the edges look set. Let them sit for exactly five minutes before serving so the centers can settle into a liquid state.
Billy’s Tips and Mistakes to Avoid
- Seal them tight. If you leave even a tiny gap in the dough, the chocolate will leak out and create a sticky mess on your tray.
- Do not overbake. These cookies look soft when they come out, but they will firm up as they cool; twelve minutes is usually my sweet spot.
- Use frozen ganache. If the centers are just cold and not frozen solid, they will vanish into the cookie dough during baking.
- Prep the centers early. I often make the chocolate balls the night before to save time and ensure they are hard enough to handle.
- Keep the dough cool. If your kitchen is warm, pop the dough in the fridge for ten minutes before stuffing the cookies to make it less sticky.
Storage Tips
These Chocolate Lava Cookies are best eaten warm, but you can keep them in an airtight container at room temperature for up to 3 days. To get that lava effect back, I suggest popping one in the microwave for about 10 seconds. If you want to keep them longer, they stay fresh in the fridge for up to 5 days.
Variations and Swaps
- Try adding a tiny pinch of sea salt on top of each cookie before baking for a salted chocolate version.
- For a dairy-free twist, use a high-quality vegan butter stick and coconut cream for the ganache center.
- Stuff the center with a half teaspoon of peanut butter along with the chocolate for a fun surprise.
Why This Recipe Works Every Time
The secret is really in the temperature control between the frozen center and the room-temperature dough. I learned after a few failed attempts that if I rushed the freezing step, the lava would just become part of the cookie dough.
Now that I take my time with the chilling process, I get that perfect molten flow every single time we break one open. It is a reliable way to get a gourmet result without needing a professional pastry kitchen.
Ingredients
- 1/2 cup unsalted butter, softened
- 1/2 cup granulated sugar
- 1/2 cup light brown sugar, packed
- 1 large eg g
- 1 teaspoon vanilla extract
- 1 1/4 cups all -purpose flour
- 1/2 cup unsweetened cocoa powder
- 1/2 teaspoon baking soda
- 1/4 teaspoon sal t
- 4 ounces semi -sweet chocolate, chopped
- 1/4 cup heavy cream
Instructions
- Prepare the lava center by heating heavy cream until simmering, then pouring over chopped chocolate. Stir until smooth and refrigerate for 30 minutes until firm.
- Scoop the chilled ganache into 12 small balls and place them in the freezer for at least 20 minutes until solid.
- In a large bowl, cream together softened butter, granulated sugar, and brown sugar until light and fluffy.
- Beat in the egg and vanilla extract into the creamed mixture.
- In a separate bowl, whisk together flour, cocoa powder, baking soda, and salt.
- Gradually incorporate the dry ingredients into the wet ingredients until a uniform dough forms.
- Preheat oven to 350 degrees Fahrenheit (175 degrees Celsius) and line a baking sheet with parchment paper.
- Divide the cookie dough into 12 equal portions. Flatten each portion, place a frozen ganache ball in the center, and wrap the dough around it, ensuring it is completely sealed.
- Arrange cookies on the baking sheet and bake for 10 to 12 minutes until the edges are set but the centers remain soft.
- Allow cookies to rest on the baking sheet for 5 minutes before serving warm to ensure a liquid center.
Frequently Asked Questions
Can I use chocolate chips for the center?
You can, but chopped baking chocolate melts much better and gives you a more liquid center. Chocolate chips have stabilizers that help them keep their shape, which is the opposite of what we want for these Chocolate Lava Cookies.
Why did my cookies go flat?
This usually happens if the butter was too melted or if the kitchen was too warm while you were working. Try chilling your stuffed cookie balls for 15 minutes before putting them in the oven to help them hold their height.
Can I freeze the unbaked cookies?
Yes, you can assemble the cookies and freeze the whole ball. Just add an extra 2 minutes to the baking time when you are ready to eat them so the center has time to melt.
The Bottom Line
There is something so comforting about a warm cookie that has a hidden surprise inside. It is the kind of treat that makes a regular Tuesday feel like a celebration for the whole family. Sweet moments don’t have to be complicated. Let’s make something wonderful together.
I hope your kitchen smells as much like a chocolate factory as mine does right now. My daughter is already waiting by the oven with a cold glass of milk. Billy
Billy