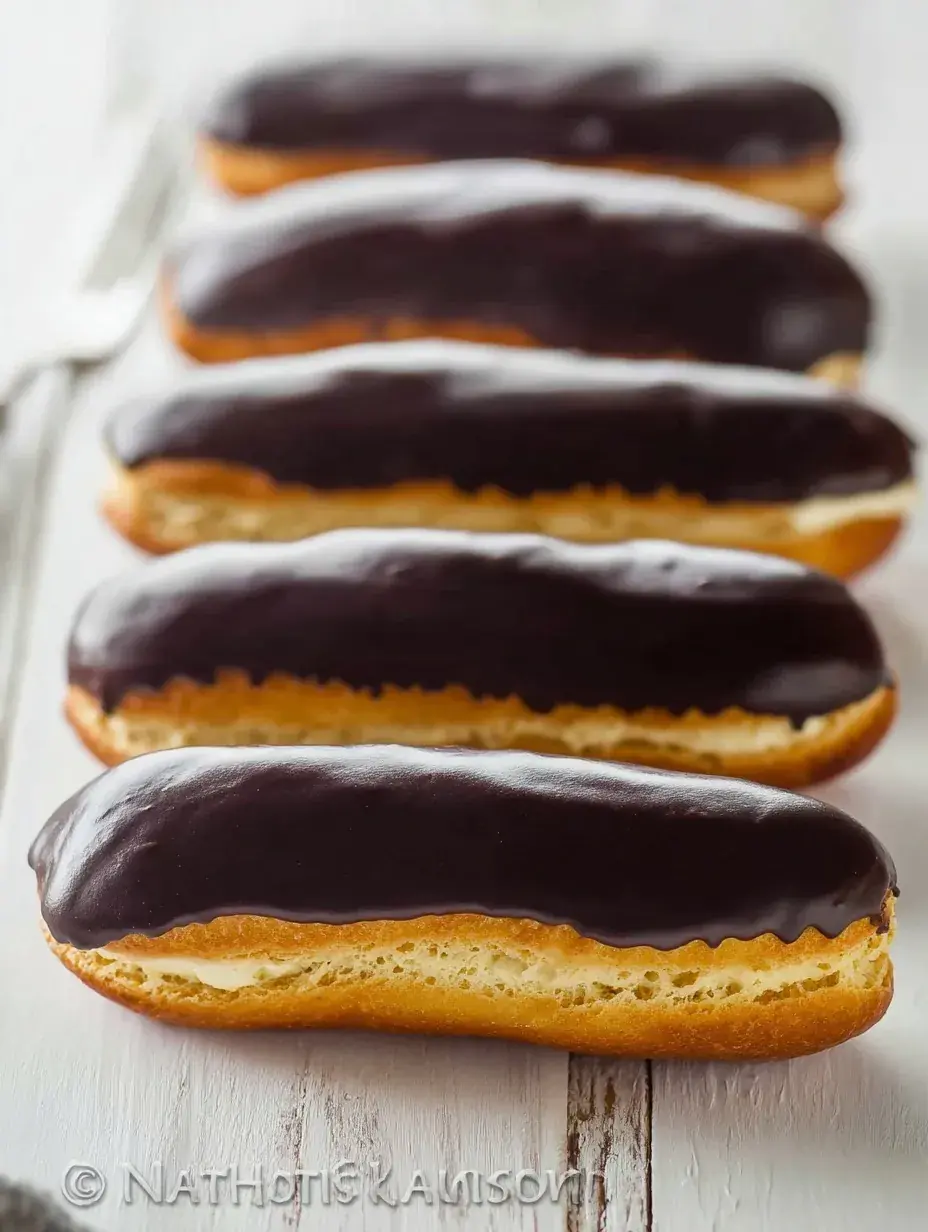
They look like they belong in a professional French patisserie window. Honestly, Classic Chocolate Eclairs are surprisingly manageable once you break down the steps in your own kitchen. My daughter and I love the way the house fills with the scent of buttery dough on a quiet afternoon.
Why You Will Love This Classic Chocolate Eclairs
I used to avoid making these because I was certain the dough would fail or the filling would be too thin. I clearly remember the first time I pulled a tray of these out of the oven and saw how beautifully they had puffed up. It was such a discovery to realize that something so elegant could be made with just a few basic pantry staples.
Since that first batch, I have found that they are the perfect way to make a simple weekend feel like a celebration. After testing this recipe several times, I learned that the secret is all in how you handle the dough before it even hits the oven.
What Makes This Classic Chocolate Eclairs Special
- The Airy Shell: This choux pastry creates a perfectly hollow center that is ready to hold plenty of sweet cream.
- Homemade Custard: Using real vanilla and egg yolks makes a filling that is much richer than any store-bought version.
- Glossy Ganache: The chocolate topping adds a beautiful shine and a deep, decadent flavor to every bite.
- Pantry Ingredients: You likely already have the butter, flour, and eggs needed to start this right now.
- Baking Together: It is a wonderful project for kids who want to help with the piping and dipping.
The Best Classic Chocolate Eclairs Recipe
I remember the first time I set these Classic Chocolate Eclairs on the table for a family dinner. Everyone went quiet, and then the smiles started as they realized I had actually made them from scratch.
Ingredient Notes
- Large Eggs: These provide the structure and the lift, so make sure they are at room temperature before you start.
- Unsalted Butter: I prefer using unsalted so I can control exactly how much salt goes into the delicate dough.
- Cornstarch: This is the secret to a pastry cream that is thick enough to stay inside the shell without running out.
- Semi-sweet Chocolate: Using a good quality chocolate bar for the glaze makes a world of difference in the final taste.
- Whole Milk: The extra fat in whole milk gives the custard that silky, luxurious mouthfeel we all love.
Instructions
- Boil Liquids. Combine the water, milk, butter, sugar, and salt in a pan and bring it to a rolling boil. You want the butter completely melted before the mixture starts to bubble.
- Cook Flour. Add the flour all at once and stir quickly until a ball forms and a light film appears on the bottom of the pan. This step dries out the dough so it can rise properly later.
- Incorporate Eggs. Beat the eggs into the cooled dough one at a time until it becomes glossy and holds its shape. It should slowly fall off your spoon in a V-shape.
- Pipe Shells. Use a piping bag to create four-inch logs on your prepared baking sheet. Leave plenty of space between them because they will double in size as they bake.
- Bake and Dry. Bake until they are golden brown, then prick each one with a toothpick immediately after taking them out. This lets the steam escape so the insides don’t get soggy.
- Fill and Glaze. Pipe the chilled pastry cream into the shells and dip the tops into your smooth chocolate ganache. Let them sit for a few minutes so the chocolate can set before serving.
Billy’s Tips and Mistakes to Avoid
- Never open the oven door during the first fifteen minutes of baking, or the shells might collapse. I learned this the hard way during my very first attempt!
- Make sure your pastry cream is completely chilled before you try to pipe it into the shells. If it is still warm, it will melt the shells and make a mess.
- If your dough is too runny, you likely added the eggs too fast or didn’t cook the flour long enough on the stove.
- Use a damp finger to smooth down any pointy tips on your piped dough before baking so they don’t burn in the hot oven.
- Let my daughter help with the dipping, as it is the best part, even if the chocolate ends up on her nose!
Storage Tips
These are definitely best the day they are made because the shells stay nice and crisp. You can store them in the fridge for up to 2 days in an airtight container, but they will soften over time. If you want to work ahead, you can bake the shells and store them at room temperature for a day before filling.
Variations and Swaps
- Try adding a teaspoon of instant espresso powder to the chocolate glaze for a mocha twist.
- For a lighter version, you can fill them with sweetened whipped cream instead of the traditional custard.
- Top the wet chocolate glaze with crushed sprinkles or toasted nuts to make them extra festive for a holiday party.
Why This Recipe Works Every Time
The balance of the crisp, hollow shell against the cool, creamy filling is what makes this dessert so iconic. By drying out the dough on the stovetop, we ensure there is enough room for that steam to puff them up perfectly every single time.
I personally found that tempering the eggs slowly into the hot milk is the most important part of the filling. The first time I tried it, I rushed and ended up with scrambled eggs, but now I know that patience leads to the smoothest custard imaginable.
Ingredients
- 1/2 cup whole milk
- 1/2 cup wate r
- 1/2 cup unsalted butter, cubed
- 1 teaspoon granulated sugar
- 1/4 teaspoon sal t
- 1 cup all -purpose flour
- 4 large eggs , room temperature
- 2 cups whole milk for pastry cream
- 1/2 cup granulated sugar for pastry cream
- 4 large egg yolks
- 1/4 cup cornstarc h
- 2 tablespoons unsalted butter for pastry cream
- 1 teaspoon vanilla extract
- 4 ounces semi -sweet chocolate, finely chopped
- 1/2 cup heavy cream
Instructions
- Preheat oven to 400°F (200°C) and line a large baking sheet with parchment paper.
- In a medium saucepan, combine 1/2 cup milk, water, 1/2 cup butter, 1 tsp sugar, and salt. Bring to a rolling boil over medium heat.
- Add the flour all at once and stir vigorously with a wooden spoon until a dough forms and pulls away from the sides of the pan. Continue to cook and stir for 2 minutes to dehydrate the dough.
- Transfer the dough to a stand mixer bowl. Beat on low speed for 1 minute to cool. Add eggs one at a time, beating thoroughly after each addition until the batter is smooth and glossy.
- Transfer dough to a piping bag fitted with a large 1/2-inch round tip. Pipe 4-inch long logs onto the baking sheet, spaced 2 inches apart.
- Bake at 400°F for 15 minutes, then reduce heat to 375°F (190°C) and bake for 20 more minutes until golden brown. Prick each shell with a toothpick to release steam and cool completely on a wire rack.
- To make pastry cream: Whisk egg yolks, 1/2 cup sugar, and cornstarch in a bowl. Heat 2 cups milk until simmering, then slowly whisk into the egg mixture to temper. Return to the pan and cook over medium heat, whisking constantly until thick and boiling.
- Remove pastry cream from heat; stir in 2 tbsp butter and vanilla. Transfer to a bowl, cover with plastic wrap touching the surface, and chill for at least 1 hour.
- To make glaze: Heat heavy cream until just simmering, pour over chopped chocolate, let sit for 5 minutes, then whisk until smooth.
- Fit a piping bag with a small round tip and fill with chilled pastry cream. Poke two holes in the bottom of each cooled shell and pipe in the cream until full. Dip the tops of the eclairs into the chocolate glaze and let set.
Frequently Asked Questions
How do I store Classic Chocolate Eclairs?
Keep them in an airtight container in the refrigerator for up to 2 days. For the best texture, I suggest waiting to fill them until the day you plan to serve them.
Can I make the pastry cream ahead of time?
Yes, you absolutely should make it at least a few hours or even a day in advance. It needs time to chill and set properly in the fridge so it doesn’t leak out of the shells.
What if I do not have a piping bag?
You can use a large gallon-sized plastic bag and snip off the corner to pipe the dough and the filling. It might not be as precise as a metal tip, but it works perfectly well for a cozy home kitchen session.
The Bottom Line
There is something truly magical about turning simple ingredients like flour, eggs, and milk into a dessert that looks this fancy. Whether you are celebrating a holiday or just want to treat your family to something special, these will always bring a smile to the table. Sweet moments don’t have to be complicated. Let’s make something wonderful together.
I hope your kitchen stays warm and your chocolate stays melty this week. Happy baking from my family to yours! Billy
Billy