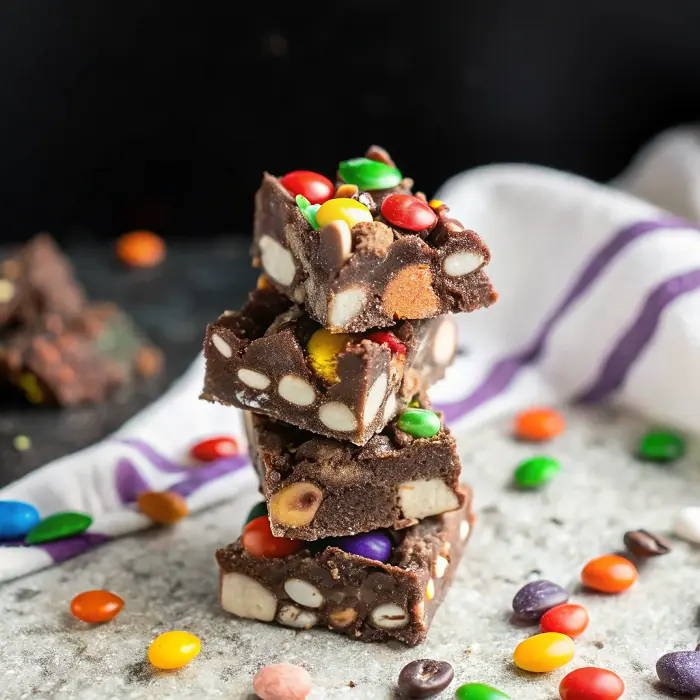
The kitchen smelled like melted chocolate and a little butter as I scraped the last of the bowl with a rubber spatula, trying to convince my daughter that two scoops of rocky road batter didn’t count as dinner. It was one of those weeknights that needed a fast sweet ending, so we pulled together chocolate, marshmallows, peanuts and chopped wafer candy and called it a party. She stirred, I swirled on spooky candy colors, and dinner ended on a gooey, crunchy note everyone was happy with.
Why You’ll Love This Halloween Rocky Road Treats
I keep coming back to rocky road because it’s forgiving at every turn — a little melted chocolate, some mix-ins, a quick chill and you have a dessert that looks like you put in way more work than you did. My baking observation: when chocolate is warm but not piping hot, it becomes very patient, letting you fold in peanuts, wafers and marshmallows without the whole thing turning into a melted puddle.
These are playful to assemble with kids, and the marbled candy melts make it feel seasonal without fuss. My daughter insists on arranging the gummy worms “her way,” which is half the fun and none of the stress.
What Makes this Recipe Unique
– Key ingredient — semi-sweet chocolate chips: the base that gives a fudgy, glossy body and lets the other textures shine.
– Method — melt-and-fold simplicity: no oven needed; melt, fold and chill for a handheld bar with layers of crunch and chew.
– Speedy shortcut: using chopped wafer candy and roasted peanuts adds instant crunch without baking or extra prep.
– Texture payoff: crispy wafer pieces meet fluffy mini marshmallows in a rich chocolate matrix for a mix of soft, gooey and crunchy in every bite.
– Playful finish: colorful candy melts and candy eyes give a marbled, seasonal look with minimal effort.
Estimated Macros & Calories
Rough estimates for a single piece, keeping toppings like gummy worms and candy eyes off the math. (estimated per serving, without optional ingredients)
- Calories: 275 kcal
- Protein: 3 g
- Carbohydrates: 25 g
- Fat: 20 g
- Fiber: 2 g
The Most Authentic Halloween Rocky Road Treats Recipe
This is the kind of recipe I reach for when the week runs away from me and we still want something festive. It’s casual, a little messy, and perfectly suited to a small pair of helping hands.
Ingredient Notes
– Semi-sweet chocolate chips: provides the glossy chocolate base; melt smoothly and carry the other flavors. Don’t skip these.
– Unsalted butter: adds richness and helps the chocolate set with a nicer snap; salt is added separately so you control the seasoning.
– Roasted peanuts (salted or unsalted): bring crunch and savory balance; salted peanuts add a touch of contrast, unsalted lets you control saltiness.
– Mini marshmallows: add soft, chewy pockets — fold them in last so they stay distinct and don’t fully dissolve.
– Kit Kat (or similar wafer candy): chopped wafers contribute crispy layers; rough chop so you get a mix of little bits and larger shards.
– Orange and black/purple candy melts: used for surface dollops and swirls; pick colors that scream Halloween and melt them separately for marbling.
– Gummy worms, Halloween M&M style candies, candy eyes, Halloween sprinkles: purely decorative and fun to arrange on top; place them on the surface so they remain whole when you cut.
Instructions
Step 1: Prepare the pan
Line a square pan with parchment, leaving a bit of overhang so you can lift the whole slab out later; a slightly bigger pan will give thinner squares if you prefer. Set it aside while you melt the chocolate.
Step 2: Melt chocolate and butter
Place the chocolate chips and butter in a heatproof bowl and melt together in short bursts in the microwave, stirring between each until smooth, or do it gently over barely simmering water. Stir in the sea salt and vanilla, then let the mixture rest briefly so it cools a touch but stays pourable.
Step 3: Prep mix-ins
Roughly chop the wafer bars and get the peanuts and mini marshmallows measured and ready. If using full-sized bars, cut them into bite-size pieces so they distribute evenly.
Step 4: Fold in the mix-ins
Fold the peanuts and chopped wafer pieces into the warm chocolate so they’re well coated — the candy coating on the wafers may soften a bit and that’s fine. Add the mini marshmallows last and fold gently so they keep their shape and don’t fully melt.
Step 5: Press into the pan
Spoon the rocky road mixture into the prepared pan and spread it so it reaches the corners, pressing lightly to make an even layer while avoiding squashing the marshmallows completely. An offset spatula helps, but a gentle hand works too.
Step 6: Add the marbled candy melts
Melt the candy melts in separate small bowls and drop spoonfuls of each color across the surface. Use a skewer or the tip of a knife to swirl the colors for a marbled Halloween look.
Step 7: Score and decorate
Mark cut lines on the surface with the point of a knife so you’ll have tidy edges later, then arrange gummy worms, candy eyes and M&Ms on top, keeping decorations away from the cut lines. If anything needs extra stick, dot a little melted chocolate under the piece.
Step 8: Chill until set
Chill the pan in the refrigerator until the slab is fully set — a couple of hours or overnight will give the firmest results. Lift it out using the parchment overhang and slice along the scored lines with a sharp knife; warming the knife briefly and drying it between cuts gives cleaner edges.
Step 9: Serve and enjoy
Store the squares chilled and bring them to room temperature for a few minutes before serving if you prefer a softer bite. My daughter always asks for a warm one straight from the fridge, and honestly, I do too.
Tips and Mistakes to Avoid
– Let the melted chocolate cool a bit before folding in wafers so the candy coating doesn’t entirely melt away.
– Add marshmallows at the end and fold gently; overmixing will make them disappear.
– When swirling candy melts, don’t overwork the surface or the colors will muddy — a few graceful lines is all you need.
– Score the slab before decorating so you don’t chop decorative pieces in half.
– Warm and dry your knife between cuts for neat squares.
Storage Tips
Keep the squares chilled in an airtight container for a few days; they stay best and firm in the refrigerator. They also freeze well if you want to stash extras for later — separate layers with parchment so they don’t stick. Let them sit briefly at room temperature before serving if you want a softer bite.
Variations and Substitutions
– Swap peanut timing: try folding in a bit more roasted peanuts if you like extra crunch, or use the salted/unsalted option listed to control saltiness.
– Color play: use the orange and black or purple candy melts listed to make different Halloween palettes or a single-color drizzle.
– Gluten-free option: omit the wafer candy and add extra peanuts and marshmallows for a naturally gluten-free slab without introducing new ingredients.
– Mix-in tweak: keep the Kit Kat pieces larger for big crunchy bites or chop finer for more even distribution.
Why This Recipe Is The Real Deal
The real draw here is texture. You get a fudgy chocolate base from the melted chips and butter, crispy shards from the wafer candy, and pillowy marshmallows that stand out — that contrast is what keeps everyone reaching back for one more piece. I love how a soft center and crunchy bits come together; it’s a simple construction that delivers layered mouthfeel.
I’ve made these for last-minute family desserts and for small holiday gatherings, and the contrast in texture is always the comment people mention first. My daughter will tell you the gummy worms are mandatory, which proves a point about presentation being half the appeal.
The Bottom Line
If you want an unfussy, slightly messy, very joyful way to end a weeknight meal, this rocky road hits the spot — minimal fuss, maximum nostalgic texture, and lots of room for kid-approved decoration. Try it, leave a note about how your kiddo arranged the worms, and tell me which candy combination stole the show.
Billy Mackenzie
Founder of MerryDessert.com
Simple, joyful homemade desserts — sweet moments, made with love.
Halloween Rocky Road Treats
Ingredients
Chocolate Base
- 12 oz semi-sweet chocolate chips
- 6 oz unsalted butter
- 1/4 tsp fine sea salt
- 1 tsp pure vanilla extract
Mix-ins
- 1 cup roasted peanuts (salted or unsalted)
- 1 1/3 cup mini marshmallows
- 8 mini bars Kit Kat (or similar wafer candy), roughly chopped
Decorations
- 4 oz orange candy melts
- 4 oz black or purple candy melts (or another color)
- gummy worms
- Halloween M&M style candies (ghoul mix)
- candy eyes (various sizes)
- Halloween sprinkles
Instructions
Preparation Steps
- Line an 8-inch square pan with parchment leaving an overhang for easy removal; an 9-inch pan works if you prefer thinner squares. Set aside.
- Place chocolate chips and butter in a heatproof bowl. Melt together in the microwave in 20–30 second bursts, stirring between each, until smooth. Alternatively, melt over a pot of barely simmering water (double boiler). Stir in the sea salt and vanilla. Allow the mixture to sit 3–4 minutes so it cools slightly but remains pourable.
- While the chocolate cools slightly, roughly chop the Kit Kat pieces and measure the peanuts and marshmallows. If using full-sized bars, cut into bite-size pieces so they distribute evenly.
- Fold the peanuts and chopped wafer pieces into the warm chocolate. The candy bar coating may soften — that's fine. Add the mini marshmallows last and fold gently so they keep their shape and don't fully melt.
- Spoon the rocky road mixture into the prepared pan and spread with an offset spatula so it reaches into the corners. Press lightly to compress the mixture into an even layer but avoid squashing the marshmallows completely.
- Melt the candy melts in separate small bowls (if using two colors) in 15–20 second bursts in the microwave, stirring until smooth. Dollop spoonfuls of each color on the surface of the rocky road and use a skewer or the tip of a knife to swirl for a marbled Halloween look.
- Mark cut lines on the surface with the point of a knife (for example 4 x 5 grid for 20 pieces). Arrange gummy worms, candy eyes and M&Ms on top, avoiding the cut lines so decorations aren’t sliced in half. If any pieces need extra adhesion, dot a little melted chocolate under them.
- Chill the pan in the refrigerator until fully set, at least 2 hours or overnight for best firmness. Remove from the pan using the parchment overhang and slice along the scored lines with a sharp knife (warming the knife under hot water and drying it between cuts yields cleaner edges).
- Store the rocky road squares in an airtight container in the fridge for up to one week. Bring to room temperature a few minutes before serving if you prefer a softer bite.