My daughter noticed the blue package of cookies on the counter and immediately dragged her stool over to the kitchen island. She knows exactly what happens when those cookies come out of the pantry. We spent the next twenty minutes laughing while she helped me crush them into little bits for our favorite white chocolate treat.
Why You Will Love This Oreo Fudge
I used to think making fudge required a candy thermometer and a lot of patience, which I rarely have on a busy weeknight. This recipe solves that stress because it uses the microwave and only takes a few minutes of active work before it goes into the fridge.
It is the ultimate solution for those times when you need a last-minute gift or a sweet treat for a school bake sale. Personally, I have found that having a reliable no-bake option in my back pocket keeps me from feeling overwhelmed during the holiday rush.
What Makes This Oreo Fudge Special
- No-Bake Simplicity: You do not even have to turn on the oven, making this perfect for warm days or when your stove is already full.
- White Chocolate Base: Using high-quality white chocolate chips creates a much creamier texture than traditional cocoa-based recipes.
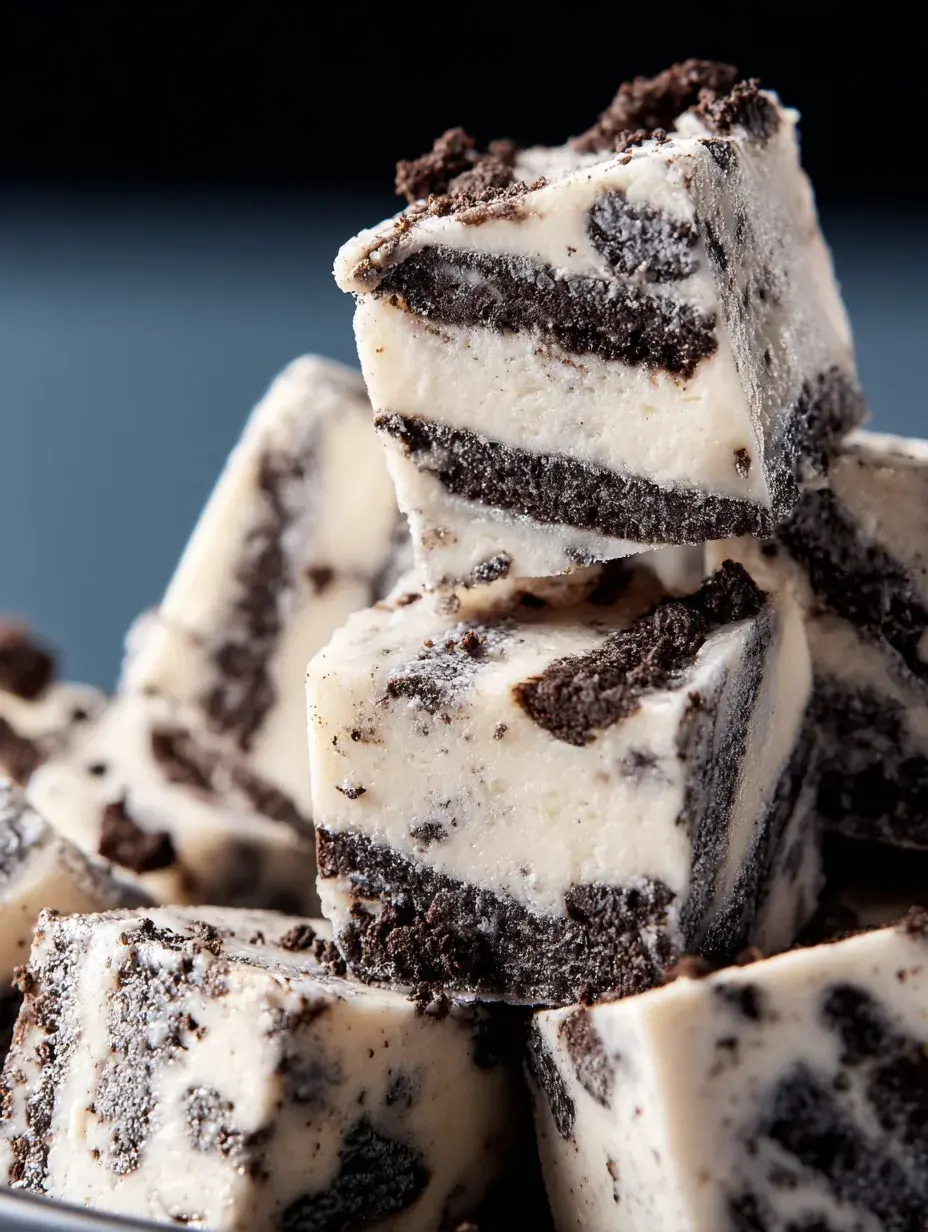
- Crunchy Cookie Texture: The contrast between the smooth fudge and the crispy cookie pieces makes every single bite interesting.
- Kid-Friendly Process: Little hands can easily help with crushing the cookies and stirring the mixture once it has cooled slightly.
The Best Oreo Fudge Recipe
This is the version we make every single Christmas Eve to leave out for Santa, though usually, we end up eating half the batch ourselves. It is thick, sweet, and exactly what a cookies and cream lover dreams about.
Ingredient Notes
- White Chocolate Chips: These provide the structure and sweetness, so I recommend using a brand you already enjoy eating.
- Sweetened Condensed Milk: This is the secret to that perfectly fudgy, chewy consistency without needing to boil sugar.
- Vanilla Extract: A little splash enhances the creamy flavor of the white chocolate and makes it taste more like a professional bakery treat.
- Oreo Cookies: I prefer the standard ones over the double-stuffed variety so the fudge holds its shape better.
- Salt: Just a pinch helps balance out the sweetness from the chocolate and the cookies.
Instructions
- Prep Pan. Line your 8×8 inch square pan with parchment paper so you can easily lift the whole block out later. Make sure the paper hangs over the edges like little handles.
- Melt Base. Place your white chocolate chips and condensed milk in a microwave-safe bowl. Heat them in 30-second bursts, stirring each time until the mixture looks glossy and smooth.
- Add Flavor. Stir in the vanilla and salt until they are completely blended into the warm chocolate. The mixture will start to thicken slightly at this stage.
- Fold Cookies. Gently stir in three-quarters of your crushed cookies using a spatula. You want them distributed evenly so every square has plenty of crunch.
- Spread Layer. Pour the fudge into your prepared pan and smooth the top with the back of a spoon. Press the remaining cookie crumbs into the surface while it is still sticky.
- Chill Firm. Place the pan in the refrigerator for at least 2 hours until it feels solid to the touch. Once it is set, lift it out by the parchment paper and slice into squares.
Billy’s Tips and Mistakes to Avoid
- Tip 1: Do not overheat the chocolate chips because white chocolate is very delicate and can grain easily. I always stop microwaving when there are still a few tiny lumps.
- Tip 2: Use a sharp knife dipped in hot water and wiped dry to get those clean, professional-looking slices.
- Tip 3: Avoid using the double-stuffed cookies because the extra cream filling can make the fudge a bit too soft.
- Tip 4: You can make this up to three days in advance and keep it in the fridge until you are ready to serve.
- Tip 5: Let your kids use a rolling pin to crush the cookies in a sealed bag; it is their favorite part and keeps the kitchen clean.
Storage Tips
This fudge stays fresh for up to 7 days when kept in an airtight container in the refrigerator. If you prefer a softer texture, you can leave it at room temperature for about 30 minutes before serving. You can also freeze individual squares for up to 60 days by wrapping them tightly in plastic wrap.
Variations and Swaps
- Try using golden Oreos or seasonal peppermint ones for a different flavor profile during the holidays.
- If you need a dairy-free version, use vegan white chocolate chips and a can of sweetened condensed coconut milk.
- Add a handful of mini chocolate chips or a drizzle of melted dark chocolate on top for extra indulgence.
Why This Recipe Works Every Time
The ratio of chocolate to condensed milk is specifically designed to set firmly without being rock hard. I spent a few batches figuring out that 21 ounces of chips is the sweet spot for a sturdy slice that still melts in your mouth.
Honestly, I once tried to use less chocolate and the Oreo Fudge never quite firmed up enough to cut properly. Now that I have the measurements down, it comes out perfectly every single time I make it with my daughter.

Ingredients
- 21 ounces white chocolate chips
- 14 ounces sweetened condensed milk
- 1 teaspoon vanilla extract
- 20 Oreo cookies , coarsely crushed
- 1/4 teaspoon sal t
Instructions
- Line an 8x8 inch square baking pan with parchment paper, leaving an overhang on the sides for easy removal.
- In a large microwave-safe bowl, combine the white chocolate chips and the sweetened condensed milk.
- Microwave the mixture in 30-second intervals, stirring thoroughly between each interval, until the chocolate is completely melted and the mixture is smooth.
- Stir in the vanilla extract and salt until fully incorporated.
- Gently fold in approximately three-quarters of the crushed Oreo cookies into the fudge base.
- Pour the mixture into the prepared baking pan and spread it into an even layer using a spatula.
- Press the remaining crushed Oreo pieces onto the top surface of the fudge.
- Refrigerate for at least 2 hours, or until the fudge is completely firm, before lifting from the pan and slicing into 24 squares.
Frequently Asked Questions
Can I use the stove instead of the microwave?
Yes, you can melt the chocolate and milk together in a small saucepan over low heat. Just make sure to stir constantly so the mixture does not burn on the bottom.
Why is my Oreo Fudge not setting?
This usually happens if the white chocolate was not melted fully or if the ratio was slightly off. Ensure you are using the full 21 ounces of chips for the best results.
Do I need to grease the parchment paper?
You do not need to grease it because the fudge has enough fat to peel away easily once chilled. The parchment is mainly there to help you lift the fudge out of the pan.
The Bottom Line
This simple treat is a wonderful way to bring a little extra joy to your kitchen without spending hours over a hot stove. Whether you are sharing it with neighbors or just enjoying a square with your coffee, it is always a hit. Sweet moments don’t have to be complicated. Let’s make something wonderful together.
I hope your kitchen smells like vanilla and cookies today, just like mine does whenever we whip this up. Have a cozy afternoon of baking! Billy
Billy