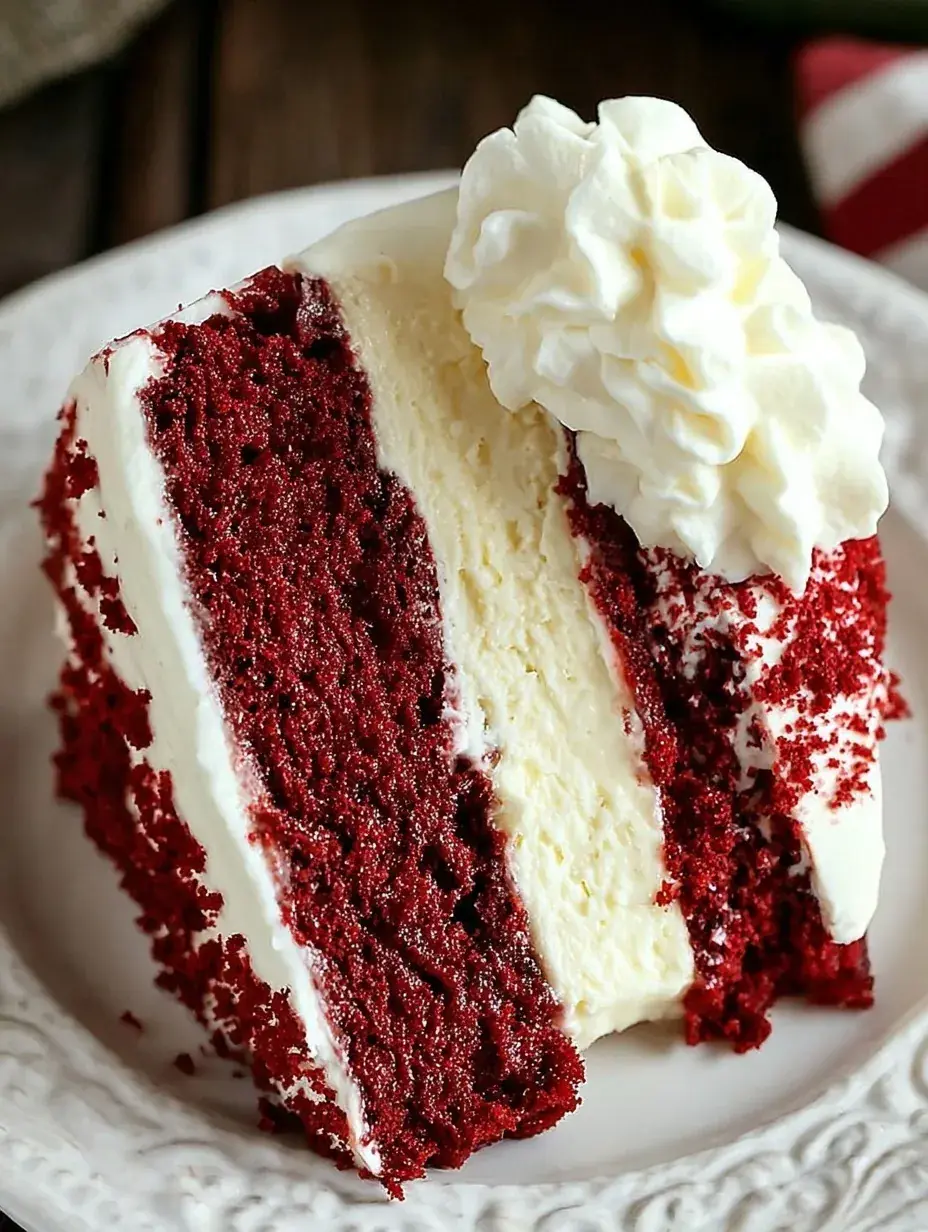
A slice of this cake feels like a holiday celebration all on its own. It took me a few tries to get the layers to stack properly, but the result is so worth it. My daughter loves watching the red batter swirl into the pans while we listen to carols.
Why You Will Love This Copycat Cheesecake Factory Red Velvet Cheesecake
I remember the first time I saw this towering cake at the restaurant and thought there was no way I could make that at home. It seemed so intimidating with those perfectly stacked layers of deep red cake and creamy cheesecake.
After experimenting in my kitchen one snowy afternoon, I realized the secret is just patience and plenty of chilling time. Honestly, I have found that this version tastes even better because the cream cheese frosting is so much fresher than anything from a box.
What Makes This Copycat Cheesecake Factory Red Velvet Cheesecake Special
- The Contrast: The deep cocoa flavor of the cake perfectly balances the tangy, dense vanilla cheesecake layer.
- Silky Frosting: Using a mix of butter and cream cheese creates a stable but melt-in-your-mouth finish.
- Visual Appeal: The bright red layers against the white frosting make this the absolute star of any holiday dessert table.
- Texture Layers: You get a mix of soft cake crumb and creamy filling in every single forkful.
The Best Copycat Cheesecake Factory Red Velvet Cheesecake Recipe
This Copycat Cheesecake Factory Red Velvet Cheesecake is the dessert I bring out when I really want to spoil my family during the holidays. It looks fancy and professional, but we just take it one step at a time together in the kitchen.
Ingredient Notes
- Cream Cheese: Use full-fat blocks for the best structure, and make sure they are very soft before you start mixing.
- Buttermilk: This is what makes the red velvet cake so tender, so please do not swap it for regular milk.
- Red Food Coloring: I prefer the gel kind for a vibrant color without adding too much extra liquid to the cake batter.
- Sour Cream: Adding this to the cheesecake layer gives it that signature tang and a incredibly smooth texture.
- White Chocolate: Shaving a high-quality bar with a vegetable peeler creates those beautiful curls for the sides of the cake.
Instructions
- Bake Cheesecake. Mix your cheesecake ingredients until smooth and bake in a water bath until the edges are set but the center remains jiggly. Let it cool completely and then chill it overnight so it is firm enough to handle later.
- Prep Cake Pans. Preheat your oven to 350 degrees and get those cake pans greased and floured well. I always line the bottoms with parchment paper to ensure the layers pop out without sticking.
- Mix Cake Batter. Whisk your dry ingredients before adding the buttermilk, oil, and red coloring until the batter is a vibrant red. You want a smooth batter but try not to overmix it or the cake texture might get tough.
- Bake and Cool. Divide the batter evenly and bake until a toothpick comes out clean from the center. Let these cool on a wire rack until they are room temperature before you even think about starting the frosting.
- Whip Frosting. Beat the cream cheese and butter until they look like fluffy white clouds. Gradually add the powdered sugar until the frosting is thick enough to hold its shape for decorating.
- Assemble Layers. Stack a cake layer, a thin spread of frosting, the chilled cheesecake, more frosting, and the final cake layer. Take your time smoothing the frosting over the sides before pressing the chocolate shavings into the edges.
Billy’s Tips and Mistakes to Avoid
- Do not rush the cooling process for the cheesecake layer. I once tried to assemble it while it was still slightly warm and the whole cake slid apart on the plate.
- Use a water bath for the cheesecake to prevent those annoying cracks that can happen from dry oven heat.
- Level your cake layers with a serrated knife so the cheesecake layer sits perfectly flat and stable.
- Refrigerate the completed cake for at least an hour before serving to let the frosting set up properly.
- Wipe your knife with a warm, damp cloth between every slice to get those clean, restaurant-style edges.
Storage Tips
Keep this cake in the fridge in an airtight container for up to 4 days. It actually tastes even better on the second day once the flavors have had time to meld together. You can also freeze individual slices wrapped tightly in plastic wrap for about a month if you have leftovers.
Variations and Swaps
- Try adding a handful of mini chocolate chips to the red velvet batter for an extra cocoa punch in every bite.
- Substitute a gluten-free 1-to-1 baking flour in the cake layers if you need to avoid gluten for your guests.
- Let your kids help press the white chocolate shavings onto the sides for a fun and festive decorating session.
Why This Recipe Works Every Time
The combination of a dense, New York-style cheesecake and a light, airy red velvet cake creates a balance that is hard to beat. It feels like serving two desserts in one, which is always a huge hit in my house during the holidays.
I learned after a failed batch that the buttermilk must be at room temperature before mixing. The first time I used cold buttermilk, the oil didn’t emulsify correctly and the cake texture turned out oily instead of soft.
Copycat Cheesecake Factory Red Velvet Cheesecake
Ingredients
- 24 oz cream cheese, softened (for cheesecake layer)
- 3/4 cup granulated sugar (for cheesecake layer)
- 3 large eggs (for cheesecake layer)
- 1/2 cup sour cream (for cheesecake layer)
- 1/3 cup heavy whipping cream (for cheesecake layer)
- 1 tsp vanilla extract (for cheesecake layer)
- 2 1/2 cups all -purpose flour
- 1 1/2 cups granulated sugar (for cake)
- 1 tsp baking soda
- 1 tsp sal t
- 1 tbsp unsweetened cocoa powder
- 1 1/2 cups vegetable oil
- 1 cup buttermilk , room temperature
- 2 large eggs (for cake)
- 2 tbsp red food coloring
- 1 tsp white distilled vinegar
- 1 tsp vanilla extract (for cake)
- 16 oz cream cheese, softened (for frosting)
- 1/2 cup unsalted butter, softened
- 4 cups powdered sugar, sifted
- 1 tbsp vanilla extract (for frosting)
- 4 oz white chocolate, shaved (for garnish)
Instructions
- Preheat oven to 325°F (163°C). Grease a 9-inch springform pan and line the bottom with parchment paper. Wrap the exterior of the pan in double layers of heavy-duty aluminum foil to waterproof it.
- Prepare the cheesecake batter: Beat 24 oz cream cheese and 3/4 cup sugar until smooth. Incorporate eggs one at a time, followed by sour cream, heavy cream, and 1 tsp vanilla. Pour into the prepared springform pan.
- Place the springform pan into a large roasting pan. Fill the roasting pan with hot water until it reaches halfway up the sides of the springform pan. Bake for 50-60 minutes until edges are set but the center remains slightly jiggly.
- Cool the cheesecake to room temperature, then refrigerate for at least 6 hours or overnight to set completely.
- Preheat oven to 350°F (177°C). Grease and flour two 9-inch round cake pans.
- Prepare the red velvet cake: Sift together flour, 1 1/2 cups sugar, baking soda, salt, and cocoa powder. In a separate bowl, whisk oil, buttermilk, 2 eggs, red food coloring, vinegar, and 1 tsp vanilla.
- Gradually combine wet and dry ingredients until just smooth. Divide batter evenly between the two cake pans. Bake for 30-35 minutes until a tester comes out clean. Cool completely on wire racks.
- Prepare the frosting: Beat 16 oz cream cheese and butter until fluffy. Gradually add powdered sugar and 1 tbsp vanilla, beating until stiff and smooth.
- Assemble the cake: Place one red velvet cake layer on a serving plate. Spread a thin layer of frosting. Carefully remove the chilled cheesecake from its pan and place it directly on top of the cake layer. Top with the second red velvet cake layer.
- Frost the top and sides of the entire cake with the remaining cream cheese frosting. Press white chocolate shavings into the sides and decorate the top edge as desired. Chill for 1 hour before slicing.
Frequently Asked Questions
Can I make the cheesecake layer ahead of time?
Yes, you definitely should make it at least a day early. It needs that long night in the fridge to become sturdy enough to stack between the cake layers.
Why did my red velvet cake turn out dry?
This usually happens if you overbake it or measure the flour too heavily. Use a spoon to fill your measuring cup instead of scooping directly from the bag for a lighter crumb.
Do I have to use a water bath for the cheesecake?
While you can skip it, the water bath ensures the cheesecake stays creamy and doesn’t get brown or cracked. It really makes a difference for that authentic copycat texture.
The Bottom Line
Making a showstopper like this at home is such a rewarding feeling, especially when you see your family’s faces. Your guests will be so impressed when you bring this beautiful cake to the table. Sweet moments don’t have to be complicated. Let’s make something wonderful together.
I hope your kitchen smells as amazing as mine does right now with the scent of cocoa and vanilla. Sending you lots of love and happy baking vibes this season. Billy
Billy