Do you ever feel like the holiday season is just one big race to the finish line in the kitchen? Honestly, I have had those years where I planned three different layer cakes and ended up too tired to even preheat the oven. This little recipe is my favorite way to keep the magic alive without the stress.
Why You Will Love This White Chocolate Christmas Bark
This recipe solves the dreaded last-minute dessert panic that always seems to hit right before a school party or a neighbor’s visit. I personally have found that having a quick, no-bake option in my back pocket keeps the holiday spirit alive when I am running low on energy.
Instead of spending hours decorating individual cookies, you can make one big batch of this and be done in ten minutes. My daughter and I have made this so many times that we can now prep the whole tray before the first Christmas song finishes on the radio.
What Makes This White Chocolate Christmas Bark Special
The peppermint extract is the secret here because it gives the white chocolate a refreshing lift. Without it, the bark can feel a little too sugary, but that hint of mint balances everything out perfectly.
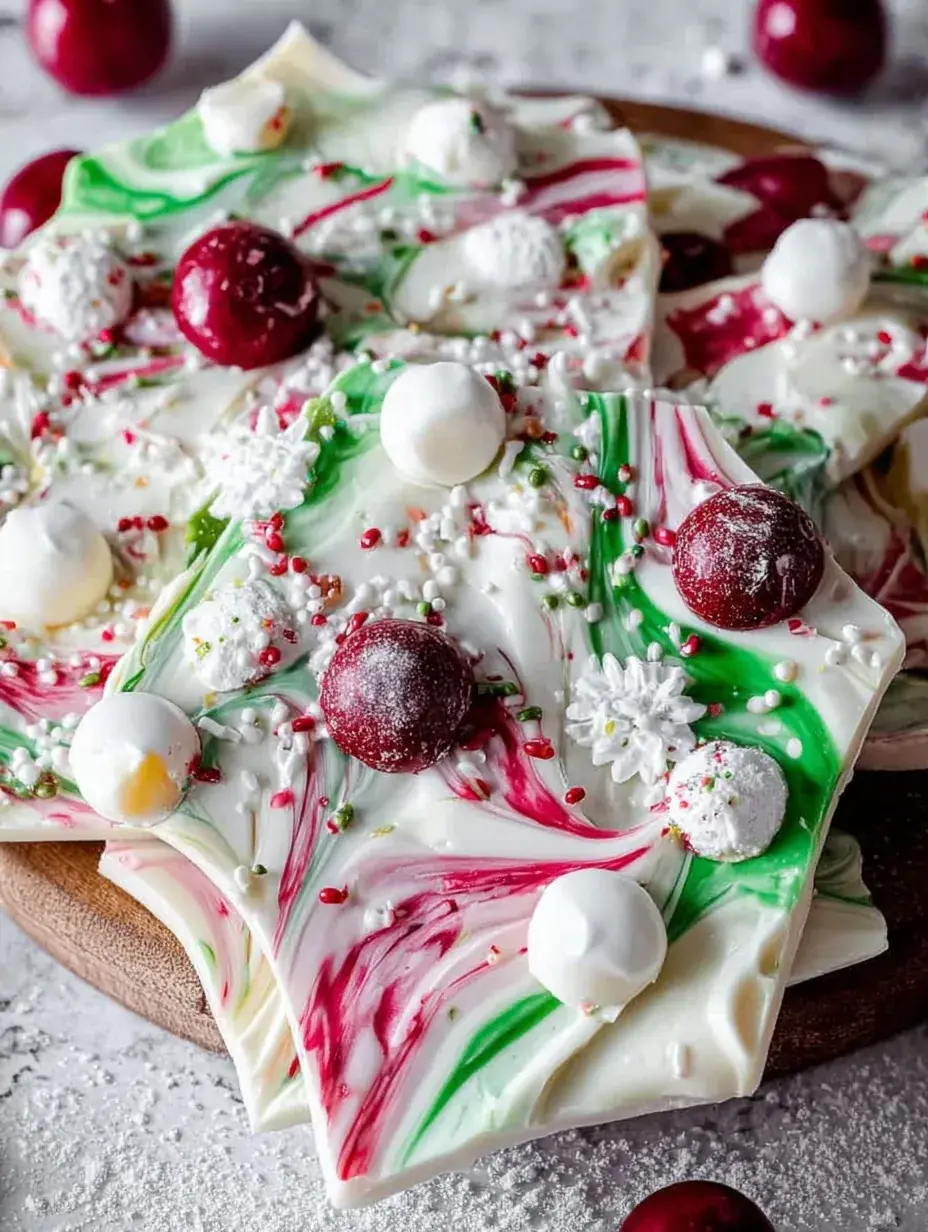
It is incredibly versatile for any holiday gathering because the red and green sprinkles look so professional against the white chocolate. You do not need any special tools or fancy skills to make it look like it came from a boutique candy shop.
Kids love being part of the process because they get to crush the candy canes and scatter the sprinkles. It is a wonderful way to get little hands involved in the kitchen without worrying about hot ovens or sharp mixers.
The Best White Chocolate Christmas Bark Recipe
I remember making this for the first time when I was completely exhausted after a long day of Christmas shopping. It turned out so beautiful that I have made it every single year since, usually while my daughter and I enjoy some hot cocoa.
Ingredient Notes
- White Chocolate Chips: These provide the creamy, sweet base for your bark. I recommend using a high-quality brand so it melts smoothly and does not seize up.
- Peppermint Candy Canes: These add that iconic holiday crunch and a burst of cool flavor. You can crush them into tiny bits or leave some larger pieces for a more rustic look.
- Holiday Sprinkles: Use the red and green ones to make the tray pop with color. My daughter always asks for extra, so we usually go a bit heavy on these.
- Peppermint Extract: This intensifies the minty flavor throughout the entire chocolate layer. A little goes a long way, so stick to the measurement for the best balance.
- Parchment Paper: This is not an ingredient, but it is essential for making sure your bark lifts right off the tray without sticking.
Instructions
- Prepare the Tray. Line your baking sheet with parchment paper or a silicone mat. This ensures the chocolate won’t stick and makes cleanup a total breeze.
- Melt the Chocolate. Use a microwave-safe bowl and heat the chips in 30-second bursts, stirring in between. Stop when the chocolate looks thick and glossy with just a few small lumps left to stir out.
- Add the Extract. Gently stir the peppermint extract into the melted chocolate. You will notice the smell immediately, which always makes my kitchen feel like a winter wonderland.
- Spread the Chocolate. Pour the mixture onto your tray and use a spatula to smooth it out. Aim for about a quarter-inch thickness so it has a satisfying snap when you break it later.
- Decorate the Surface. Sprinkle the crushed candy canes and festive sprinkles over the wet chocolate right away. They need to settle into the warmth so they stay put once the bark hardens.
- Chill and Break. Place the tray in the fridge for about 30 minutes until it feels firm to the touch. Once it is set, you can shatter it into irregular pieces by hand or use a sharp knife for cleaner edges.
Billy’s Tips and Mistakes to Avoid
- Do not let even a drop of water touch your chocolate while melting. I learned this the hard way when a wet spoon caused my whole bowl of chocolate to turn into a grainy mess.
- If you use the microwave, be patient and stir often. White chocolate burns much faster than dark chocolate, so those 30-second increments are really important.
- Wait until the chocolate is completely set before trying to break it. If it is still soft in the middle, you will end up with messy fingerprints all over your beautiful treats.
- Store the finished pieces in a cool spot or the fridge. If your kitchen gets warm from holiday cooking, the thin bark might start to soften on the counter.
- Let the kids do the crushing by putting candy canes in a sealed bag and using a rolling pin. It is a fun way for them to help out and burns off a little holiday energy.
Storage Tips
You can keep this bark in an airtight container at room temperature for up to 2 weeks if your house is cool. For the best snap and freshness, I prefer keeping it in the fridge where it stays perfect for about 3 weeks. If you want to get ahead of the holiday rush, it also freezes beautifully for up to 2 months.
Variations and Swaps
- Try a dark chocolate swirl by melting a few ounces of semi-sweet chocolate and dragging a toothpick through the white chocolate layer.
- If you need a dairy-free version, you can use vegan white chocolate chips which are becoming much easier to find at the grocery store.
- Swap the peppermint for crushed pretzels and a drizzle of caramel for a salty-sweet version that is just as easy to make.
Why This Recipe Works Every Time
The ratio of chocolate to toppings in this recipe creates the perfect bite every single time. It is sturdy enough to be packaged as a gift but soft enough that it melts on your tongue as soon as you take a bite.
I have tried using different types of chocolate, and I found that using standard chips actually works better for beginners than expensive baking bars. The chips are formulated to hold their shape and set firmly, which is exactly what you want for a successful holiday bark.

Ingredients
- 24 ounces white chocolate chips
- 1/2 cup peppermint candy canes, crushed
- 1/4 cup festive holiday sprinkles (red and green)
- 1 teaspoon peppermint extract
Instructions
- Line a 9x13 inch baking sheet with parchment paper or a silicone mat.
- Melt the white chocolate using a double boiler over low heat or in a microwave-safe bowl in 30-second increments, stirring until completely smooth.
- Stir the peppermint extract into the melted chocolate until well combined.
- Pour the melted chocolate onto the prepared baking sheet and spread evenly to approximately 1/4 inch thickness using a spatula.
- Immediately distribute the crushed candy canes and festive sprinkles across the wet chocolate surface.
- Refrigerate the tray for at least 30 minutes until the chocolate is firm and set.
- Break the set bark by hand or cut into irregular pieces with a knife.
Frequently Asked Questions
Why did my white chocolate seize and turn chunky?
White chocolate is very sensitive to heat and moisture. If it gets too hot or if a tiny bit of water gets into the bowl, it will seize up. Always melt it slowly and make sure all your bowls and spoons are completely dry.
Can I use peppermint oil instead of extract?
You can, but peppermint oil is much stronger than extract. If you swap them, use only a drop or two of the oil so the flavor doesn’t become overwhelming.
How do I get the candy canes to stick to the bark?
The trick is to sprinkle them on immediately after you spread the chocolate. If the chocolate starts to cool and form a skin, the toppings will just slide right off when you try to break the pieces.
The Bottom Line
This bark is the ultimate reminder that you do not need to spend all day in the kitchen to create something festive and delicious. It is bright, crunchy, and brings a little bit of winter cheer to any dessert table. Sweet moments don’t have to be complicated. Let’s make something wonderful together.
I hope your kitchen smells as minty and wonderful as mine does today! Happy holiday snacking. Billy
Billy