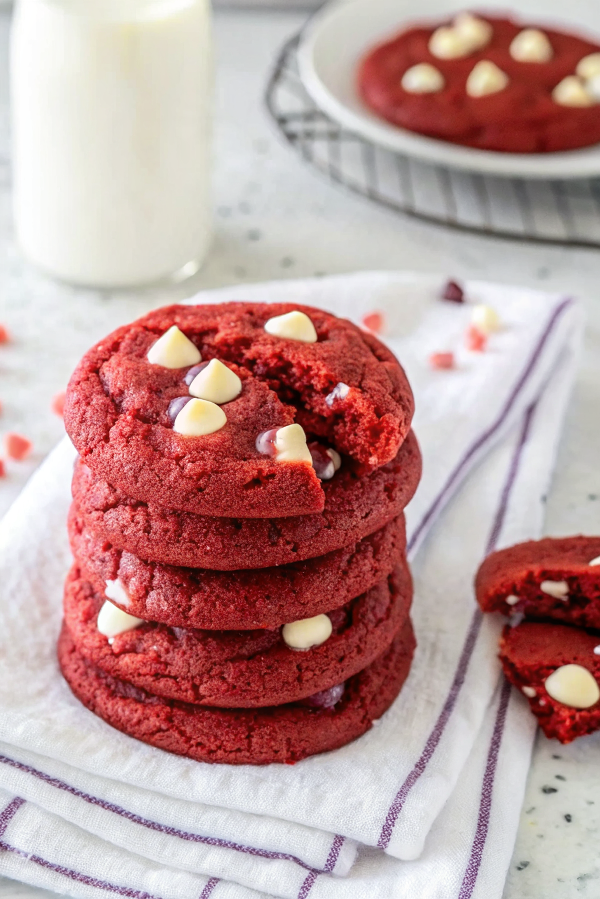
Mid-week lunchbox boredom struck again, so I dug through the pantry and threw together a simple red velvet cookie that brightened our sandwiches in a snap. My daughter helped stir and insisted on “just one more” white chocolate chip on top before they cooled. They’re the kind of batch that makes the lunchbox feel special without a lot of fuss.
Why You’ll Love This Delish Red Velvet Chocolate Chip Cookies
When the week gets hectic and you need a fresh dessert idea for lunchbox treats, these cookies are a busy-family lifesaver. I usually make a batch while prepping dinner and stash some for school days — they travel well and kids love the creamy white chocolate bits.
They come together with everyday pantry ingredients, and chilling the dough makes portioning quick, which is a small win when you have a toddler asking for help stirring. Baking them feels like one of those cozy kitchen moments that actually fits into a real life routine.
What Makes this Recipe Unique
– Chill-and-scoop shortcut: Chilling the dough firms it up so you can portion by spoon without the dough spreading into thin disks.
– Classic pantry mix: All-purpose flour, cocoa, and a splash of vanilla and vinegar create that subtle red velvet note using things you probably already have.
– Simple method: Creaming butter and both sugars first gives you the light, fluffy base without complicated steps or special tools.
– Creamy pockets: White chocolate chips melt into little creamy bites that offset the cocoa and tender crumb.
– Texture trick: A bit of cornstarch keeps the cookies tender and slightly soft in the center while edges set up just right.
Estimated Macros & Calories
Rough nutrition estimates for a single cookie, based on the ingredient list used here. (estimated per serving, without optional ingredients)
- Calories: 135 kcal
- Protein: 2 g
- Carbohydrates: 18 g
- Fat: 6 g
- Fiber: 0.5 g
The Most Authentic Delish Red Velvet Chocolate Chip Cookies Recipe
These are the cookies my family keeps asking for at lunchtime and after school; they use simple ingredients and a short chill so they’re easy to portion. I like making them on a weekend evening and letting the dough rest so the flavor softens overnight.
Ingredients
– 1 3/4 cups all-purpose flour
– 1 1/2 tablespoons unsweetened cocoa powder
– 1 teaspoon cornstarch
– 3/4 teaspoon baking soda
– 1/2 teaspoon fine salt
– 9 tablespoons unsalted butter, softened
– 1/3 cup light brown sugar, packed
– 1/2 cup granulated sugar
– 1 large egg
– 1 teaspoon vanilla extract
– 1/2 teaspoon white vinegar
– 2 teaspoons red food coloring (liquid or gel)
– 3/4 cup white chocolate chips
Ingredient Notes
– All-purpose flour: The base for structure. Don’t skip measuring accurately or the dough can get too stiff.
– Unsweetened cocoa powder: Gives the red velvet its faint chocolate background; use unsweetened to avoid extra sweetness.
– Cornstarch: Adds tenderness so the centers stay soft rather than cakey.
– Butter and sugars: Creaming these until pale and fluffy incorporates air for a lighter cookie texture; room temperature butter helps this along.
– Egg, vanilla, and white vinegar: The trio adds moisture, flavor, and helps develop that red velvet character when combined with the baking soda.
– Red food coloring: Choose liquid or gel based on what you have — it just colors the dough, so add until the dough looks evenly tinted.
– White chocolate chips: Fold them in gently so they don’t break up too much and you keep pretty pockets of creamy chocolate.
Instructions
Step 1: Line the Sheets
Prepare two baking sheets with parchment or silicone mats and set them aside so everything is ready at bake time. When you plan to bake, bring the oven up to temperature.
Step 2: Whisk Dry Ingredients
In a medium bowl, whisk the flour, cocoa, cornstarch, baking soda, and salt together until evenly combined. Set this dry mix aside while you work on the butter and sugars.
Step 3: Cream Butter and Sugars
In a large bowl, beat the softened butter with both sugars until the mixture is pale and fluffy; a couple minutes with a hand mixer does the trick. This step builds the base texture for the cookies.
Step 4: Add Wet Flavors
Add the egg, vanilla, and white vinegar to the butter-sugar mixture and beat until just combined. Stir in the red food coloring until the dough is evenly colored, taking care not to overmix.
Step 5: Combine Dry and Wet
With the mixer on low, add the dry ingredients in two stages, scraping the bowl between additions. Finish folding any remaining streaks by hand with a spatula so the dough is uniform.
Step 6: Fold in the Chips
Gently fold the white chocolate chips into the dough until distributed throughout. A few gentle turns keep the chips intact and evenly spread.
Step 7: Chill the Dough
Cover the bowl with plastic wrap and chill the dough until it firms up; a short chill or overnight both work and help deepen the flavor. Chilled dough portioning is much easier and helps prevent excessive spreading in the oven.
Step 8: Portion the Cookies
Scoop the dough by heaping tablespoonfuls and place them spaced apart on the prepared sheets. If the dough warms as you work, pop the tray back into the fridge briefly before baking.
Step 9: Bake Until Set
Bake the cookies on the middle rack until the edges are set and the centers still look slightly soft; bake one sheet at a time for the most even results, or rotate sheets halfway if you bake two at once. Remove them when the centers hold but are still a touch soft.
Step 10: Cool and Finish
If you like, press a couple extra white chocolate chips into the warm tops so they look pretty. Let the cookies cool on the baking sheet for a few minutes, then transfer to a wire rack to finish cooling.
Tips and Mistakes to Avoid
– Chill the dough until firm enough to portion easily; warm dough spreads into thin cookies.
– Don’t overmix after adding the flour — stop as soon as there are no streaks to avoid tough cookies.
– If you press chips into the tops after baking, do it right away; the warmth helps them set nicely without melting away.
Storage Tips
Store cooled cookies in an airtight container at room temperature for a few days to keep them tender. For longer keeping, freeze the baked cookies and thaw at room temperature when you need a quick lunchbox add. You can also freeze portioned dough for a make-ahead option and bake straight from chilled.
Variations and Substitutions
– Swap the white chocolate chips for semi-sweet chips if you prefer a less sweet contrast.
– For a gluten-free version, use a cup-for-cup gluten-free flour blend in place of the all-purpose flour and proceed the same way.
– To try a different color or milder tint, reduce the red food coloring slightly — the cocoa will still give depth.
Why This Recipe Is The Real Deal
Texture is what keeps us coming back: tender centers, set edges, and melty pockets of white chocolate make these cookies feel relaxed but thoughtful. I’ve made them a few different ways and chilling the dough consistently gives the best chew and shape.
I usually let the dough rest overnight when I can, and the next day the cookies bake up with a fuller taste and that soft, slightly fudgy center everyone reaches for seconds of.
The Bottom Line
If you need a reliable lunchbox pick-me-up that uses simple ingredients and a small chill to make life easier, give these red velvet chocolate chip cookies a try and tell me how they travel. I’d love to hear which little kitchen shortcut you end up relying on most.
Billy Mackenzie
Founder of MerryDessert.com
Simple, joyful homemade desserts — sweet moments, made with love.

Delish Red Velvet Chocolate Chip Cookies
Ingredients
Dry ingredients
- 1 3/4 cups all-purpose flour
- 1 1/2 tablespoons unsweetened cocoa powder
- 1 teaspoon cornstarch
- 3/4 teaspoon baking soda
- 1/2 teaspoon fine salt
Wet ingredients
- 9 tablespoons unsalted butter, softened
- 1/3 cup light brown sugar, packed
- 1/2 cup granulated sugar
- 1 large egg
- 1 teaspoon vanilla extract
- 1/2 teaspoon white vinegar
- 2 teaspoons red food coloring (liquid or gel)
Add-ins
- 3/4 cup white chocolate chips
Instructions
Preparation Steps
- Line two baking sheets with parchment or silicone mats and set aside. Preheat the oven to 350°F (175°C) when you're ready to bake.
- In a medium bowl whisk together the flour, cocoa powder, cornstarch, baking soda, and salt until evenly combined; set aside.
- In a large mixing bowl, beat the softened butter with both sugars until the mixture is pale and fluffy, about 2–3 minutes using a hand mixer or stand mixer fitted with the paddle.
- Add the egg, vanilla, and white vinegar to the butter-sugar mixture and beat just until incorporated. Stir in the red food coloring and mix until the dough is evenly colored but be careful not to overmix.
- With the mixer on low, gradually add the dry ingredients in two stages, scraping the bowl between additions. Finish folding the last bits by hand with a spatula until there are no streaks of flour.
- Gently fold in the white chocolate chips until distributed throughout the dough.
- Cover the bowl with plastic wrap and chill the dough for at least 1 hour to firm up (overnight is fine and will deepen flavor). Chilled dough is easier to portion and helps prevent excessive spreading.
- Scoop dough by heaping tablespoonfuls (about 1 to 1 1/2 tablespoons each) and place 2 inches apart on the prepared sheets. If the dough warms while scooping, return the tray to the fridge for 10 minutes before baking.
- Bake cookies on the middle rack 9–11 minutes, or until the edges are set and centers still look slightly soft. Bake one sheet at a time for most even results, or rotate sheets halfway if baking two at once.
- Remove from oven and, if desired, press a couple extra white chocolate chips into the warm tops. Let cookies cool on the baking sheet 5 minutes, then transfer to a wire rack to finish cooling.