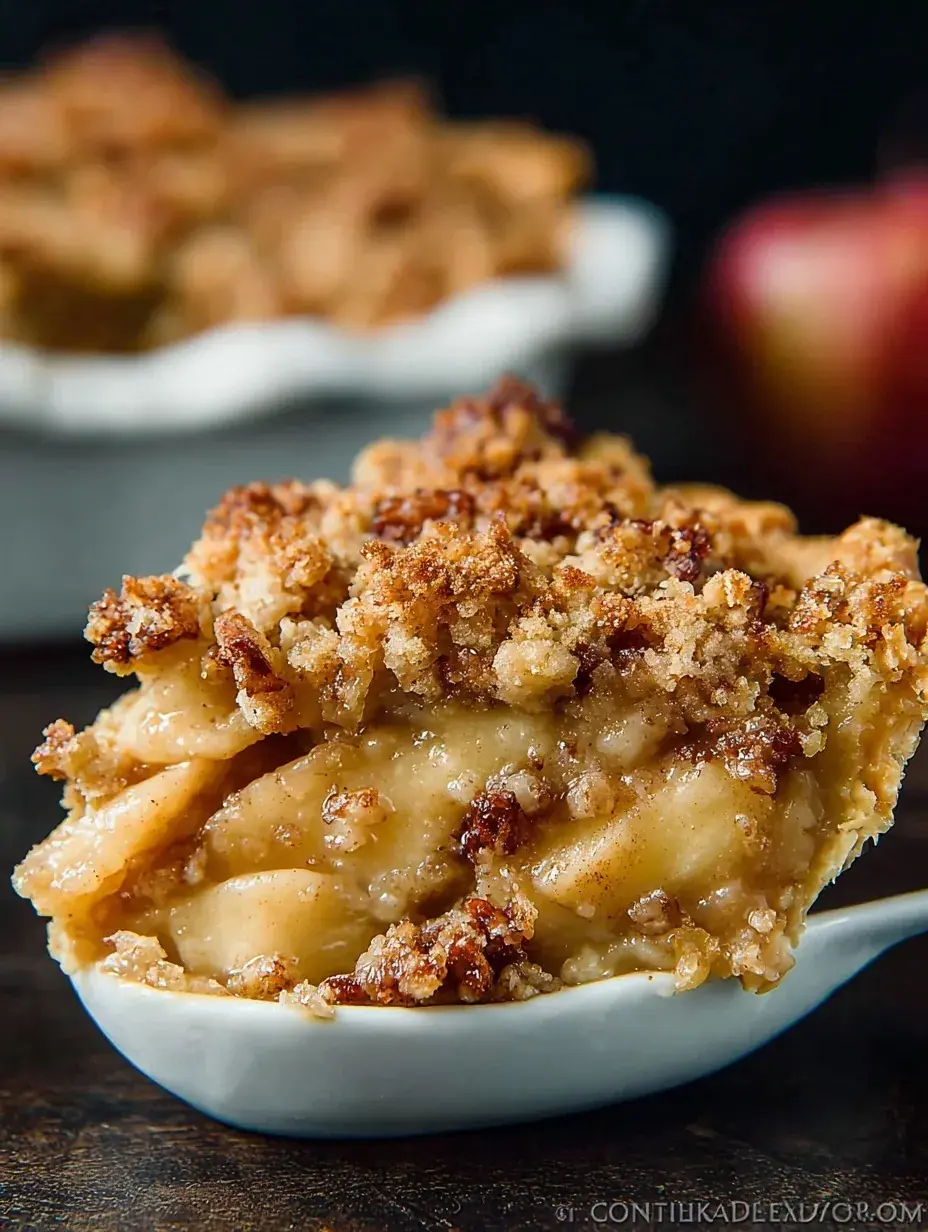
Have you ever stood in your kitchen on a chilly afternoon just craving that specific smell of cinnamon and warm fruit that makes a house feel like a home? I used to think a classic pie was too much work for a regular Tuesday until I realized the magic of a crumb topping. It is my favorite way to get that bakery finish without the stress of a perfect lattice crust.
Why You Will Love This Dutch Apple Pie
I used to struggle so much with traditional pie crusts, especially when it came to making the top look pretty without it shrinking or tearing in the oven. This recipe completely solves that frustration because the buttery streusel hides everything while adding a crunch that a regular crust just cannot provide.
Personally I have found that the biggest hurdle to making a homemade pie is the time it takes to roll out two different layers of dough. By switching to a crumb topping, you cut your prep time in half and get a much better texture contrast against the soft apples. My daughter loves helping me sprinkle the topping and it is much more forgiving than trying to teach a seven year old how to crimp a delicate top crust.
What Makes This Dutch Apple Pie Special
The texture of this Dutch Apple Pie is really what sets it apart from a standard fruit pie. You get those soft, spiced apples tucked under a thick layer of buttery crumbs that stay crispy even the next day.
Using Granny Smith apples is a little secret I swear by because they hold their shape beautifully during the long bake. I once tried using softer apples and ended up with a bit of a mushy mess, so the firmness here is key.
This is the ultimate dessert for anyone who wants a fancy looking treat without needing professional pastry skills. It is simple enough for a quiet weekend but looks impressive enough to sit right in the middle of your holiday table.
The Best Dutch Apple Pie Recipe
There is something so comforting about pulling a golden pie out of the oven when the kitchen is starting to get dark early in the evening. This version is my go-to because it never fails to make the whole family run to the kitchen the second they smell the cinnamon.
Ingredient Notes
- Granny Smith Apples: These provide the perfect tart balance and do not turn into applesauce while baking.
- Lemon Juice: A quick splash keeps the fruit bright and prevents it from browning while you prep the topping.
- Chilled Butter: It is important to keep this cold so your streusel stays crumbly rather than melting into a flat layer.
- Brown Sugar: This adds a deep, almost caramel-like sweetness to the topping that white sugar just misses.
- Cinnamon: I usually add a little extra because we love that warm, spicy aroma filling the house.
Instructions
- Prep the Crust. Get your oven hot and tuck your pastry into the pie plate, making sure to pinch the edges so they look nice and rustic.
- Mix the Filling. Toss your sliced apples with the sugar, flour, and spices until every piece is coated in that sticky, sweet mixture.
- Fill the Shell. Pile the apples into your crust and spread them out so the top is relatively flat, which helps the topping sit evenly.
- Make the Topping. Whisk your flour and brown sugar together before working in the cold butter pieces.
- Create the Crumbs. Use a pastry cutter or your fingers to rub the butter in until you have small, pea-sized clumps.
- Bake and Cool. Slide it into the oven until the juices are bubbling and thick, then let it sit for at least an hour so the slices come out clean.
Billy’s Tips and Mistakes to Avoid
- Tip 1: Make sure to slice your apples thinly and evenly so they all soften at the same rate. I made the mistake once of having thick chunks that stayed crunchy while the rest was soft.
- Tip 2: Do not skip the cooling time even though it smells amazing. The juices need that hour to thicken up or your pie will be runny when you cut it.
- Tip 3: If you see the crust edges getting too dark halfway through, just cover them loosely with a little foil.
- Tip 4: Keep your butter in the fridge until the very second you are ready to mix the topping for the best texture.
- Tip 5: Let your little ones help with the sprinkling part as it is a great way to get them involved in the kitchen.
Storage Tips
This pie keeps beautifully on the counter for up to 2 days if you cover it loosely. If you have leftovers beyond that, tuck them into the fridge for up to 4 days, though I find the topping is best when it is fresh. You can even freeze a baked pie for up to 3 months by wrapping it tightly in plastic and foil.
Variations and Swaps
- Add a handful of chopped pecans or walnuts to the crumb topping for an extra nutty crunch.
- For a dairy-free version, I have used cold coconut oil instead of butter in the topping and it works surprisingly well.
- Try adding a half cup of fresh cranberries in with the apples during the holidays for a pop of color and tartness.
Why This Recipe Works Every Time
The balance of the tart fruit against the sweet, heavy topping is what makes this a winner every single time I bake it. It relies on simple pantry staples so I never have to make a special trip to the store when the craving hits.
After making this dozens of times I realized that the lemon juice is not just for color, it actually cuts through the sugar and makes the apple flavor pop. One time I forgot it and the pie felt a bit too heavy and sweet, so I never skip it now.
Ingredients
- 1 9 -inch unbaked pie crust
- 6 cups Granny Smith apples, peeled, cored, and sliced
- 0.5 cup granulated sugar
- 0.25 cup all -purpose flour
- 1 teaspoon ground cinnamon
- 1 tablespoon lemon juice
- 1 cup all -purpose flour for topping
- 0.5 cup packed light brown sugar
- 0.5 cup chilled unsalted butter, cubed
Instructions
- Preheat oven to 400 degrees Fahrenheit (200 degrees Celsius).
- Place the unbaked pie crust into a 9-inch pie plate and crimp the edges.
- In a large mixing bowl, toss the sliced apples with granulated sugar, 0.25 cup flour, cinnamon, and lemon juice until evenly coated.
- Pour the apple mixture into the prepared pie crust, spreading it into an even layer.
- In a separate medium bowl, whisk together 1 cup flour and brown sugar for the topping.
- Using a pastry cutter or two knives, cut the chilled butter into the flour mixture until it resembles coarse crumbs.
- Sprinkle the crumb topping evenly over the top of the apple filling.
- Bake for 45 to 50 minutes until the crust is golden brown and the internal apple juices are bubbling.
- Remove from the oven and allow to cool on a wire rack for at least 1 hour to set before slicing.
Frequently Asked Questions
How do I keep my bottom crust from getting soggy?
I like to bake the pie on the lowest oven rack for the first half of the time to ensure the bottom gets crisp. You can also brush the crust with a little egg white before adding the fruit to create a barrier.
What are the best apples for Dutch Apple Pie?
Granny Smith is the gold standard because they hold their shape perfectly. If you want a mix, Honeycrisp or Braeburn are also excellent choices that won’t turn into mush.
Can I use a store bought crust for this recipe?
Honestly I do it all the time! A good quality refrigerated crust saves so much time and still tastes wonderful with the homemade filling and topping.
The Bottom Line
There is no better way to celebrate a cozy evening than with a warm slice of pie and maybe a scoop of vanilla ice cream. It is the kind of dessert that reminds you to slow down and enjoy the simple things. Sweet moments don’t have to be complicated. Let’s make something wonderful together.
I hope your kitchen smells as heavenly as mine does right now with this in the oven. Sending you lots of love and happy baking vibes today. Billy
Billy