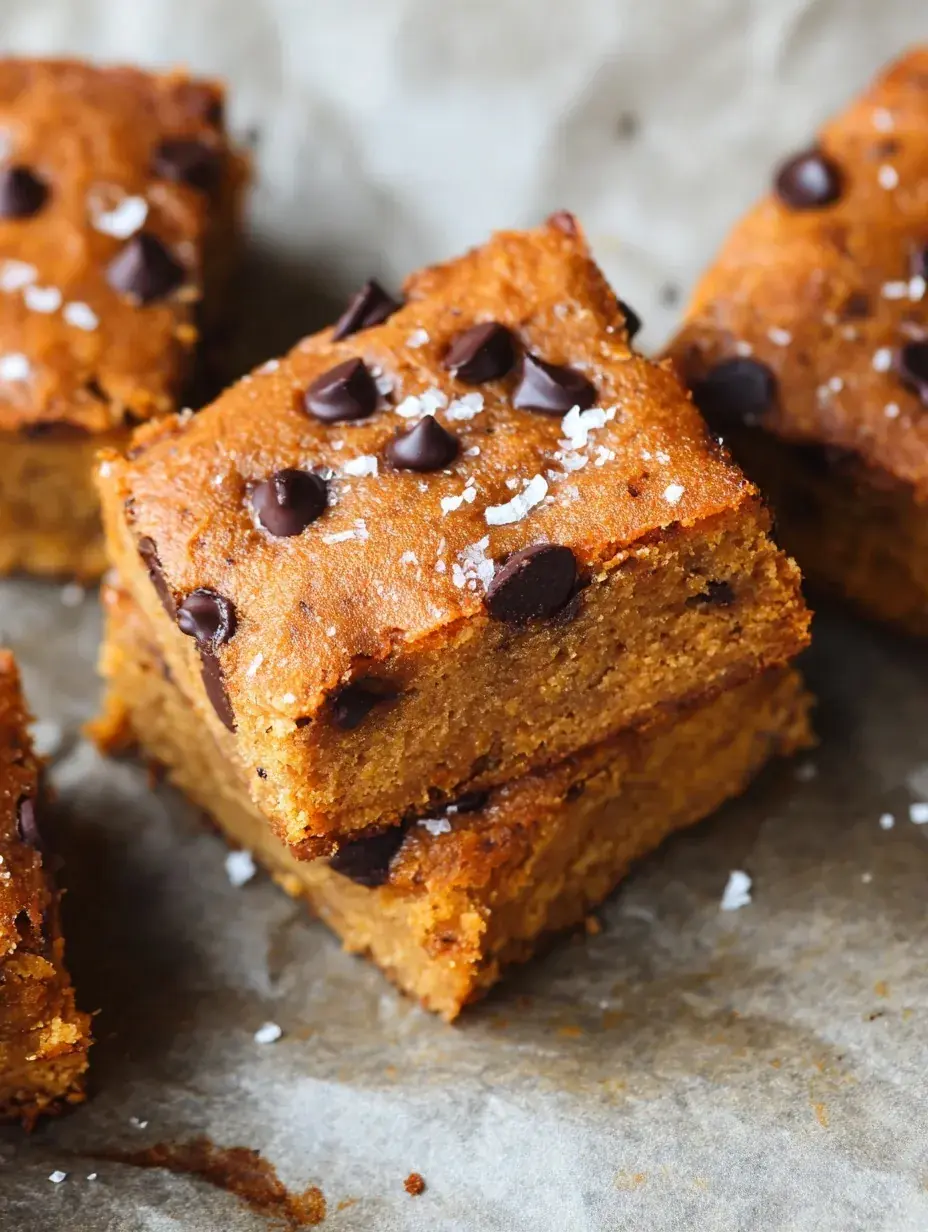
Have you ever felt like you had to choose between a dessert that tasted good and one that everyone at the table could actually eat? It is such a struggle when you want that deep, butterscotch flavor but need to skip the wheat flour. My daughter and I spent a rainy afternoon testing this batch of Gluten-Free Blondies until we finally got that perfect crackly top.
Why You Will Love This Gluten-Free Blondies
Finding a gluten-free treat that does not crumble into a dry mess can feel like a part-time job. I used to get so frustrated watching my friends enjoy chewy bars while I settled for something that tasted like cardboard. This recipe solves that by using enough brown sugar and butter to keep everything dense and moist.
It also fixes the problem of having way too many dishes to wash after a baking session. You only need one bowl and a spatula to bring these together, which is a total win on a busy weeknight. I personally found that letting the butter cool slightly before mixing is the secret to getting that thick, fudgy texture every time.
What Makes This Gluten-Free Blondies Special
The texture is the real star here because it stays soft and gooey even the next day. Most wheat-free bakes get hard quickly, but these keep their chewiness beautifully.
Using a generous amount of vanilla extract transforms the simple base into something that tastes like a fancy bakery treat. It brings out the rich notes of the brown sugar in every single bite.
The chocolate chips add just enough melty sweetness to balance the salty, buttery dough. My daughter always insists on adding a few extra on top before they go into the oven.
The Best Gluten-Free Blondies Recipe
I have made these so many times for school bake sales and holiday parties, and honestly, nobody ever guesses they are gluten-free. They are my go-to when I want something faster than cookies but more comforting than a plain cake.
Ingredient Notes
- Unsalted Butter: Melting it creates that dense, fudgy crumb that makes a blondie different from a cake.
- Light Brown Sugar: This provides the classic molasses flavor and keeps the bars incredibly soft.
- Gluten-Free Flour Blend: Make sure yours has xanthan gum already in it to help the structure hold together.
- Vanilla Extract: I prefer using a whole tablespoon because it really highlights the buttery base.
- Chocolate Chips: Semi-sweet works best to cut through the sweetness of the dough.
Instructions
- Prep and Heat. Start by preheating your oven and lining your square pan with parchment paper. This makes it so much easier to lift the bars out later for perfect squares.
- Mix Butter and Sugar. Whisk the cooled melted butter with the brown sugar until the mixture looks smooth and combined. You want to make sure there are no large lumps of sugar left.
- Add Egg and Vanilla. Beat in the egg and vanilla vigorously until the batter looks glossy and shiny. This step is what helps create that beautiful thin, crackly crust on top.
- Fold in Dry Ingredients. Use a spatula to gently stir in the flour, salt, and baking powder. Stop as soon as you do not see any white streaks of flour left in the bowl.
- Stir in Chips. Fold in the chocolate chips so they are evenly distributed throughout the thick batter. It will be much thicker than a cake batter, which is exactly what we want.
- Bake and Cool. Spread it into the pan and bake until the edges are golden and the center is set. Let them cool completely in the pan so they firm up enough to slice cleanly.
Billy’s Tips and Mistakes to Avoid
- Do not overbake these or they will lose that fudgy center we all love. I start checking them at the 20-minute mark to be safe.
- Make sure your egg is at room temperature so it emulsifies properly with the butter. I once used a cold egg and the batter looked slightly curdled, though it still tasted okay.
- Use a light-colored metal pan if you can for the most even browning. Glass pans tend to hold heat differently and can make the edges too hard.
- Let the butter cool for a few minutes after melting so you do not accidentally cook the egg when you mix them.
- If your flour blend does not have xanthan gum, you will need to add a quarter teaspoon yourself to prevent crumbling.
Storage Tips
You can keep these in an airtight container at room temperature for up to 4 days. If you want them to last longer, they freeze beautifully for up to 3 months when wrapped tightly. I usually just leave them on the counter because they disappear within 24 hours in my house.
Variations and Swaps
- Swap the chocolate chips for white chocolate and macadamia nuts for a classic flavor twist.
- Use a dairy-free butter substitute if you need to make these completely vegan-friendly too.
- Sprinkle a little flaky sea salt on top right after they come out of the oven for a gourmet touch.
Why This Recipe Works Every Time
The balance of fat to flour is what makes these so reliable regardless of which gluten-free blend you use. I have tested this with three different brands and the result is always a satisfyingly heavy, chewy bar.
The high vanilla content is my little secret for masking any earthy flavors that some alternative flours can have. The first time I made these, I used too little vanilla and they felt a bit plain, but now they are perfect.
Ingredients
- 1/2 cup unsalted butter, melted and slightly cooled
- 1 cup packed light brown sugar
- 1 large egg , room temperature
- 1 tablespoon vanilla extract
- 1 cup gluten -free all-purpose flour blend (containing xanthan gum)
- 1/2 teaspoon kosher salt
- 1/4 teaspoon baking powder
- 1/2 cup semi -sweet chocolate chips
Instructions
- Preheat oven to 350°F (175°C) and grease an 8x8 inch square baking pan or line with parchment paper.
- In a large mixing bowl, whisk together the melted butter and brown sugar until smooth.
- Add the egg and vanilla extract, whisking vigorously until the mixture is glossy and well combined.
- Fold in the gluten-free flour blend, salt, and baking powder using a spatula until just incorporated.
- Fold in the chocolate chips.
- Spread the batter evenly into the prepared baking pan.
- Bake for 20 to 25 minutes, or until the edges are golden brown and a toothpick inserted into the center comes out with a few moist crumbs.
- Allow the blondies to cool completely in the pan on a wire rack before slicing into 16 squares.
Frequently Asked Questions
Can I use dark brown sugar in Gluten-Free Blondies?
Yes, it will make them even chewier and give them a deeper caramel flavor. Just be aware they will look a bit darker than the light brown sugar version.
Why are my blondies cakey instead of fudgy?
This usually happens if you overbeat the eggs or add too much baking powder. For a dense result, keep the mixing gentle once the flour is added.
Can I add nuts to this recipe?
Absolutely, chopped walnuts or pecans add a wonderful crunch to the soft base. I usually add about half a cup if I am in the mood for something extra hearty.
The Bottom Line
These treats are proof that skipping gluten does not mean skipping the joy of a warm, buttery dessert. I hope you enjoy these as much as my family does during our weekend movie nights. Sweet moments don’t have to be complicated. Let’s make something wonderful together.
I am off to put on some music and start a fresh batch for my neighbor’s holiday party. Happy baking to you and yours! Billy
Billy