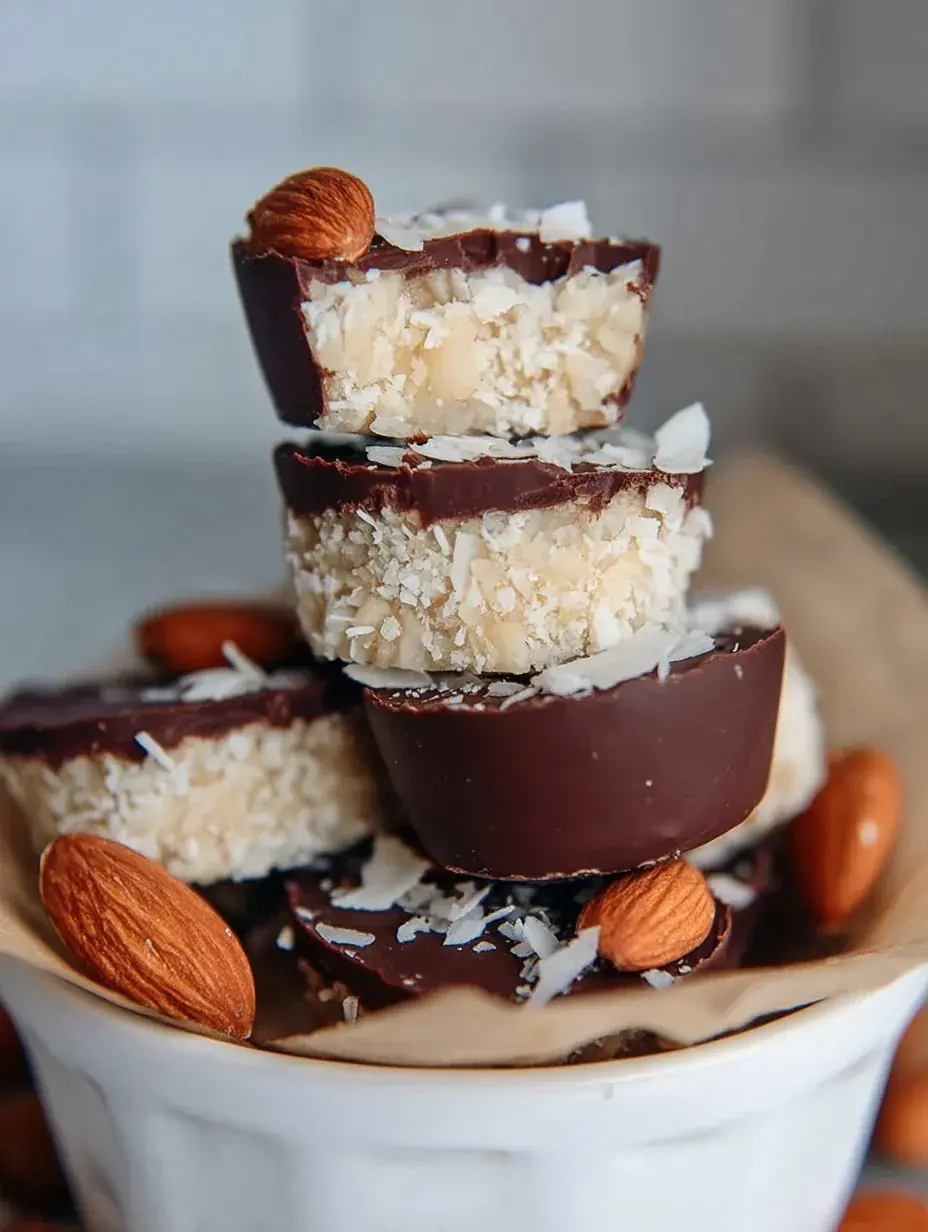
The rain is tapping against the window today, making it the perfect afternoon to stay inside and potter around the kitchen. My daughter and I were craving something sweet, but I wanted to keep it a bit lighter than our usual holiday fudge. We pulled out the coconut and started experimenting with a cleaner version of those classic candy bars we both love.
Why You Will Love This Healthy Almond Joys
I remember saving up my pocket money just to buy these treats from the corner shop when I was little. There is something so satisfying about that combination of chewy coconut and a crunchy almond. Personally I have found that making them at home actually tastes better because the coconut stays so much fresher and the chocolate is richer.
I tested this recipe a few times to get the texture just right because the first batch was a bit too crumbly. Adding a touch more coconut oil really helped them hold their shape during the dipping process. My daughter loves being the one to press the almonds into the top of each little log before they go into the freezer.
What Makes This Healthy Almond Joys Special
- Key feature: These bars have a much cleaner ingredient list than the store-bought version without losing that nostalgic, chewy flavor.
- Key ingredient: Pure maple syrup provides a gentle sweetness that complements the coconut perfectly without being overpowering or artificial.
- Ease factor: Since there is no actual baking involved, this is a great project for a quick afternoon snack session with very little cleanup.
- Seasonal fit: I love making these during the summer when it is too hot to turn on the oven, but they are great for holiday gift boxes too.
- Kid-friendly note: Little hands are perfect for shaping the coconut mixture into small rectangles and helping dip them into the melted chocolate.
The Best Healthy Almond Joys Recipe
These treats have become a staple in our house whenever we need a little pick-me-up during the week. I usually keep a batch in the freezer so I can grab one when the afternoon cravings hit or when guests drop by unexpectedly.
Ingredient Notes
- Unsweetened shredded coconut: This provides the chewy base and I prefer unsweetened to control the sugar level myself.
- Pure maple syrup: It acts as the binder and the natural sweetener for the filling, keeping the recipe refined sugar-free.
- Virgin coconut oil: This helps the bars firm up in the fridge and adds a lovely tropical scent to the base.
- Whole roasted almonds: These give the classic crunch that defines this specific candy bar experience.
- Dark chocolate chips: I usually go for 70 percent cacao or higher to keep the recipe rich and decadent without extra dairy.
Instructions
- Pulse the base. Put the coconut, syrup, oil, vanilla, and salt in a processor until it looks like a sticky dough. It should hold together easily when you pinch a small amount between your fingers.
- Prepare your tray. Line a small baking sheet with parchment paper to prevent sticking. This makes it so much easier to move the bars in and out of the freezer later on.
- Shape the logs. Scoop about a tablespoon and a half of the mixture and press it firmly into a small rectangle. You should end up with exactly twelve even portions for this batch.
- Add the almonds. Press one whole almond firmly into the top of each coconut log so it stays put. Make sure it is tucked in well before you put the tray in the freezer.
- Freeze to set. Place the tray in the freezer for thirty minutes until the coconut feels very firm to the touch. This step is vital because it stops the bars from falling apart when you dip them in warm chocolate.
- Coat in chocolate. Melt the chocolate chips with a teaspoon of oil and dip each chilled bar using a fork. Tap the fork on the side of the bowl to let the extra chocolate drip away for a smooth finish.
Billy’s Tips and Mistakes to Avoid
- Tip 1: If your coconut mixture feels too dry to stay in a log shape, add one more teaspoon of melted coconut oil to help it bind. I learned this the hard way during a very dry winter afternoon in my kitchen.
- Tip 2: Make sure the melted chocolate is not boiling hot when you start dipping or it will melt the coconut base too quickly.
- Tip 3: Skipping the freezer step will result in a messy pile of coconut in your chocolate bowl, so please be patient with the chilling time.
- Tip 4: These are best kept in the fridge or freezer because the coconut oil will soften if left at room temperature for too long.
- Tip 5: You can use a toothpick to swirl a little extra chocolate over the top for a professional look before the coating sets.
Storage Tips
You can keep these in an airtight container in the refrigerator for up to 7 days for a soft bite. If you want them to last longer, they freeze beautifully for up to 1 month. Just let them sit on the counter for a few minutes before eating if they are coming straight from the freezer so the chocolate does not crack.
Variations and Swaps
- Try swapping the almonds for roasted hazelnuts or even macadamia nuts for a different nutty crunch.
- You can use dairy-free white chocolate if you want a sweeter and creamier finish on the outside of your bars.
- Sprinkle a tiny pinch of flaky sea salt on top of the wet chocolate for a sophisticated salty-sweet balance that I personally love.
Why This Recipe Works Every Time
The balance of healthy fats from the coconut and the antioxidants in the dark chocolate makes these feel like a treat you can actually feel good about. I love how the maple syrup brings out the natural sweetness of the coconut without that artificial aftertaste you find in store-bought candy.
After making these several times, I discovered that using high-quality dark chocolate really makes the difference in how they set. I once tried a cheaper brand and it did not melt nearly as smoothly, which made the coating look a bit lumpy and dull instead of glossy.
Ingredients
- 2 cups unsweetened shredded coconut
- 1/4 cup pure maple syrup
- 2 tablespoons virgin coconut oil, melted
- 1/2 teaspoon vanilla extract
- 1/8 teaspoon sea salt
- 12 whole roasted unsalted almonds
- 1 cup dark chocolate chips (70% cacao or higher)
- 1 teaspoon coconut oil (for chocolate coating)
Instructions
- Place the shredded coconut, maple syrup, 2 tablespoons of melted coconut oil, vanilla extract, and salt in a food processor and pulse until the mixture is well-combined and sticky.
- Line a small tray or plate with parchment paper.
- Scoop about 1.5 tablespoons of the coconut mixture and shape into a small rectangular log, repeating for all 12 portions.
- Press one whole almond firmly into the top center of each coconut log.
- Place the tray in the freezer for 30 minutes to firm the coconut base.
- In a small microwave-safe bowl, combine dark chocolate chips and 1 teaspoon of coconut oil; heat in 30-second intervals, stirring in between, until completely smooth.
- Using a fork, dip each chilled coconut bar into the melted chocolate until fully coated, then tap off the excess chocolate.
- Place the coated bars back onto the parchment paper and refrigerate for 30 minutes or until the chocolate is set.
Frequently Asked Questions
Can I use honey instead of maple syrup?
Yes, honey works well as a substitute, though it will change the flavor profile slightly and the bars won’t be strictly vegan. It provides the same sticky texture needed to hold the coconut together.
What if I do not have a food processor?
You can mix the ingredients by hand in a bowl, but you will need to chop the shredded coconut a bit finer first. This ensures the mixture is dense enough to be shaped into logs without crumbling apart.
Why is my chocolate not setting properly?
This usually happens if the chocolate was not melted slowly or if the room temperature is too warm. Popping the finished bars back into the fridge for an extra ten minutes should fix the issue quickly.
The Bottom Line
These little bites are the perfect way to satisfy a chocolate craving while sticking to simpler, natural ingredients. They are so easy to whip up and even more fun to share with friends during a weekend get-together. Sweet moments don’t have to be complicated. Let’s make something wonderful together.
I hope your kitchen smells as much like a tropical paradise as mine does right now. Happy snacking. Billy
Billy