It looks like a complicated layered treat that took all afternoon to assemble. These S’mores Cookie Bars actually took me less than twenty minutes to prep before the oven did the rest of the work. My daughter and I love how the house smells like a summer campfire while they bake.
Why You Will Love This S’mores Cookie Bars
These bars are the ultimate bridge between the end of summer and the first chilly nights of autumn. I love serving them when the sun goes down a little earlier and we want that nostalgic campfire taste without actually having to sit outside in the wind. They bring all the joy of a backyard bonfire right into the kitchen where it is warm and cozy.
Personally, I have found that these are the biggest hit at our late August potlucks when everyone is craving one last taste of vacation. I made the mistake of bringing a different dessert once, and my friends actually asked where the marshmallows were. It is a tradition now that marks the start of our favorite baking season.
What Makes This S’mores Cookie Bars Special
- Graham Cracker Base: We use actual cracker crumbs in the dough to give it that authentic, slightly sandy crunch that balances the sweet chocolate.
- Gooey Middle Layer: Using whole milk chocolate bars instead of chips creates a thick, melty layer that stays soft and decadent.
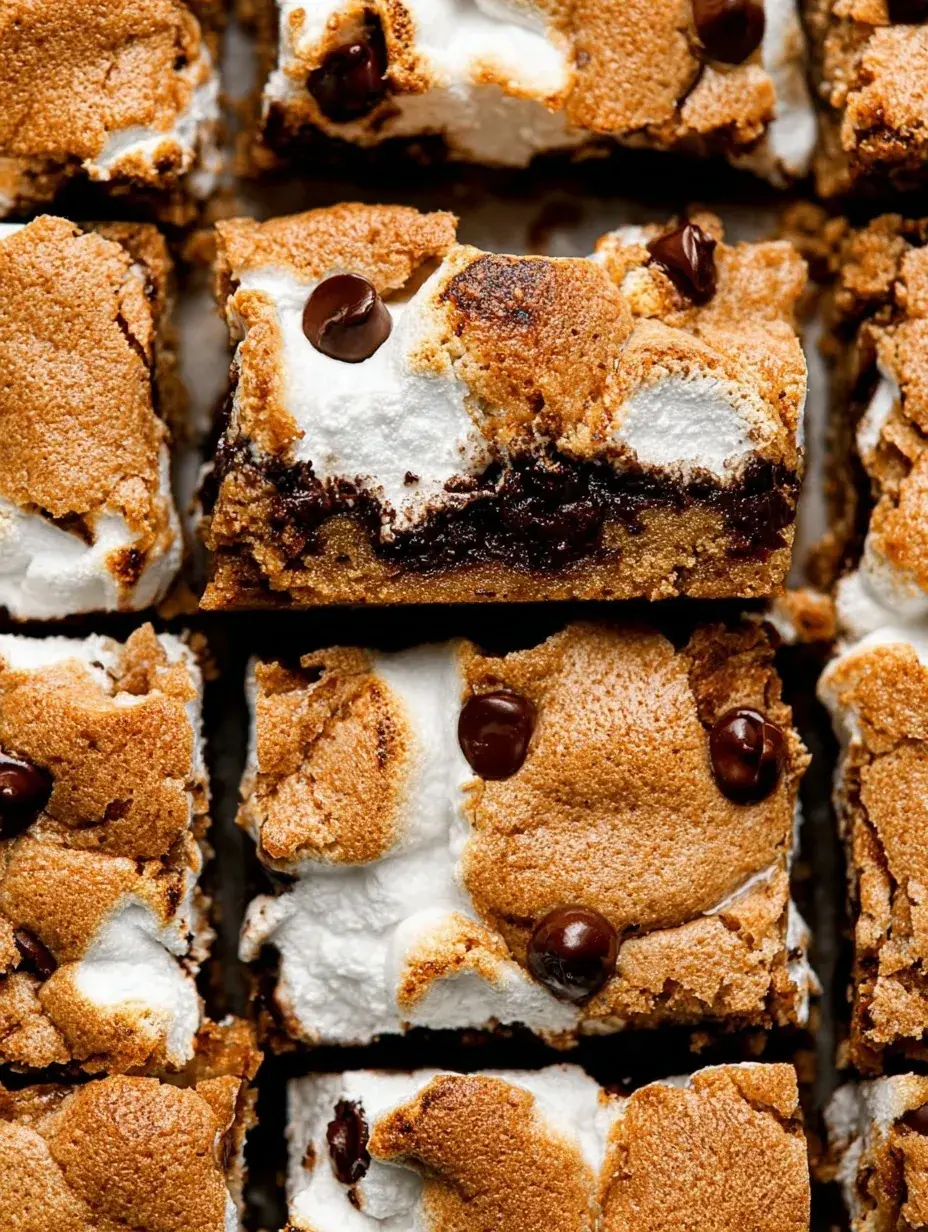
- Toasted Finish: The mini marshmallows puff up and turn a beautiful golden brown on top, giving you that perfect campfire texture.
- One-Pan Ease: You get all the classic layers without having to roast individual marshmallows or deal with sticky skewers in the backyard.
The Best S’mores Cookie Bars Recipe
I remember the first time I pulled these out of the oven; the smell of melted chocolate filled the whole house instantly. These have become a frequent request in our home, especially on Friday nights when we want something special but I am a bit too tired for a big project.
Ingredient Notes
- Graham Cracker Crumbs: These provide the signature flavor and a slightly rustic texture to the cookie base.
- Milk Chocolate Bars: I prefer using the classic thin bars because they melt into a perfectly even layer across the dough.
- Mini Marshmallows: These are much easier to spread than the large ones and they create a more consistent toasted top.
- Light Brown Sugar: This keeps the cookie layers soft and adds a subtle molasses note that pairs so well with the chocolate.
- Unsalted Butter: Make sure it is softened but not melted so your dough has the right structure to support the heavy toppings.
Instructions
- Cream Butter and Sugars. Use a large bowl to beat the softened butter and sugars until the mixture looks pale and fluffy. This step creates the foundation for a soft, tender bar.
- Mix in Egg and Vanilla. Add these in and beat until the mixture is smooth and fully combined. You should see a light, creamy consistency before moving on to the dry ingredients.
- Whisk Dry Ingredients. In a separate bowl, combine the flour, graham cracker crumbs, baking powder, and salt. Whisking them together first ensures there are no salty pockets in your finished bars.
- Combine Wet and Dry. Gradually add the flour mixture to the butter mixture until a stiff dough forms. It should feel thicker than standard cookie dough but still be easy enough to press down.
- Layer the Components. Press half the dough into your pan, top with chocolate bars and marshmallows, then crumble the rest of the dough on top. Make sure the chocolate bars are laid out flat to cover as much surface area as possible.
- Bake and Cool. Place in the oven for 30 minutes until the top is golden and the marshmallows have puffed. You must let them cool completely in the pan, or the chocolate layer will be too runny to slice cleanly.
Billy’s Tips and Mistakes to Avoid
- Use a piece of parchment paper to press the bottom dough layer down; it keeps your hands from getting sticky and ensures an even base.
- I learned the hard way that cutting these while warm results in a giant chocolate mess, so give them at least two hours to set properly.
- If you skip the baking powder, your bars will be very dense and hard, so double check that your supply is fresh.
- You can make the dough a day ahead and keep it in the fridge if you are planning a busy party or holiday gathering.
- Let your kids help crumble the top layer of dough over the marshmallows; my daughter says it is the most fun part of the whole process.
Storage Tips
These stay fresh at room temperature in an airtight container for up to 4 days. If it is a particularly warm week, you can keep them in the fridge for 6 days, though the chocolate will firm up quite a bit. They also freeze beautifully for 2 months if you wrap them individually in plastic wrap before placing them in a freezer bag.
Variations and Swaps
- Add a thin layer of creamy peanut butter over the graham cracker base before adding the chocolate for a salty-sweet twist.
- Use dark chocolate bars instead of milk chocolate if you prefer a richer, slightly less sweet dessert.
- Swap the mini marshmallows for colorful festive ones if you are making these for a specific holiday or a themed birthday party.
Why This Recipe Works Every Time
The secret is in the ratio of the graham cracker crumbs to the flour. It gives you enough structure to hold the bars together while still tasting exactly like the crackers we use for traditional outdoor s’mores. I tested this three times to make sure the dough was not too dry, and this version is perfectly soft and chewy.
The layering technique ensures that every single bite has the right amount of chocolate, marshmallow, and cookie. On my second batch, I tried using chocolate chips, but the bars felt less substantial, so I went back to the traditional bars for that thick, gooey center that everyone loves. It makes all the difference in the final texture.
Ingredients
- 1/2 cup unsalted butter, softened
- 1/2 cup granulated sugar
- 1/4 cup light brown sugar, packed
- 1 large eg g
- 1 teaspoon vanilla extract
- 1 1/3 cups all -purpose flour
- 1 cup graham cracker crumbs
- 1 teaspoon baking powder
- 1/4 teaspoon sal t
- 4 milk chocolate bars (1.55 oz each)
- 1 1/2 cups mini marshmallows
Instructions
- Preheat oven to 350°F (175°C) and grease an 8x8 inch square baking pan.
- In a large bowl, cream together softened butter, granulated sugar, and brown sugar until light and fluffy.
- Beat in the egg and vanilla extract until well combined.
- In a separate bowl, whisk together the flour, graham cracker crumbs, baking powder, and salt.
- Gradually add the dry ingredients to the wet ingredients, mixing until a stiff dough forms.
- Divide the dough into two equal portions.
- Press one half of the dough into the bottom of the prepared baking pan in an even layer.
- Place the milk chocolate bars side-by-side on top of the dough layer, breaking them as needed to fit.
- Spread the mini marshmallows evenly over the chocolate bars.
- Crumble the remaining dough over the marshmallow layer, pressing down lightly to flatten.
- Bake for 30 minutes, or until the top is golden brown and the marshmallows have puffed.
- Allow the bars to cool completely in the pan before cutting into squares.
Frequently Asked Questions
Can I use marshmallow fluff instead of mini marshmallows?
I do not recommend it for this specific recipe because fluff tends to dissolve into the dough while baking. The mini marshmallows hold their shape much better and give you that classic toasted, puffy top that makes these bars so visually appealing.
Do I need to grease the pan if I use parchment paper?
I usually do a quick spray even with parchment just to be safe. It makes lifting the whole block of bars out of the pan much easier once they have cooled, which prevents the edges from crumbling. It is a small step that saves a lot of frustration later.
Can I use pre-made graham cracker crumbs?
Absolutely, that is what I usually do to save time on busy afternoons. Just make sure they are finely ground so the dough stays cohesive and does not fall apart when you try to slice the bars into squares.
The Bottom Line
These bars are such a joy to make when you want that nostalgic summer feeling without the hassle of an actual fire. They are simple, sweet, and always make people smile when they see the toasted marshmallows on top. Sweet moments don’t have to be complicated. Let’s make something wonderful together.
I hope these bring a little bit of that cozy campfire magic into your kitchen this week. My daughter already has her eye on the next batch! Billy
Billy